La Passacaglia - the Millefiori Quilt Update
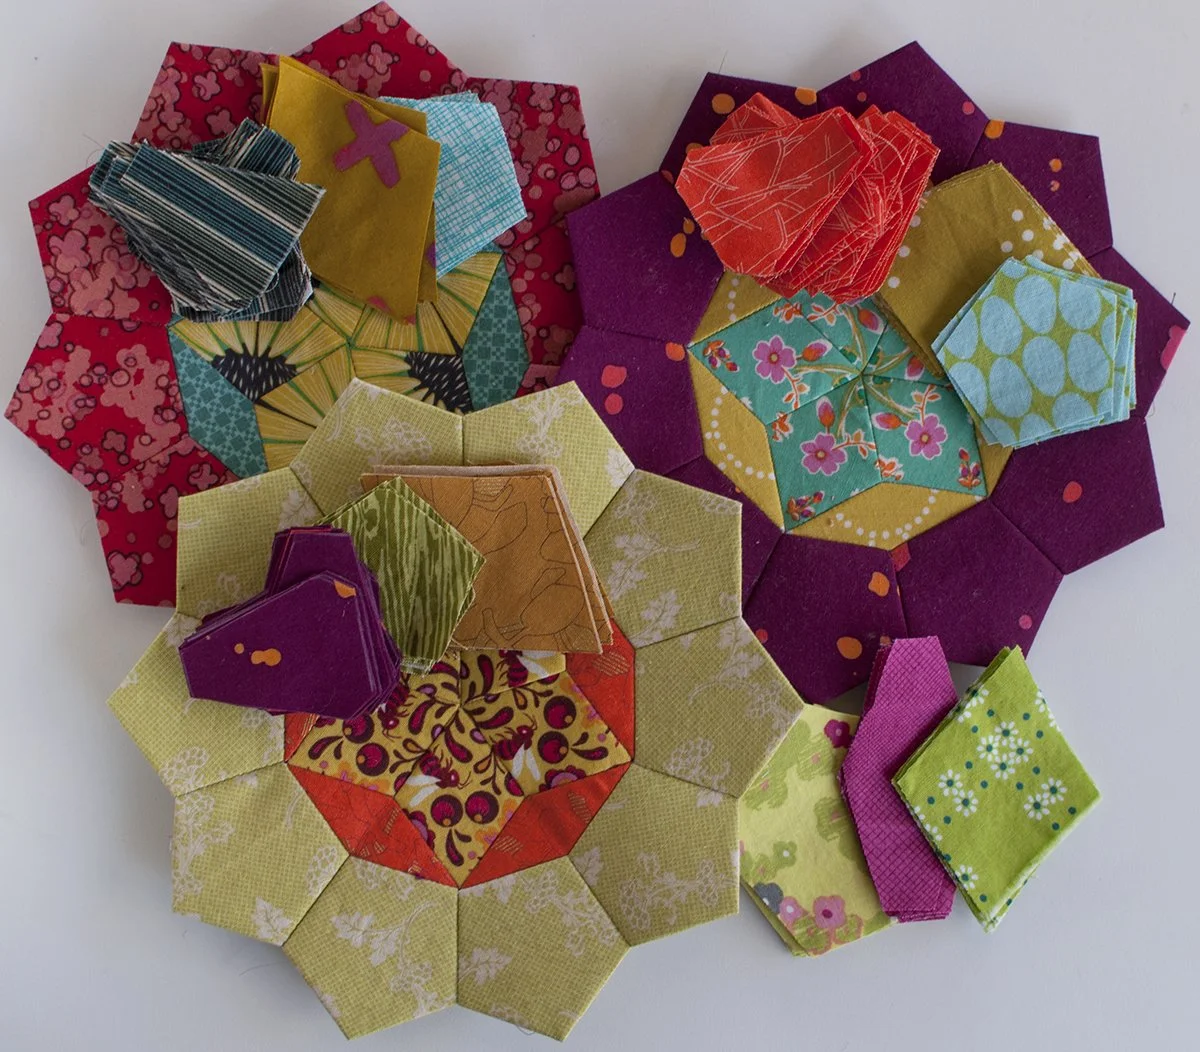
I have been slowly plugging away at stitching together cogs for my La Passacaglia quilt. If you follow me over on instagram you may have seen a few progress shots over the last few weeks. Today I want to share a couple of photos of some of the cogs I have been working on.

I am enjoying the process of choosing the fabrics for each step and mixing in some fussy cut areas with some that are not fussy cut.

So far I haven't joined any of the cogs together yet. I want to have a few more completed before I start deciding on placement.
A Quick and Easy Baby Quilt
I appreciate a big sewing challenge like the La Passacaglia quilt but I also love simple designs that I can knock out in a couple of days. It is wonderful to have the feeling of accomplishment you get when finishing a project quickly.

This week, when I needed a baby quilt for a gift, I tried not to overthink it. I pulled out my pile of reproduction 1930s prints and started cutting 3.5 inch squares. The size of the finished quilt was determined by the size of the piece of sweet bunny print flannel I had for the back.It was quick to cut, quick to piece, and also quick to quilt. When quilting, I followed the piecing lines to make these fun twisted square shapes.

I took it out for a photo shoot yesterday. And yes, I am eagerly awaiting the arrival of spring.

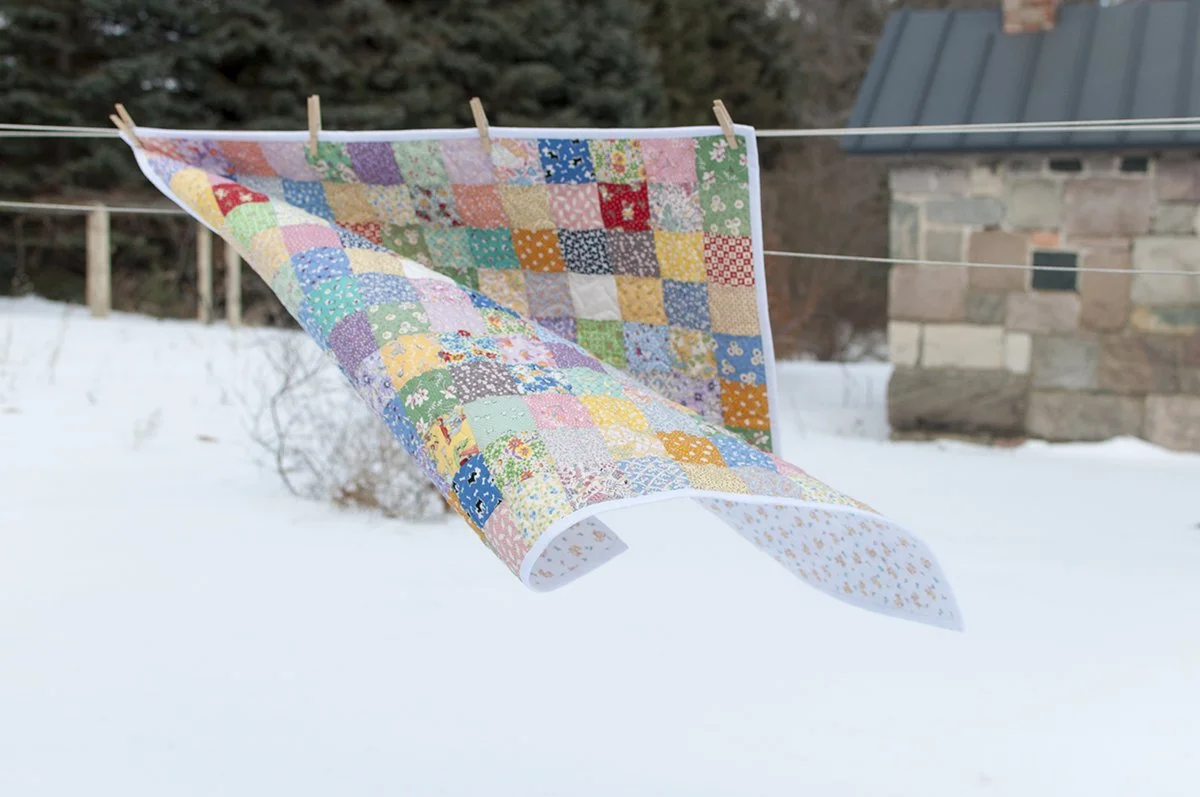

Finished size 38'' by 42''
WIP Wednesday
I really enjoyed making these string pieced melons throughout last year. It was fun sewing and I was able to make some of them with the handcrank machine on the back porch last summer. I took them on a couple of retreat weekends too. Putting the melon units together with the background fabric requires a bit more concentration than building the string units. The curves are gentle enough that they are not a problem. The challenge is in getting all of the points to line up nicely where they come together. For a flatter finish I am sewing just up to the point where the seams intersect so that the seam allowances will twirl on the back side. I have them sewn into rows and am now taking my time sewing the rows together as that is the trickiest part.I am eager to have this together and start the quilting on it. I am also itching to start a new project but I will wait at least until this top is sewn together.
Mute Monday

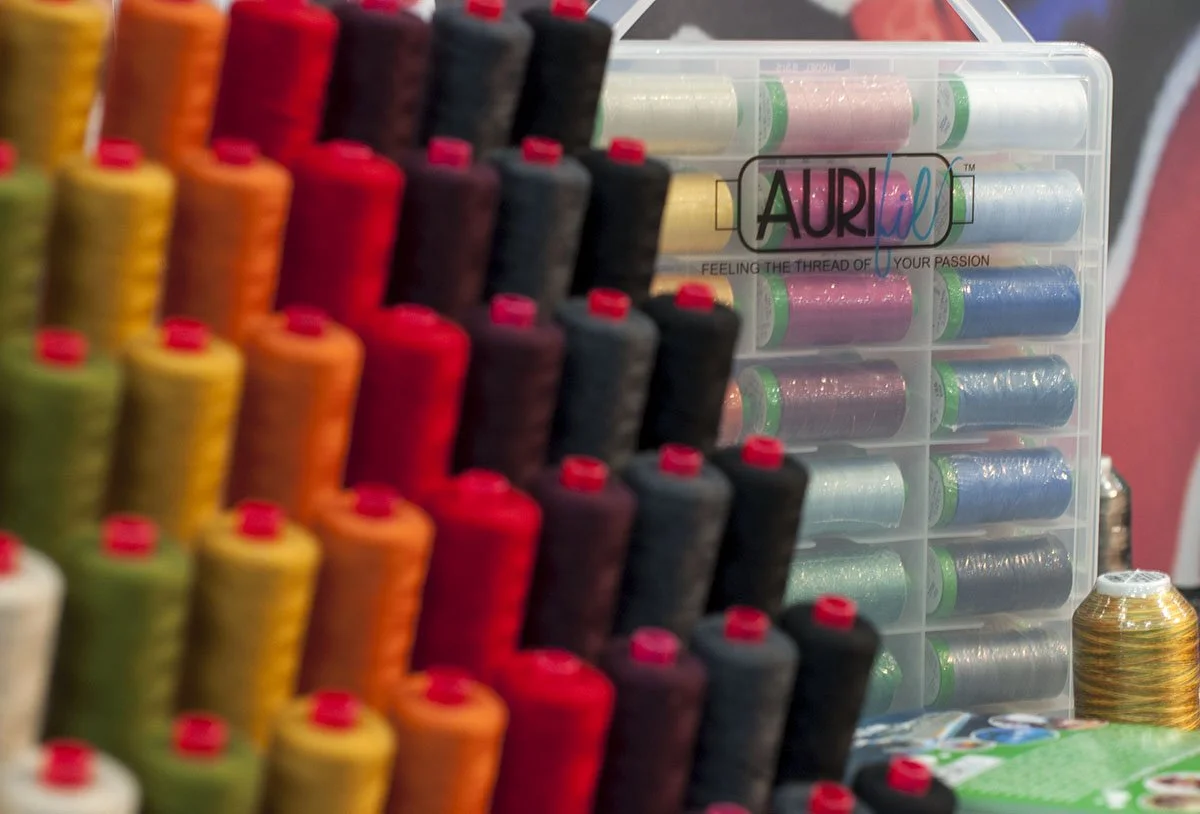
Aurifil Designer of the Month - January
Remember when I mentioned that I'm a member of the 2015 Aurfil Design Team? Well, it's time for the thread fun to begin! I plan to try out all of the different Aurifil threads this year, not just the 50wt that I have been using for piecing and quilting. I'll be sharing a little project that I've made each month.I had fun trying out the Aurifloss on a tea towel yesterday. The floss is smooth and doesn't shred or fray like other floss brands I've tried. The spools help keep the floss neat and without fold lines or creases in the thread. It is also easy to wrap unused floss strands back around the spool of the same color floss. Anything that helps keep the floss neat and free of tangles is a win in my book. And who doesn't want their floss on cute little wooden spools? It really takes embroidery to a new level.This flower design came from 5000 Flower and Plant Motifs - a Sourcebook by Graham Leslie McCallum.

I love the rich colors in Lynn Krawczyk's collection. Thanks, Lynn, for sending a box for me to try. I know I'll be using more Aurifloss in the future. I'm eager to try some fancy stitches with it.

**links to amazon are affiliate links
I Jumped on the La Passacaglia Train
Early last year my Instagram feed included a few beautiful Englis Paper Pieced quilts being constructed. They were all from the same incredible pattern, La Passacaglia. I did a little research and found that the source of the pattern was the book Millefiori Quilts by Willyne Hammerstein. The only place I could find to purchase it at that time was from Quiltmania. I ordered it from there and had to wait quite a while for delivery from Europe.The book sat in my sewing room while I finished other projects and cleared the decks. I drooled over more quilts on Instagram and thought more about starting my own version of the quilt.In the fall I saw that Paper Pieces has the book and packets of the precut paper shapes for getting started. They also have acrylic templates for cutting the fabric. I ordered the papers and clear templates and got started with the new year.

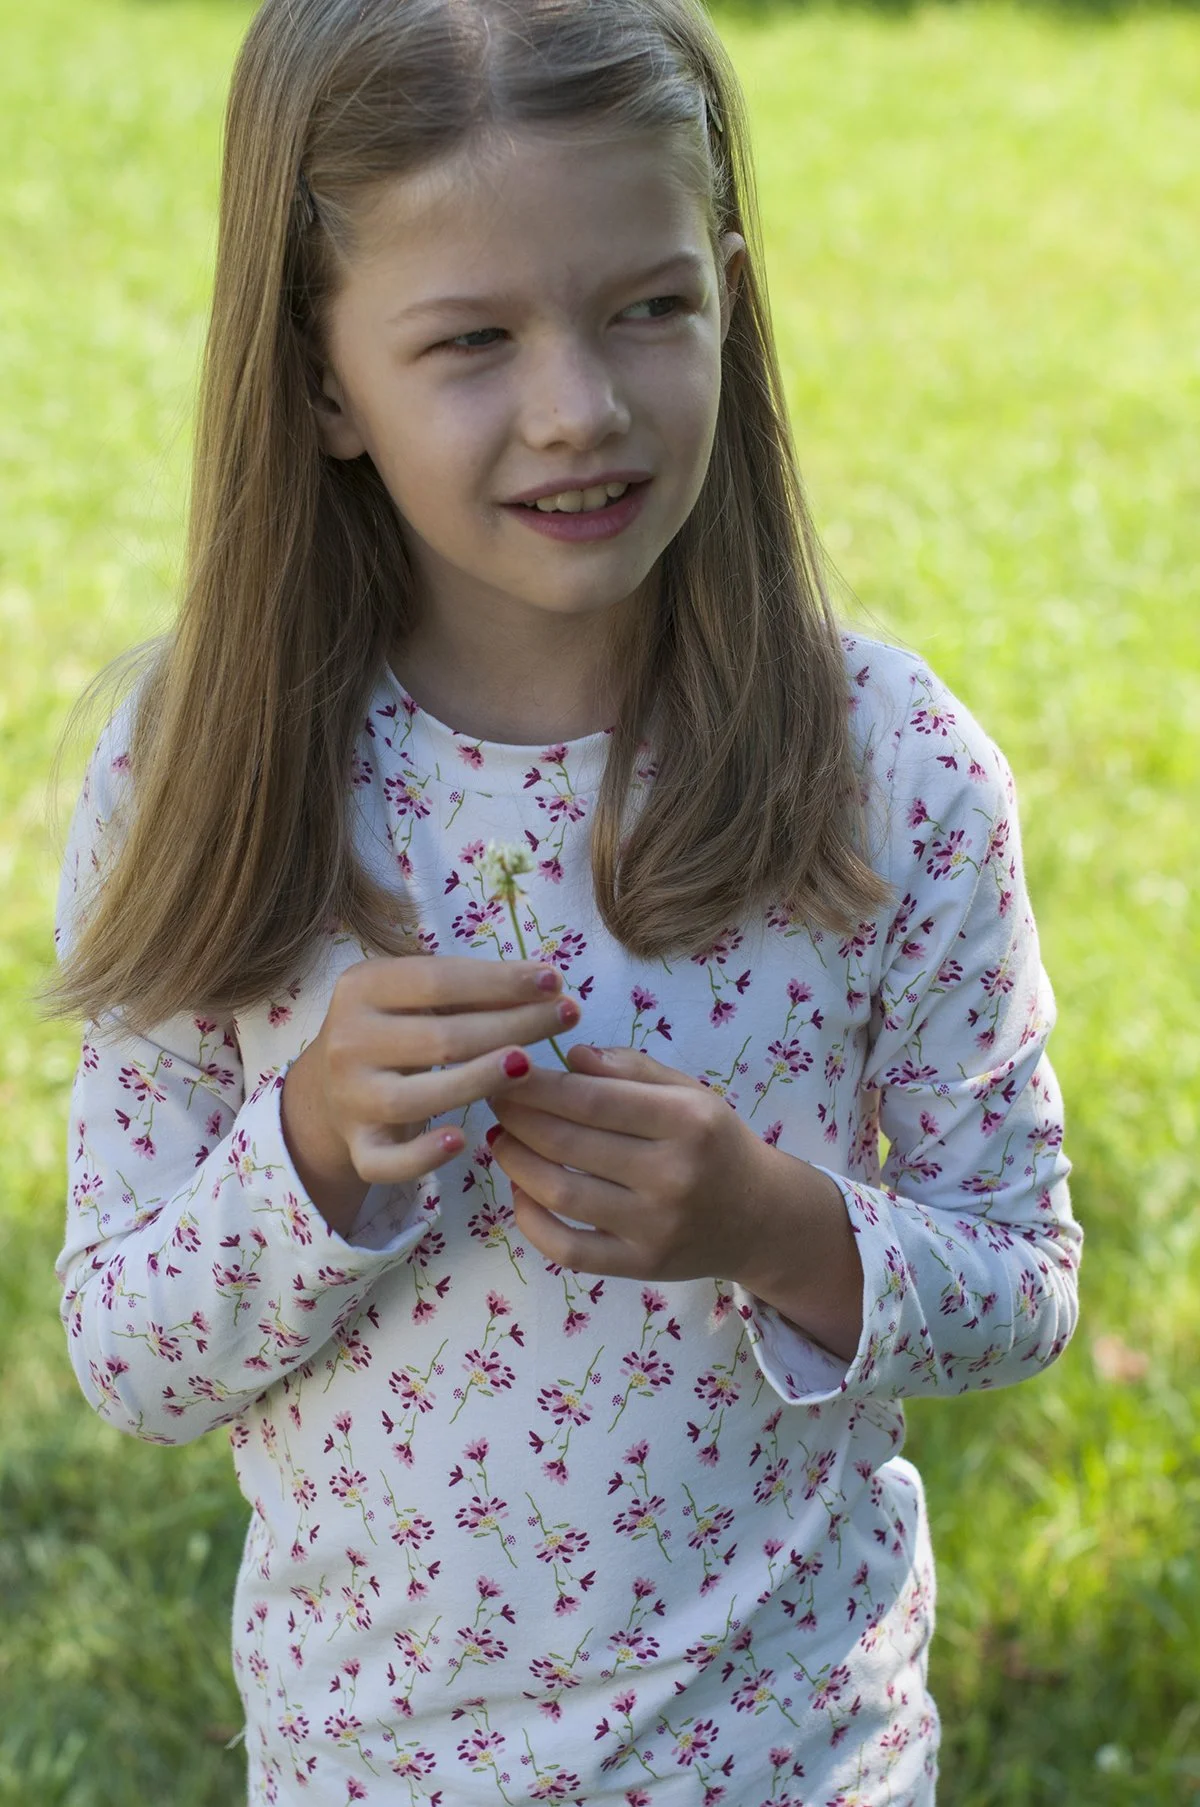
My fabric choices started with this fabulous Anna Maria Horner coneflower print. Any fabric in the quilt will have to look good with this print.
The clear templates are great for doing the fussy cutting to get each piece of a shape to have the same section of the print. Here you can see that I cut diamonds from this print and will be able to cut the larger hexagons from the space between.
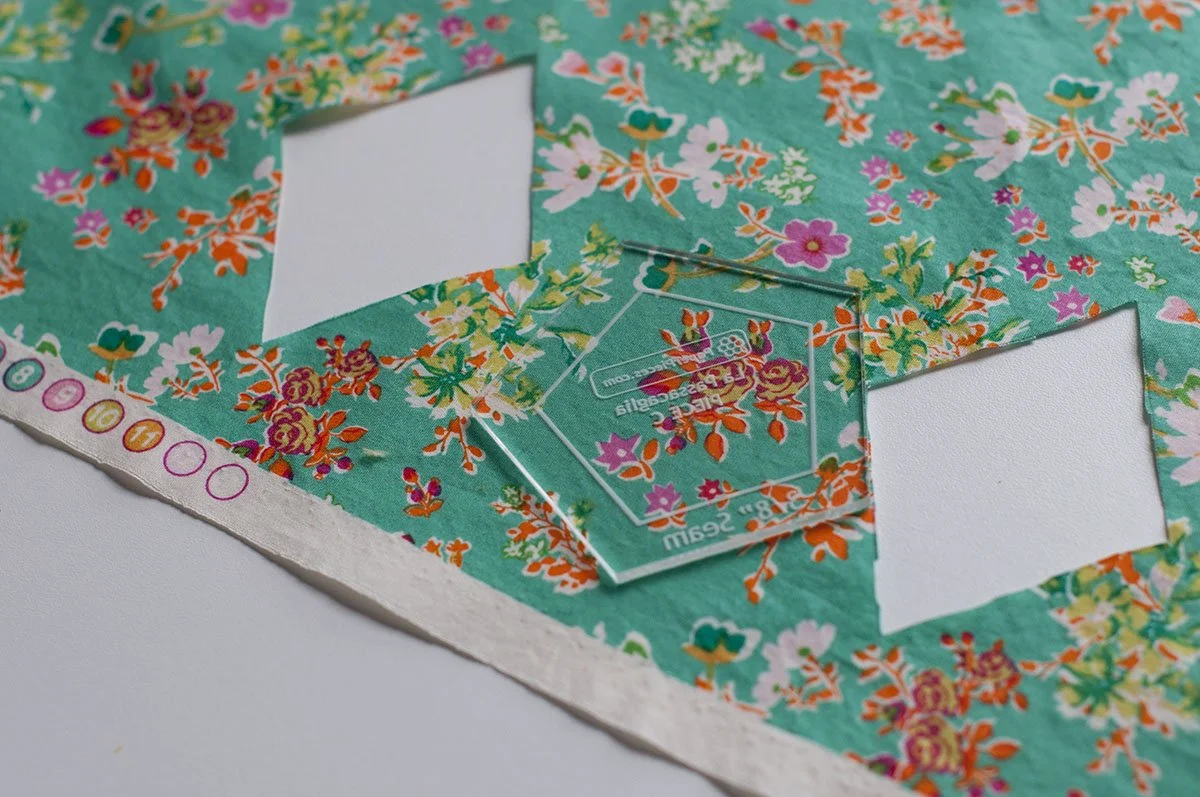
I find the fussy cutting to be more fun than I thought. I love the magic in the symmetry. The same fabric will look different depending on which part is cut and how it is oriented when paired with its neighboring piece. Not all of the pieces will be fussy cut, the pink fabrics in this phot were cut as they would fit from the fabric with no attention to the print.

This is also a fun take along project. Once a few fabric decisions have been made, I cut the fabric and put the parts in a little altoids tin for traveling.

I've been posting more process photos on Instagram as I go so if you're interested you can follow along over there. I'll be sure to post here occasionally too.
I have been following the #lapassacaglia hashtag on Instagram and am amazed at how different all of the quilts look. Everyone is so creative with their fussy cut sections and their fabric choices. Go have a look. I'm SURE you will want to join the fun. Go ahead, you know you want to.
Aurifil Design Team 2015
Did you see that Aurifil announced the 2015 design team? I am thrilled to be a member of the team next year.I love using Aurifil thread and am eager to work more with all of the different threads they offer. I plan to share a small project featuring one of the Aurifil thread weights each month when I link to the designer of that month.
There are so many great quilters in the line up and I am really looking forward to getting to know all of them better!

Aurifil 2015 Design Team collage
Let me introduce you to the groupBack row
Front row
Lower row
Camp Stitchalot with Carolyn Friedlander and Sherri Lynn Wood
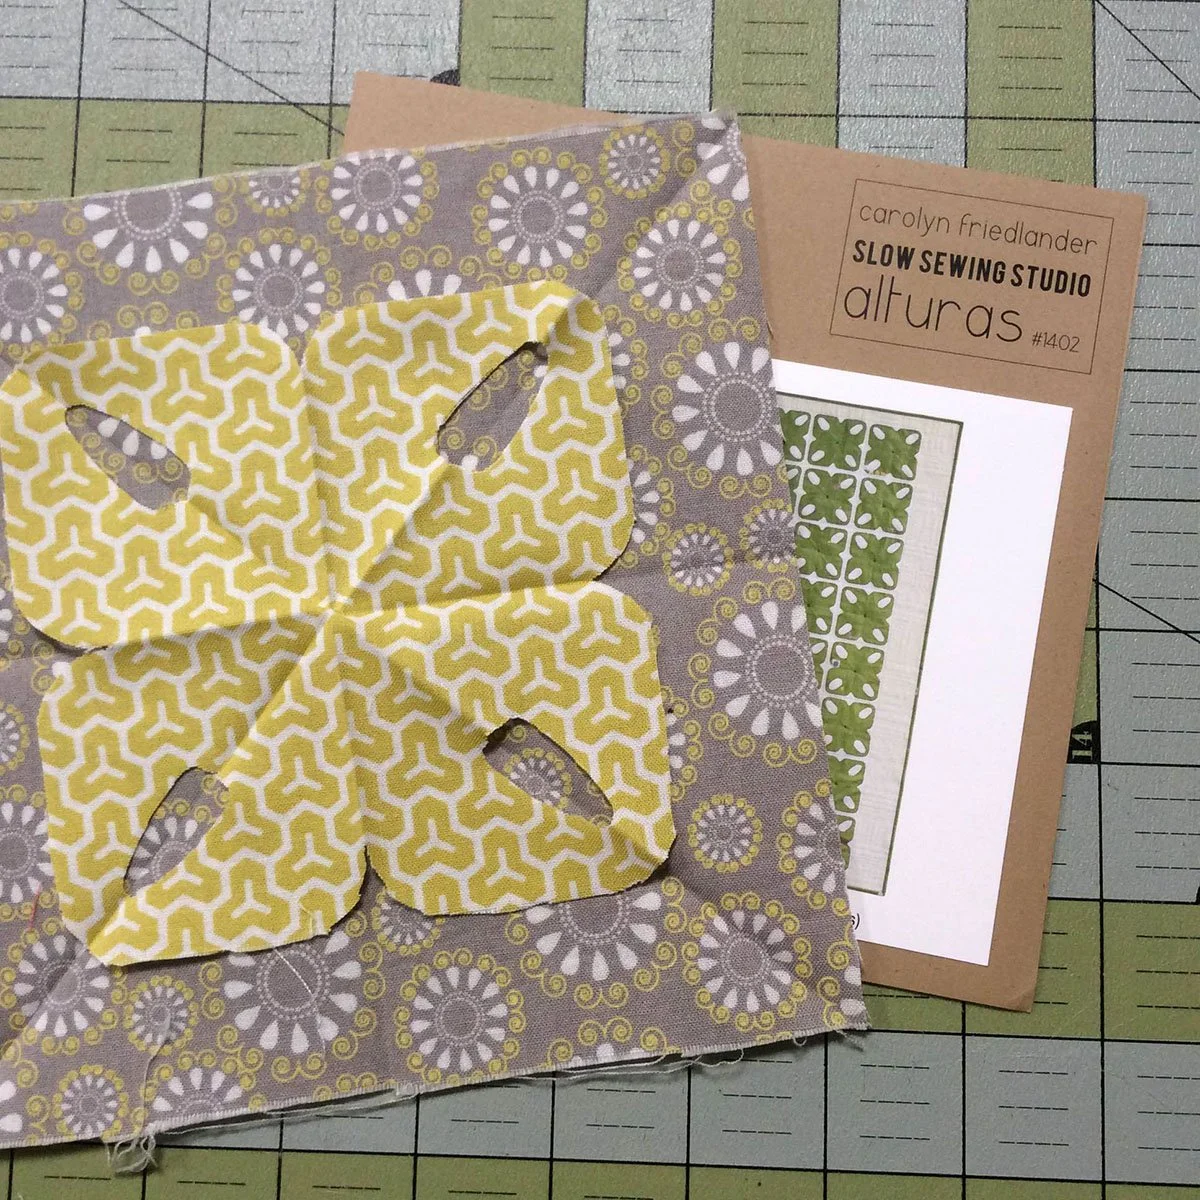
Projects galore! I spent a few days over the weekend at Camp Stitchalot. It was such a wonderful experience. There were local friends attending as well as a few friends I have known from the internet that I finally had the pleasure to meet in person at camp.Friday night Carolyn Friedlander taught her method of hand applique. Many campers started working on her arial grove pattern. I started an alturas block.
Saturday was an all day workshop with Sherri Lynn Wood and her Get Your Curves On class. I was a bit out of my comfort zone with this one but was much happier when I was able to let go a bit and not try to control the final outcome. With this technique you have to follow the process and not try to force the design to end up a particular way. It was a stretching experience for me.
It was a great birthday weekend getaway for me.
Secret Stalker Swap

Last night at the Ann Arbor Modern Quilt Guild we revealed our Secret Stalker Swap quilts. It was hilarious fun. I loved hearing about the stalkees and trying to guess who they were before the name was revealed. Some of the stories of online research and stalking social media sites were so funny. A few guild members really went over the top with their designs and made such amazing and personalized quilts for their recipients.

The person I was stalking has tastes very similar to mine. She loves solid fabrics and improv piecing.

I posted a couple of process shots on facebook and instagram while I was working on this and was THRILLED when my quilt recipient, who never usually comments on things that I post, commented that she loved the quilt. She didn't know that it was for the swap and of course did not know that it would be for her.

The secret stalker swap is a great way for members of the guild to get to know each other a little better. I know I'll be participating again next time around.

String Pieced

Here you see 120 string pieced melon blocks. I worked on these on and off for months- at a quilt retreat, on the back porch with using the hand crank machine, sitting at my desk while watching Netflix, even Miss Petunia sewed some strings together. After I finished the last of these I did a little celebration, as one does after such an accomplishment, and then carfully sorted, tidied, and folded the remainder of the light scraps. It felt so good to have them neatly stacked and the scrap bin back in ship shape. I thought I had finished enough of these melons for 89" by 101'' quilt, but alas, after double checking my calculations and counting the finished melons I found that I need to make seven more. Still, this lovely pile of string piecing makes me giddy thinking about the next step (after making seven more blocks).
Streak of Lightning

As I mentioned before, I love a good red and white quilt. This quilt uses the same triangle unit as the first red and white quilt that I made only this one is set as a streak of lightning.

I can hardly wait to see this one quilted. I think I'll put vertical feathers in the muslin.
Postage Stamp Quilt

As a longtime attendee of Gwen Marston's Beaver Island retreat, I was excited to attend the first annual Holly Girls Quilt Retreat last week. Pat Holly and Sue Nickels continued the retreat on the heels of Gwen's retirement. They planned a theme of "machine quilting" and I was glad to practice free motion skills in a small scale on the old Bernina 1230. Pat and Sue brought a large collection of antique quilts along with quilts they had made and we all learned a lot about quilting design from them and each other. Next year the retreat will focus on applique border design. I've already reserved my spot for next year- sign up and I'll see you there!Between free motion practice sessions I worked on piecing this postage stamp quilt.

A few weeks ago miss P and I cut some mini charm packs and a lot of scraps into 2 inch squares. It was nice to have a "quilt kit" ready to piece at retreat.

The piecing process for this quilt was easy. First I made four patches from all of the scraps. Then, I pieced those into sixteen patches. I sewed the sixteen patch blocks together in rows to finish the quilt. I was able to rotate the fourpatches so that all of the seams nest throughout the quilt.

I am smitten by the finished quilt. It is so cheery and reminds me of this favorite quilt made by B's grandmother.
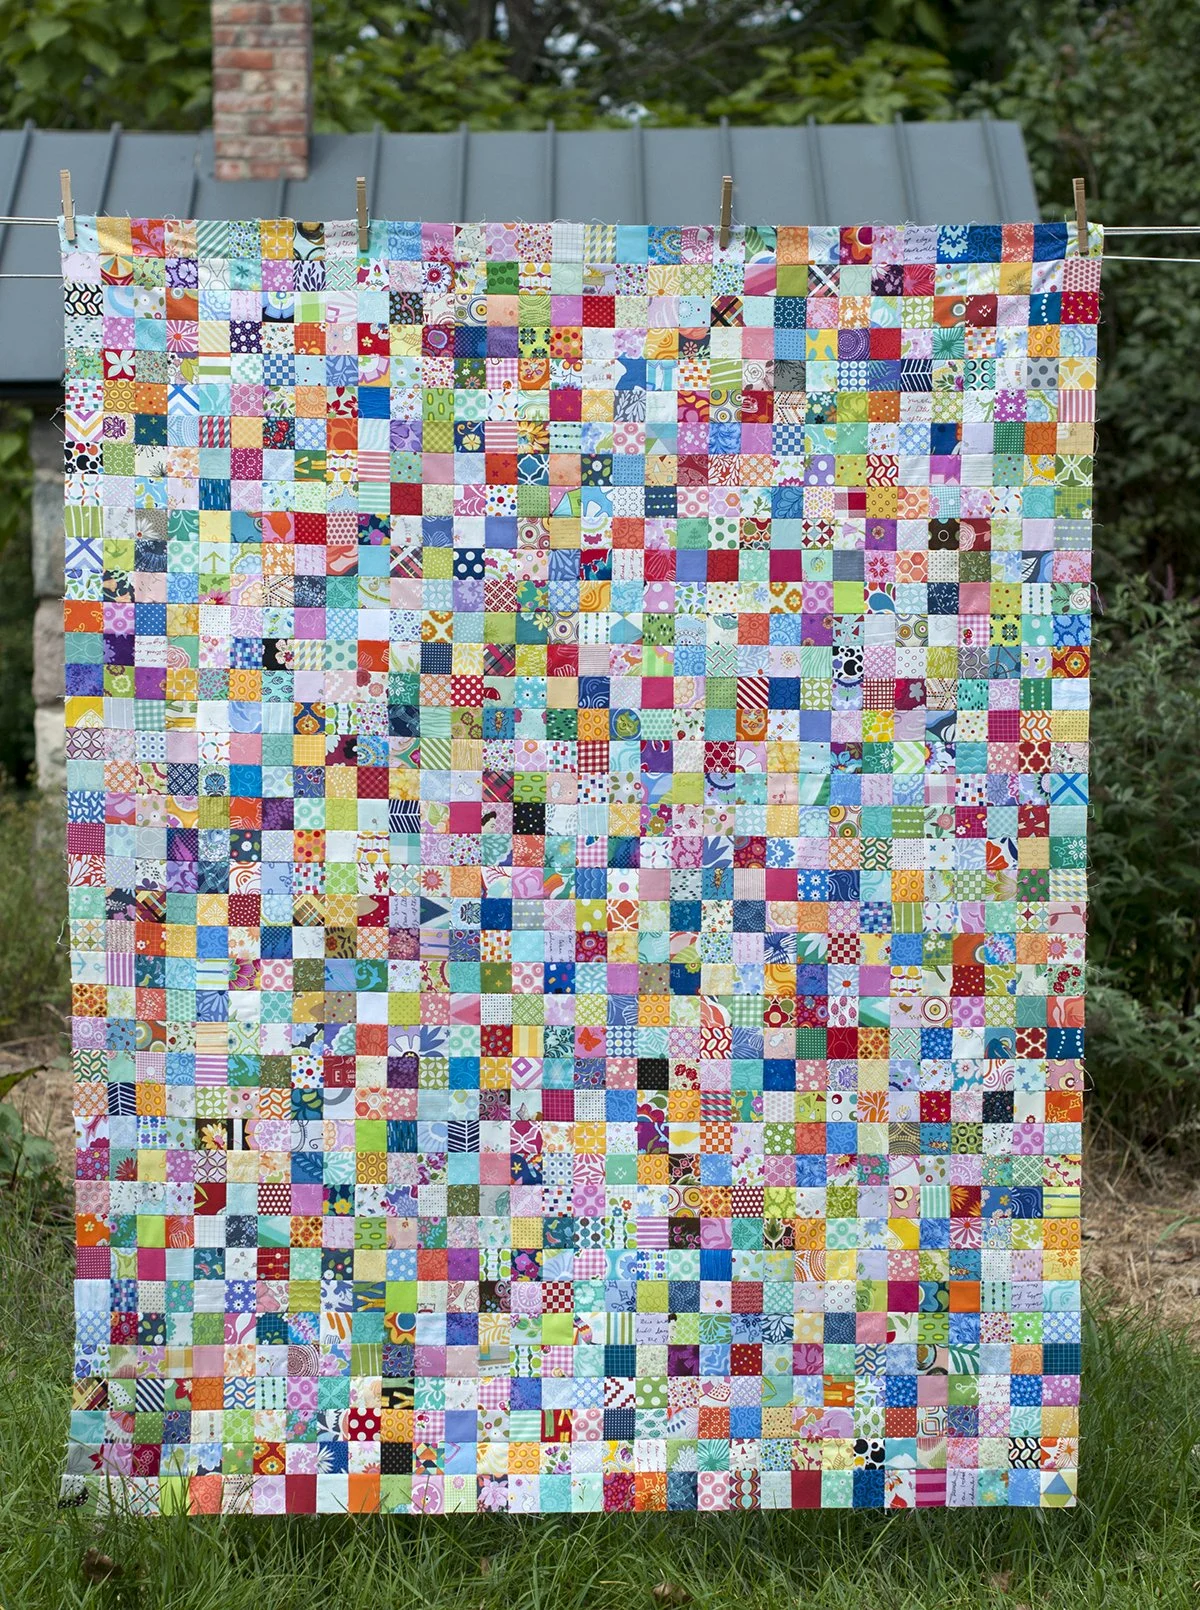
I am eager to use my new quilting skills and ideas but I think this quilt needs some straight line quilting.Finished size 48" by 60"
Flashback Skinny Tees for School
I've been in a bit of a creative funk lately but I've been trying to push myself to do some sewing and work on other projects in the studio thinking that a few finishes might get me energized for some quilty fun again.Earlier in the summer I bought some of this beautiful knit. It is from Bari J's new Emmy Grace line for Art Gallery Fabrics. If you have not had the pleasure of sewing with the new Art Gallery knits you are in for a treat. This fabric is seriously the best and softest knit I have ever seen. I want a whole new wardrobe from Art Gallery knits.

I used Rae's Flashback Skinny Tee pattern and made a new top for Miss P to wear to school. I used size 7/8 and added a couple of inches to the length and it fits her perfectly.
As I have gotten older I find that I prefer V neck shirts for myself. Although I used to only wear round neck tops, I now feel like a regular round neck tee is strangling me. I ordered some fun new V neck tees for myself from Patchwork Threads and culled the tees in my dresser.

I found a few like new shirts with those strangling necklines and cut them down for Miss P. Again, I used the Flashback Skinny Tee pattern. I was able to keep the original hem on the bottom and the sleeves when I cut the new pieces out. I picked out the neckband, trimmed it to the right length, and stitched it back on to the new shirt.

I feel a bit better after finishing some tops and Miss P is pleased as punch with her super soft Emmy Grace knit top for fall. She has some light blue fabric that she is wanting to make into a top for herself. Maybe we'll get to that after her current binge into her brothers' legos and k'nex collections.
Kids Sewing Camp
My featherweight collection got quite the work out the last two weeks. I hosted Kids Sewing Camp here at the house and each student had loads of fun using one of my five featherweights. When I first mentioned that I was going to have a sewing camp, the five student class filled quickly with Miss P's friends and before I knew it I had three groups of kids signed up. We did a bit of basic sewing practice and then made three projects.
The first project was a pillowcase.

Second, we used mama urchin's tutorial for the drawstring backpacks and sized them up a bit because the tutorial is for a toddler size.

The last project of the week was pajama pants. Most of the kids used Rae's Parsley pants pattern. A few of the older kids used the Sew Easy Pajama Pants by Cindy Taylor Oates.

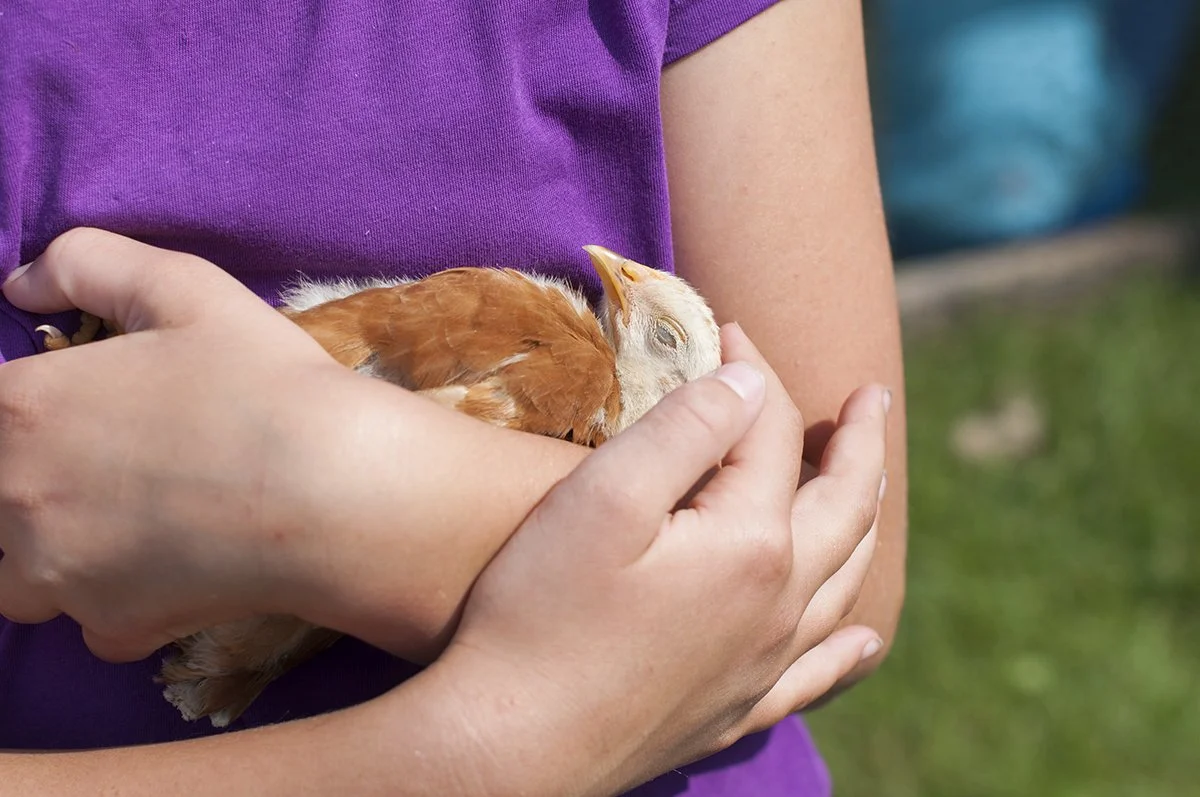
I think all of the campers had fun making their projects, playing with our young chicks, and and swinging on our barn swing. Our chicks are much tamer now after all of the attention they got.

Sewing Camp was so much fun for everyone that I think it will be an annual event around here.
Summer Sewing
After a long weekend of sunshine and outdoor play - resulting in a bit of sunburn, we decided that Miss P needed a new sun hat. She shopped the fabrics in my sewing room and picked a pretty floral print and a green batik for the lining.

She also suggested the rick rack trim. I think that was just the right touch for the edge of the brim. It also made turning and pressing the brim easier!

I used an old pattern that I had in my collection. Butterick 6613 from 1993.

I made the brim a tad wider and I think that will be better for days when we are out in the kayaks and canoe. The sun can get pretty intense out on the water. I think it turned out pretty cute.Only seven and a half days 'till summer vacation!!! But who's counting?
Science Fair

Do you remember the Science Fair quilt I shared last month? Well, I have gotten it quilted and bound. I used an all over flower design with a few swirls thrown in. I think that's just the right kind of quilting for a quilt that will be used.

I did all of the hand stitching of the binding in the car on the way to Pittsburgh last week and I'm thrilled with the finished quilt. Thank you for driving, Debbie!

Things are looking up. I'm getting caught up and even have a customer quilt on the frame for quilting!
Pattern Review - Science Fair
Hop on over Sara Lawson's Sew Sweetness blog and read my pattern review of Jaybird's Science Fair.I love the quilt. It has now been quilted but is waiting for binding.I'll do a follow up post here when it is finished.


Crank Along
I don't know about you, but I am ready for warm weather, sunshine, and time spent outside!A few of us over on Instagram have been sharing some of our vintage sewing machines. I posted a photo of this beauty, a handcrank Singer 99.

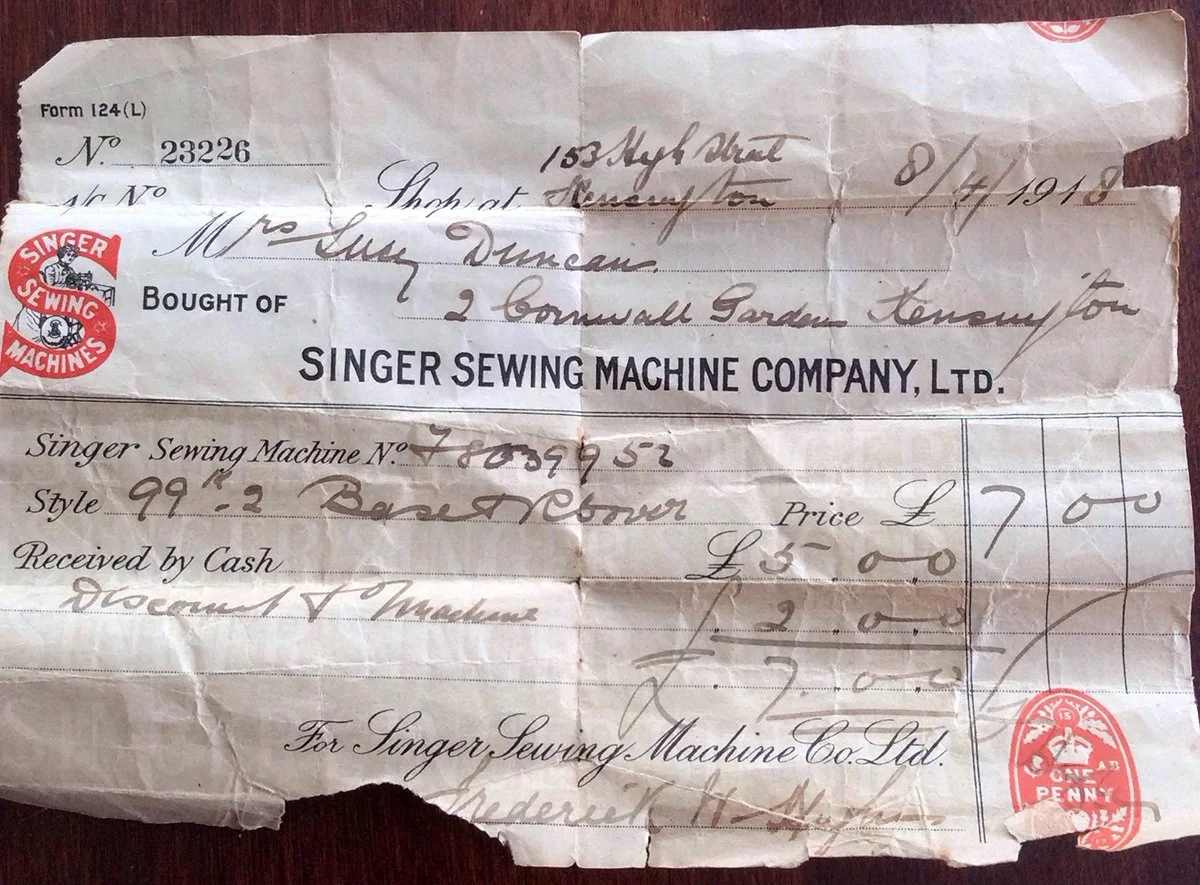
She originally belonged to my mother-in-law's grandmother.
According to the original bill of sale, she was purchased in 1918 for 5 pounds, 2 pounds discount off the original 7 pound price. What a deal!
After seeing that several people have old hand crank sewing machines, I suggested that we take them outside when the weather is warm and do some outdoor sewing. So, how about it? Do YOU have a non electric machine? Come and join us. We will be using the hashtags #crankalong and #backporchsewing for our outdoor sewing adventures this summer. We plan to start on June 1st so this should give you plenty of time to get your machine cleaned and oiled and get your project ready for warm weather. I'll need a project that doesn't involve lots of teeny tiny pieces as sometimes it can get windy outside. I am eager to relax outside and enjoy the fresh air.Are you in? If you don't have a handcrank machine then join us with your treadle or handstitching and use the #backporchsewing hashtag. I can't wait to see all the photos.
A Thing of Beauty
Hello, hello, is anybody still out there?
This has been one heck of a winter. We still have about two feet of snow on the ground but at least we have sunshine and blue skies today.
I recently treated myself to a new friend for spring sewing. Look at her; she's a sweet celery colored Singer featherweight - just right for getting into the spring sewing swing. I know what you are thinking. Some of you may think I have enough sewing machines, others of you know and understand. Really, this wasn't just a new, for play, machine. Really.

Miss P and her friends are at just the right age for learning to sew. SO, I was thinking that I could get back into teaching kids sewing classes and maybe even have a kids sewing camp this summer. I'd like to have five kids sewing at a time so I really need ONE MORE featherweight.Still, I need to get her broken in and make sure she'll be a good machine for classes.

See, I have a fresh spring colored project ready to go. I'll be making a baby quilt from Jaybird's Science Fair pattern. It's always good to have a few baby quilts on hand.

I'm hoping for this winter to melt away into the past and happier, sunnier, less stressful days for sewing to sprout up.