sewing

Liberated Log Cabin Blues

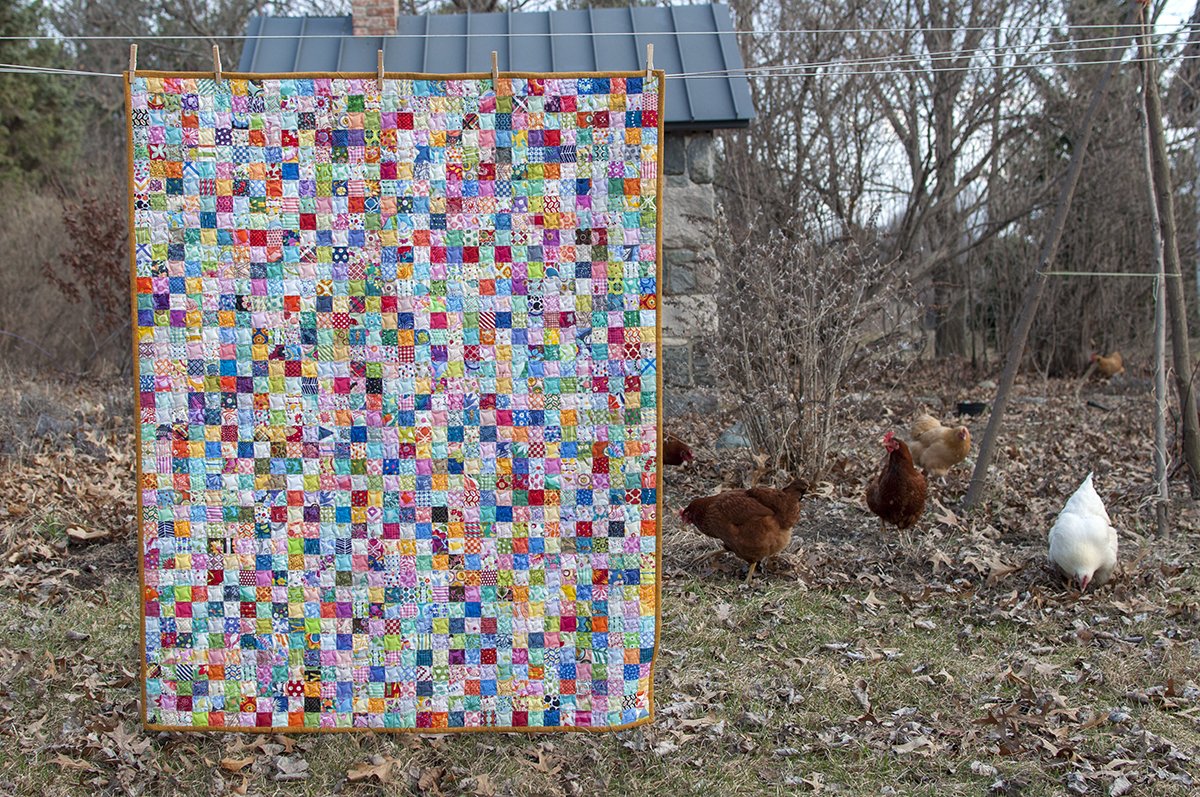
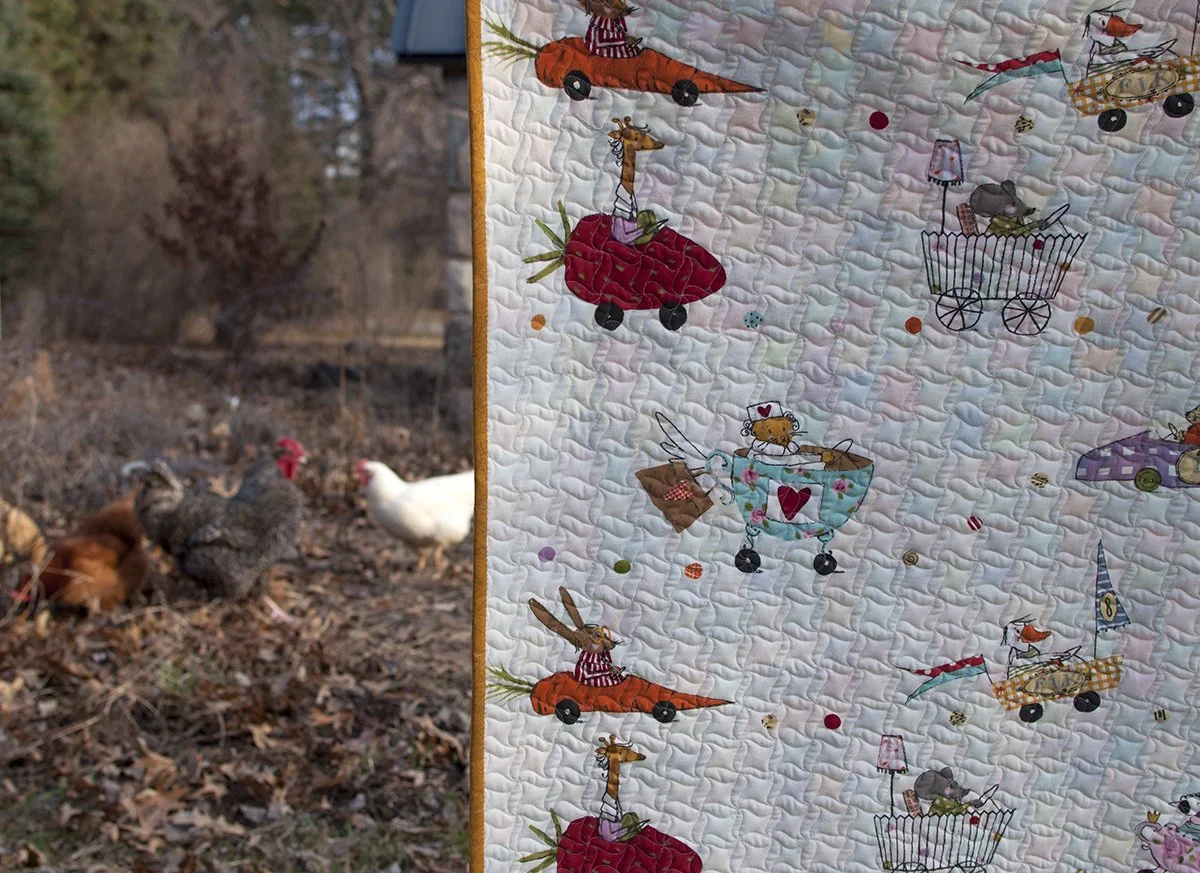
I have been plugging along on my projects here between our family summer activities. This binding on this little quilt is almost finished and I've started quilting the liberated log cabin that I made a couple of weeks ago. I'm approaching the quilting in an improvisational manner making it up as I go. The quilting on both of these little quilts has been done while my husband reads chapters of Harry Potter and the Prisoner of Azkaban to us. It has been heavenly. My boys were just the right age when the books first came out and had to wait for each book until it was released. We read each of them as a family one chapter a day and savored that time. I thought we were teaching some good life lessons there. You only get to read them for the first time once. Two years ago we started the series with miss P. one book each summer starting on Harry's birthday. It is a slow pace for some but just right for us and faster than the boys made it through them. I think enough time may have passed that it isn't on everyone's mind and so far she hasn't heard spoilers from her friends. So far so good.

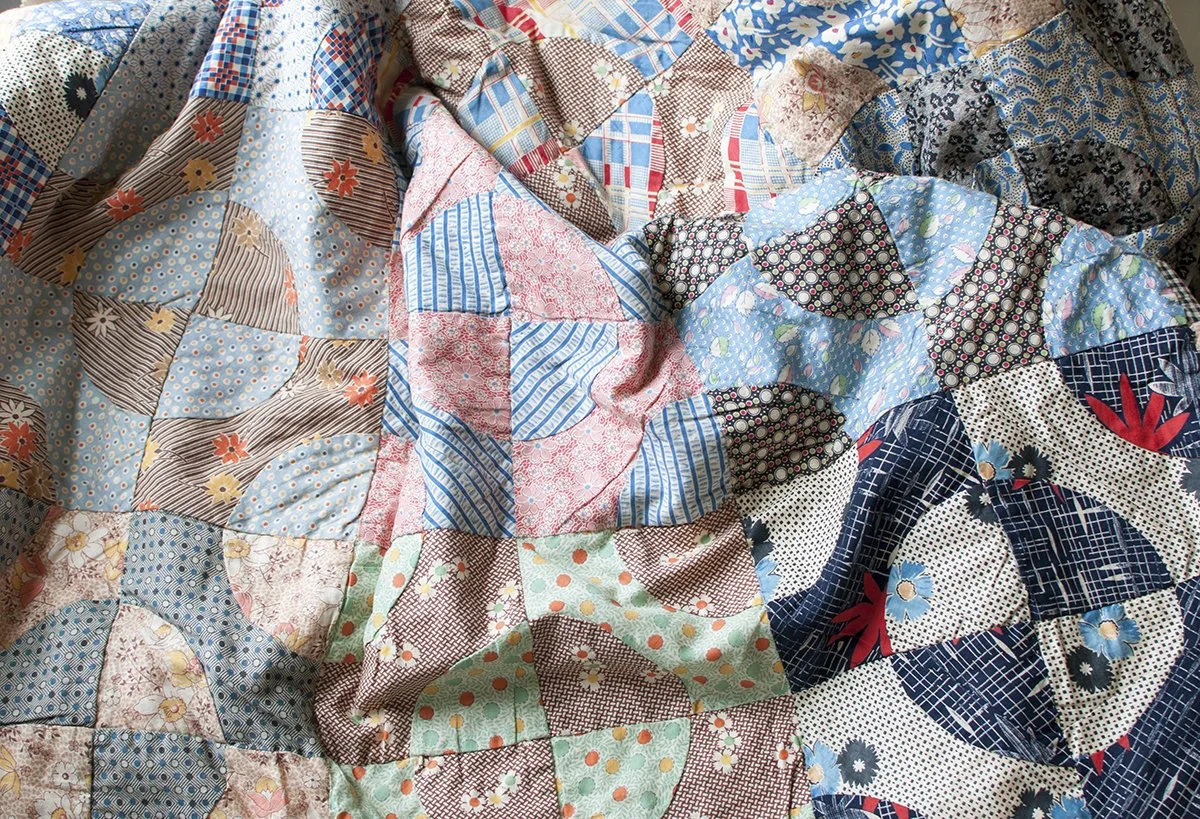
Yesterday I was a bit under the weather and spent the afternoon on our back porch couch with this quilt. I love the quilt but being feverish I really wanted to snuggle under it and thought it needed to be about eight inches longer. So, today, I started another log cabin that I hope will end up a little bigger than the postage stamp quilt I used yesterday.

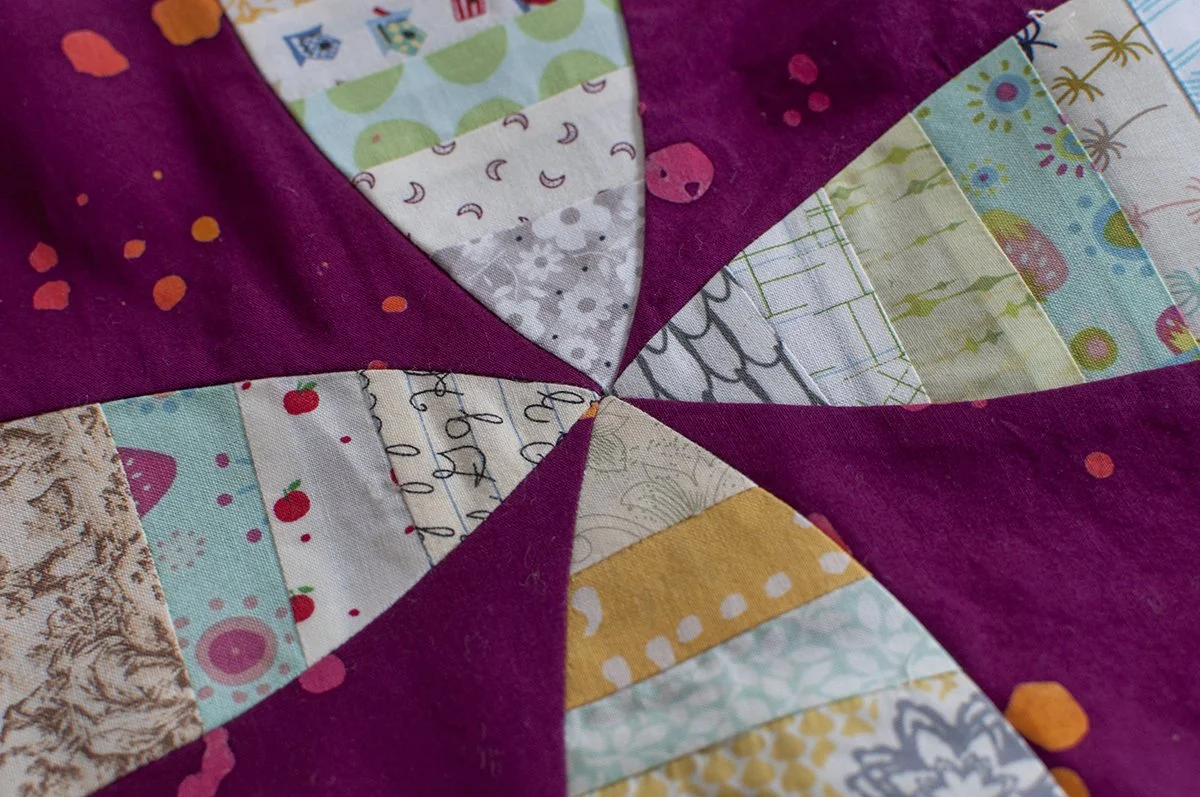
I'm working with my blue scraps with a touch of gold. I like it so far but dang, these pieces are big! I'm hoping for a quickish finish so I'm pushing through. 

Heirloom Coverlet

I love old quilts and especially love this coverlet my grandmother gave me when I was in high school.It was started by her mother and lacked several blocks from being complete. She shared it with me and asked if I would like her to finish it for me.Of course I wanted her to finish it for me!It's a simple block but just look at those fabrics!I love this old searsucker print, isn't it interesting?Can you tell which blocks my grandmother added?Those 1970s fabrics have quite a different look.

Wardrobe Upcycle

This weekend Miss P and I went through her dresser to switch out the winter and spring clothes. She tried everything on and we bagged up the items that were too small to wear anymore.She was pleased that she can still fit into this dress I made her back in August of 2012! That was second grade, folks! Look at what a little peanut she was then.  The dress is much shorter on her now but it still fits in the chest and shoulder area.This is the pile of tights we found that were too short to wear anymore.Her cousin recently sent her a box of hand-me-downs that included a couple of pair of leggings that she has been wearing with her skirts and dresses. We decided to try converting the tights to leggings.It was easy as pie. I cut the foot part off and hemmed up the lower edge using a multi-step zigzag stitch on the sewing machine. I used the foot portion to test out which stitch worked best.P is thrilled to have new wardrobe pieces made from her old favorites.She wishes that favorite brown jacket were a little bigger so she could wear that too! She squeezed herself into it for the photo.

The Splendid Sampler - Wings

Have you started the Splendid Sampler sew along, a year long sew along organized by Pat Sloane and Jane Davidson yet?I have finished the second block, Wings, designed by Jane Davidson.I had a hard time deciding if I wanted to add the embroidery detail. Here is is with the first block before I added the antennae.I have enjoyed scrolling through the #TheSplendidSampler hashtag on Instagram to see all of the different versions of the blocks. Come join the fun and add your photos.

Pillow Talk

Two years ago I gave my daughter-in-law two pillow forms for Christmas and told her I would make some pillows for her. After much delay they are finally finished.Megan chose the color palette and pulled a selection of fabrics from my stash. She also requested velvet backing for the pillows.The larger pillow is a block from Jane Davidson's Rock Pools quilt. The pattern is in her self published book Desert to Sea.The smaller pillow top was made in a class with Sherri Lynn Wood last fall.I sometimes have a hard time squaring up large blocks so I want to share how I trimmed these pillow tops to size.To trim the large blocks I used Karen Kay Buckley's Perfect Adjustable Square. It comes is a beautiful box that keeps all of the parts safely stored together.Inside there are pieces that go together to build squares from 4 inches to 24 1/2 inches. This device makes it easy to find the center of a square without marking the diagonal lines.I highly recommend this set for squaring up large blocks. It is well worth the price to know you are getting it right with little effort. 

Sizzix - a time saver

You guys,  look what came in the mail!!!! My new sizzix custom die!This die has the blades to cut twenty one inch squares at a time. I can place small scraps over the die cutting surface and then run them through the Sizzix.Here's what it looks like after cutting. Sizzix squares cutI can quickly separate the squares from the cut away trash. I had these quares cut and stacked in no time this afternoon. Since I'll be sewing these across from point to point and trimming one side to make half square triangles, I am able to use squares that are missing one corner.I put five layers of white backgound fabric through the sizzix and cut one hundred squares at once!!! This new Sizzix die will save me days of cutting time.To make sewing point to point easier, I put a piece of washi tape in line with the sewing machine needle. I can now line up the point of the square on that line and follow it as I sew across the square.Zippity zip and I have lots of sewn half square triangles. This is only the beginning.Now, I'm ready to sew miles and miles of tiny sawteeth strips!I'm crushing hard on that strip of alternating teeth on the right.

Every Last Piece - feature quilt of the Week - Square Root

The featured quilt this week is Square Root, another from the gallery section of Every Last Piece. This quilt is composed of four patch and nine patch blocks. The background is a plain muslin fabric and all of the other sqaures are scraps from other projects. I chose scraps that read as dark to give the finished design more impact.This was one of the first quilts I quilted on my longarm. I did an all over loopy design on it.There are no patterns in the book for the quilts pictured in the "gallery." They are there to provide inspiration and ideas for the designs presented later in the book.I chose this quilt to share with you now, because my friend Trudi Wood sent me this photo on Instagram and it made my day. (photo shared with permission) She is making her own version of the quilt. She figured out the layout in EQ, sized it up for a bigger quilt, and has added a border to it. She says she'll use reproduction 30's fabrics. I love that fancy feather quilting she has planned for the border. After reading the book she says, "I've been thinking very differently about my scraps AND my stash!"I hope there are others out there inspired to make scrap quilts after reading Every Last Piece!If you are making anything inspired by the quilts in my book please use the hashtag #everylastpiece so I can see what you're doing.  

Wardrobe Sewing - The Fancy Sailor Top

Yesterday afternoon I put the finishing stitches on a new top for myself. It has been a long time since I've sewn anything new for myself.I bought the Sailor Top pattern from Fancy Tiger Crafts early last fall but didn't get around to making it until last week. The fabric I used is London Calling, a light weight lawn from Robert Kaufman.I love the thinner drapier fabric for this top.The pattern is listed as a beginner pattern and went together pretty quickly.I love the narrow yoke at the top.I know I'll get a lot of wear out of it.I want to make a few more of these.I'm off to scout some pretty knit and rayon fabrics to try with this pattern. 

Postage Stamp Quilt

I've been working hard to finish projects lately.This postage stamp quilt that I put together last fall is the most recent finish. See this post for details about the piecing process.

The cheery colors and fun fabrics are making me deliriously happy as we wait for spring to arrive. It is still dreary and brown outside but the chickens have been out scratching in the garden and we have had a few sunny "no coat" days! Spring is coming. I'm sure of it. I snapped these photos this morning just before it started to pour rain and I am now listening to rumbles of thunder as I type. It is a happy day.

I recently purchased a roll of Quilter's Dream wool batting and have  wanted to try it.

I LOVE the way the wool quilts. It may be my new favorite batting. It has just the right amount of puff and isn't heavy. They say it is washable but I haven't washed this yet. The wool also springs back a little better than the cotton after being folded. I'll be sure to let you know if I have any problems with it but so far it's a winner.

I quilted it in a simple point to point quilting pattern that follows the shape of the squares.

I worked across the quilt back and forth repeating the following two stitch patterns.

This simple quilting design doesn't detract from the postage stamp pattern while giving it just enough oomph.

The "S" curves make an interesting twisted square shape.

The backing is this fun Ikea fabric that I've been saving for years.

It is quilted with a subtle variegated thread.

I think it's time to start a new quilt!

The finished quilt measures 46'' by 58''
squares are 1.5'' finished
batting - Quilter's Dream wool
quilted with Aurifil 50wt #4651

WIP Wednesday

I really enjoyed making these string pieced melons throughout last year. It was fun sewing and I was able to make some of them with the handcrank machine on the back porch last summer. I took them on a couple of retreat weekends too. Putting the melon units together with the background fabric requires a bit more concentration than building the string units. The curves are gentle enough that they are  not a problem. The challenge is in getting all of the points to line up nicely where they come together. For a flatter finish I am sewing just up to the point where the seams intersect so that the seam allowances will twirl on the back side. I have them sewn into rows and am now taking my time sewing the rows together as that is the trickiest part.I am eager to have this together and start the quilting on it. I am also itching to start a new project but I will wait at least until this top is sewn together.

Every Last Piece

I have been waiting on pins and needles for the day that I could share this news with you!Here it is, all of that frantic and late night sewing last year was for this. A BOOK! I can hardly believe this is really almost a reality. My love of using scraps led me to write a whole book on scrap quilting!A huge thank you to all of you who encourage me to do what I love and try to use Every Last Piece of fabric in my scrap pile. There are scrap quilt designs in the book that you can use no matter how big your scrap pile is. The first quilts in the book are full on all scrap quilts. As you work your way through the book, the designs use fewer scraps the idea being that if you make all of the quilts in the book you can actually use up your scraps.The book, Every Last Piece: 12 Beautiful Design Inspirations Using Scraps, Strings, and Applique  is now available on amazon for preorder and will be released next May. 

A Thing of Beauty

Hello, hello, is anybody still out there?This has been one heck of a winter. We still have about two feet of snow on the ground but at least we have sunshine and blue skies today.I recently treated myself to a new friend for spring sewing. Look at her; she's a sweet celery colored Singer featherweight - just right for getting into the spring sewing swing. I know what you are thinking. Some of you may think I have enough sewing machines, others of you know and understand. Really, this wasn't just a new, for play, machine. Really.Miss P and her friends are at just the right age for learning to sew. SO, I was thinking that I could get back into teaching kids sewing classes and maybe even have a kids sewing camp this summer. I'd like to have five kids sewing at a time so I really need ONE MORE featherweight.Still, I need to get her broken in and make sure she'll be a good machine for classes.See, I have a fresh spring colored project ready to go.I'll be making a baby quilt from Jaybird's Science Fair pattern. It's always good to have a few baby quilts on hand.I'm hoping for this winter to melt away into the past and happier, sunnier, less stressful days for sewing to sprout up.

Barn Quilt

I've been wanting to share this quilt with you but I needed some helpers to hold it for photographing. D was eager to help as long as he got to climb out on the roof of the barn. Hm. This is a BIG quilt.I made this king size quilt for B's parents back in 1999.  B's dad had told me that he always wanted a handmade quilt on his bed but had never had one. I let him look through some of my quilt books and he chose this Dahlia pattern, Dahlia Delight, from Quick and Easy Scrap Quilts by Leisure Arts.The hand applique blocks made a nice travel project.I hand quilted this one on a big frame in our living room and had a couple of friends who came over to helped quilt it. The boys also each put in a few stitches. They weren't very old then!It is nice to have this one at our house now. M has been sleeping under it while he's been home for Thanksgiving break. It has a flannel sheet for the batting and is quite warm. 

Colonial Halloween

Miss P finished her costume last night just after bed time. Whew. She thought it was a lot of work and there may have been some unhappy words at the thought of HAND sewing the snaps and inner ties. In the end she did the hand sewing and was THRILLED to have done it herself.She told me this morning that she thought she was smiling in her sleep all night!She put one of her dress up tutus on underneath to give it a little fullness at the top of the skirt; it was pretty droopy without the extra fluff.It is a good thing that the dress is long because we didn't have time to complete the look with period footwear.A colonial dress has been on her wish list since our visit to Colonial Williamsburg two years ago. I am happy that SHE is happy.The pattern is from my vintage children's sewing pattern collection.edit to add- I helped speed things along by using the ruffler foot on the featherweight to gather/ruffle the lace. She glue basted the lace to the front panel before stitching - that was much easier than stitching the wiggly pinned lace.

Halloween Costume Pattern - from the Archives

Miss Petunia wants to make her own Halloween costume this year. She chose this pattern from my vintage collection and we ordered the paisley fabric online.My job while she is at school today is to make a "muslin" of the bodice so that we can have a fitting after school. She will make the final version herself.

Scrap Management

As soon as P started back to school, it seems that my brain had some space for sewing ideas. This week I designed a bunch of quilts and started cutting up scraps. I cut a whole stack of triangles for half square triangle units that would finish at one inch. When I started sewing them I realized how small that actually was. Hmmm. I put that project in a bag and scaled up my plan. I cut an even LARGER stack of triangles that will finish at one and a quarter inches. Yeah, because that's SO much bigger.Fun times, I tell you. I may be finished with the summer blahs and be moving into full fall sewing madness!It's a good thing I have have at least FIVE quilts started and on my project table right now. I'll be able to alternate between them. When I get the crazies from tiny triangles, I can switch to tiny squares!!! Bwahahahahahahaha!!!

Three Kitchen Fairies

We have had some lovely weather this week in Michigan. I've been taking advantage of the cooler drier air by spending time outside reading and even doing a little hand stitching. It's been like a vacation without the hassle of packing and driving.Paloma, of Three Kitchen Fairies, sent me some of her hexie papers to try and I finally got around to making a project with them. These are one inch on each side. The paper is thinner than the papers I had been using and I love that you can get a thin crisp turned edge with these papers. They are also easier to pop out after stitching. The papers in the photo have been used and are in great condition for using again. If you want to try them yourself you can get the papers here in Paloma's etsy shop. She also has some sweet instant download embroidery patterns. I especially like this one.A few scraps, aurifil 50 wt thread, and hexie papers are the perfect ingredients for relaxing afternoon and a pretty transformation for a tea towel.Now, I think I need to get some more of these bright tea towels to decorate.