June 1985 my sister's graduation from Virginia Tech.My aunt, uncle, mother, grandmothers, my sister, and me taken under the apple tree in our back yard.
Wordless Wednesday - the tea party edition


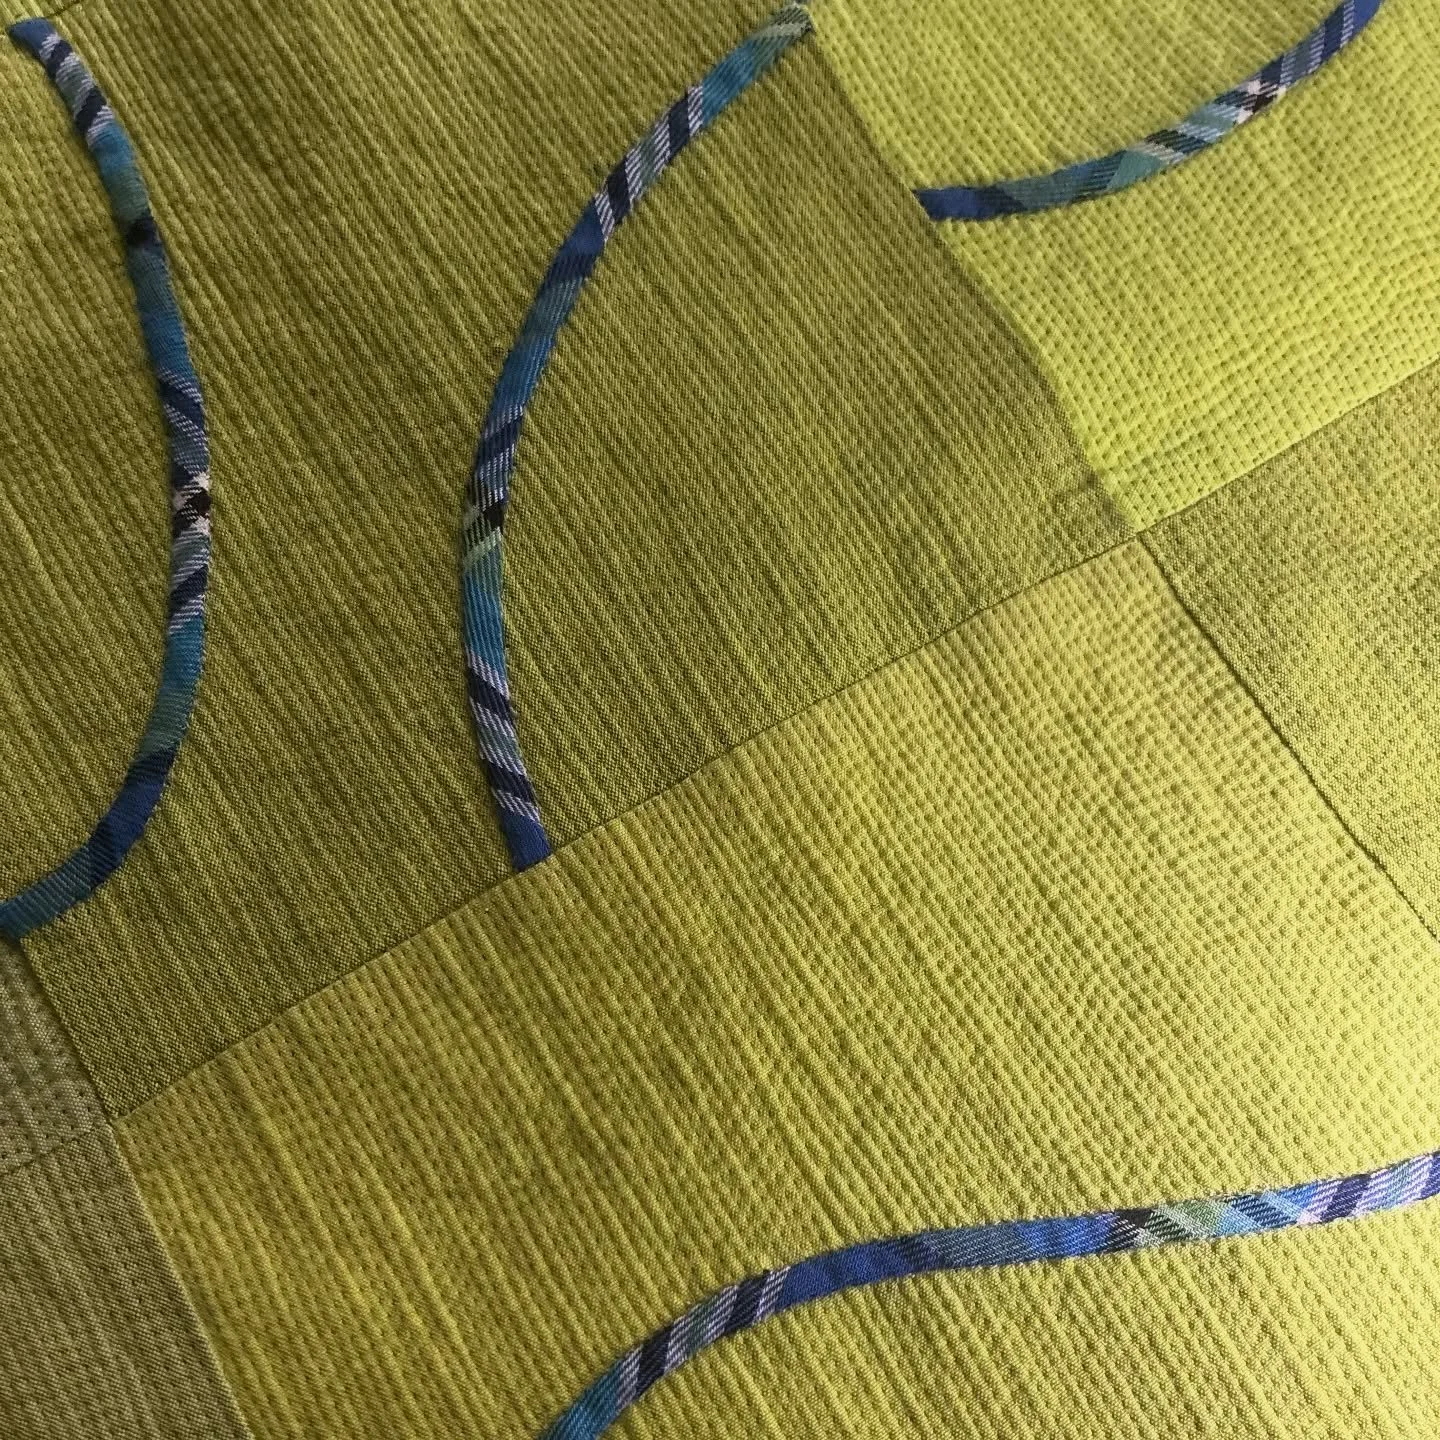
Washi Tunic
Last week I took a fitting class with Rae and Karen where I learned some basic tips for bodice fitting. Most importantly for me was how to move the dart. After adjusting the Washi Dress pattern we made a "test" top. Here's mine.

I used some fabric that I had in my stash and I'm pretty happy with how it turned out. After making adjustments to the pattern, the top/dress goes together pretty quickly.

I also like the shirring in the back - no zipper!I'm going to make a few more adjustments to the pattern and make another.
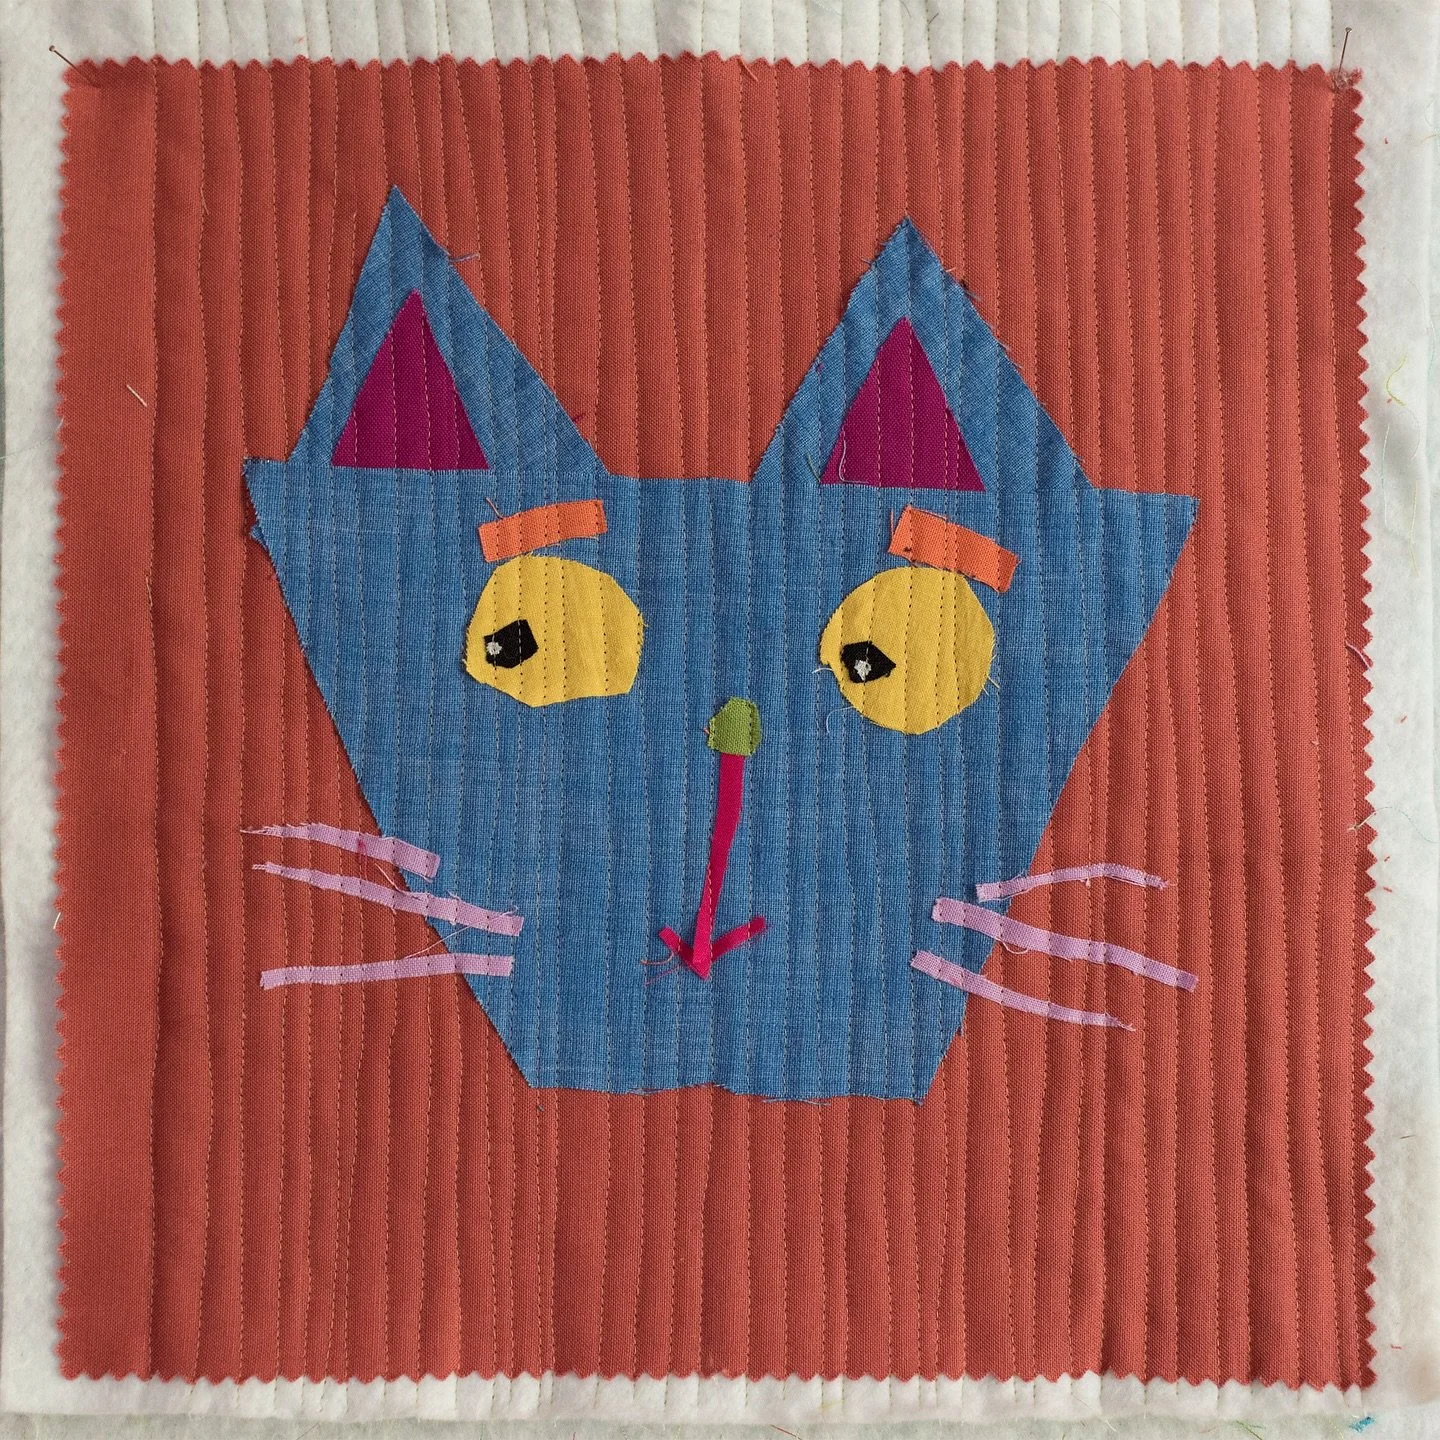
New Quilt Designs
Miss P and I have been designing some quilts this summer. I can't share mine yet but she says I can share hers.
She tells me that this one is to be done in reverse applique, you know, "when the back fabric peeks through".

This is her "bunny quilt"

This is an abstract design.

She whipped out a drawing before dinner the other night that I'm actually going to try to make.
Fun times in the sewing room this summer.
Flashback Friday

1977 Not sure what I was doing. Maybe that was something for my doll house which I got about this time.That shirt must be a hand me down from my sister. Red, white, and blue was all the rage in 1976 for the Bicentennial Celebration.
Dressmaking
I used the vintage Simplicity pattern seen here to make P a new dress for school. We still have a few weeks before school starts but it is better to have these things finished ahead! I've done last minute school sewing before and it's not as much fun.

We opted to use elastic in the bodice casing instead of the suggested ribbon and also used contrasting fabric for the collar and peek-a-boo pleat.

Here's an action shot. She wanted to make sure you could see the green fabric in the pleat.

And here's one more shot just because I thought we needed one with chickens. (I know the first photo has one too, but this one shows them better.) Those two are "teenagers" of this years new brood.

Last night I started making a Washi Dress for myself. Thank you Karen and Rae for teaching a very helpful class. It was fun to see a room full of people with very different body shapes start with the same pattern and each end up with a muslin bodice to fit their body. Seriously, it was like Advanced Potions class at Hogwarts. I am so happy to have the secrets of pattern fitting unlocked!I am thrilled that I'll finally be able to make clothes for myself again! I used to make dresses YEARS ago when I fit into a standard pattern. Yeah, I'm talking about all the way back in high school. I can't wait to show you some finished Washi tops and dresses!
I Hopped on the Band Wagon
I've been seeing lots of frame purses popping up around the web.
I finally broke down and jumped on the frame purse band wagon. I ordered the The Easy Peasy Purse kit from U-handbag to get me started. I also stocked up on different size frames.
I used the pattern provided for these two purses but used a different construction technique to avoid a raw edge at the join of the purse.

I drafted my own pattern to fit some other size frames. This sock monkey purse has an 8 inch frame. I also quilted the outer fabric instead of using fusible interfacing on this one.

I love the wee little 3 inch change purse. P wants to put her milk money in that and use it with her matching lunch bag.

Here you can see the finished edge at the join of the frame and bag.
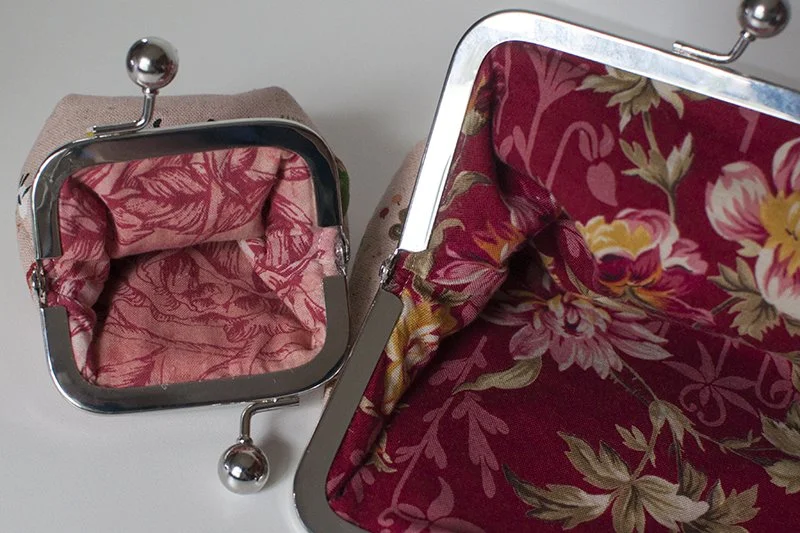
These purses are so fun to create. It is a great way to use fun fabrics and fat quarters. They are quite addictive. Really. Once you start you can't stop. I already have more cut and ready to sew.
We still have enough of the Little Red fabric and super cute matching ribbon Brenda gave us to make another project. What should we make?

Cover Girl
Look who's on the cover of the new Generation Q magazine!

P and I had fun earlier in the summer taking photos for the cover and the article inside. Admittedly, the cover photo took us several outings as I felt a bit of pressure to get everything just right. P was a real sport about it and pretty patient with me so I thank her for her cooperation.
I was also a little nervous about taking photos of our house in its state of unfinished renovation. I worked on taking pictures over a period of days. We even staged a tea party with tiny shortbread cookie cutter cookies. It's all in the preparations, right? I sent them a bunch of different photos and I don't know which ones they included.
I enjoyed emailing and talking with Melissa and Jake on the phone. They were very patient, helpful, and easy to talk to. I am still amazed that they wanted to write an article about little ol' me.
They say it will be in selected newsstands later this month. I can hardly wait for it to arrive! You can read more about it here.
Information on the cover quilt, Twinkling Stars, can be found HERE.I suppose I should go write out the directions for the quilt that started it all and will be in the NEXT issue of GenQ.
Flashback Friday

1976 - Four Corners
Wordless Wednesday

Catching Butterflies

It was a beautiful day for trying out the butterfly nets at home.
Butterfly Walk
It was a beautiful day yesterday and we went for a butterfly walk with some people who really know their butterflies.

We saw about 15 different species of butterflies,

and also found a few praying mantis.

I'm glad that the super heat of summer has broken enough for us to turn off our air conditioner units - at least for a few days. We are enjoying a lovely breeze through open windows today.
Now, if we could just get some rain...
Flashback Friday
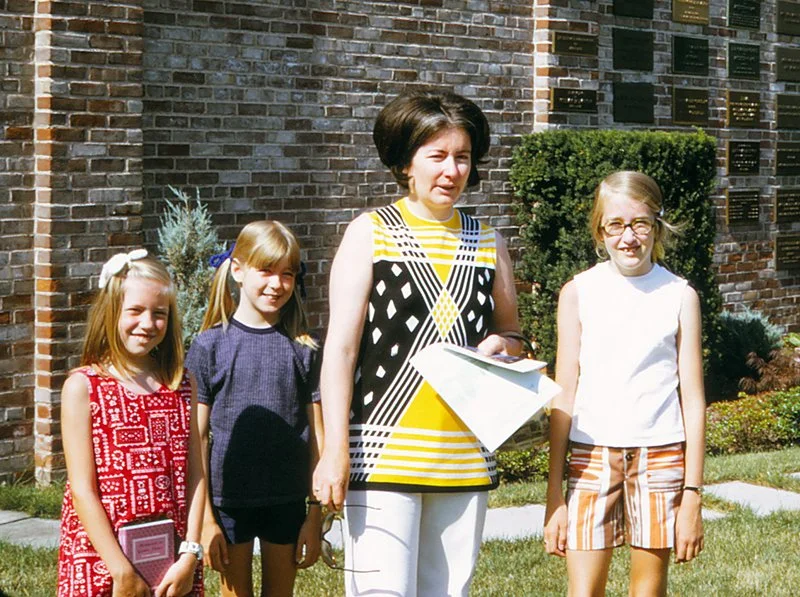
1972 - same day as last week's photo at the National Garden Club Headquarters in St. Louis. This gives a better view of my mom's groovy top, my sister's cool shorts, and my favorite summer dress ever!
Drawstring Lunch Bag

While P and a friend were working on their own sewing project this afternoon, I made this super cute drawstring lunch bag using this tutorial.I used the Little Red Kokka print I got at Brenda's yesterday and some coordinating fabrics from my stash. I love that I used some of those OLD prints and made a little room for some new fabric.The bag has a drawstring top and is lined with the darker red fabric that is also used in the top band.

Miss P is quite happy with it. She has always struggled to eat a good lunch at school so, maybe she will happier to eat her lunch away from home if she gets to take it in a cute bag.

This bag design is quite versatile; it would also be great for carrying hand sewing or knitting projects.
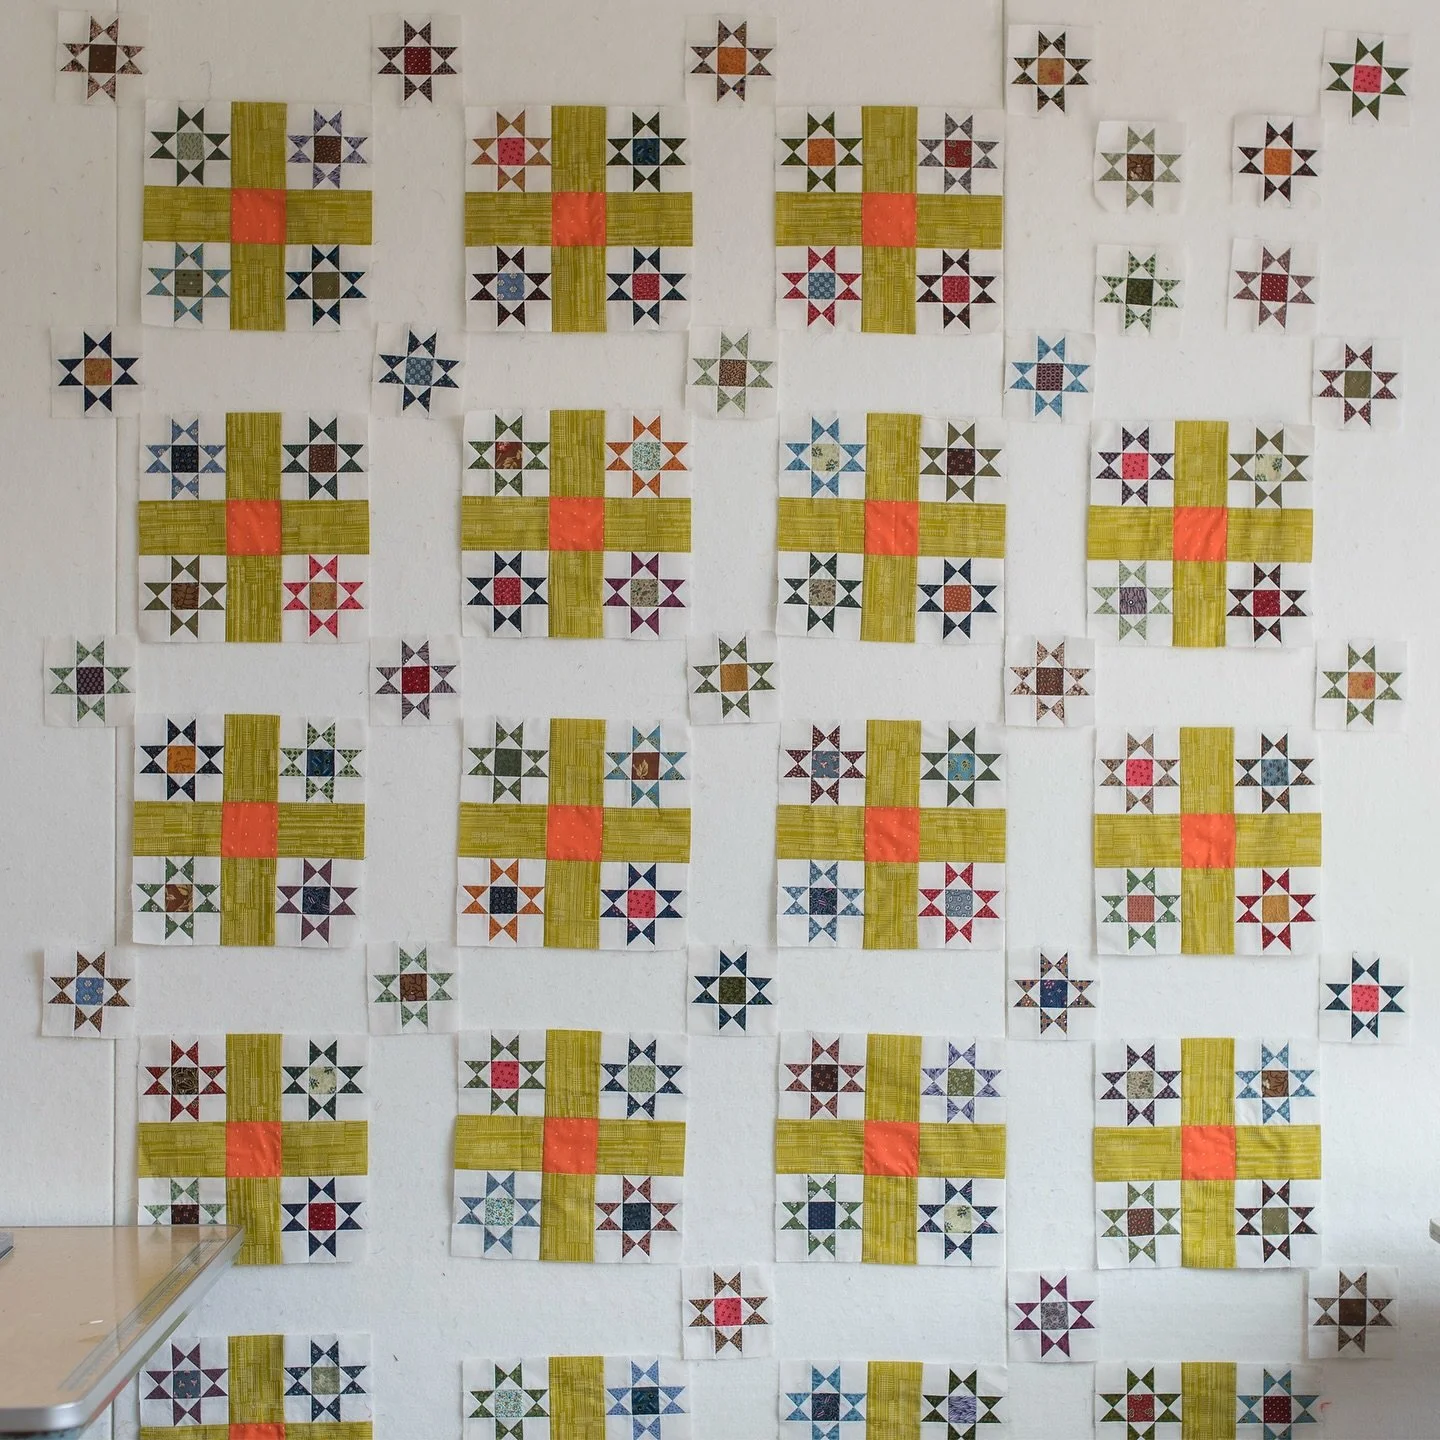
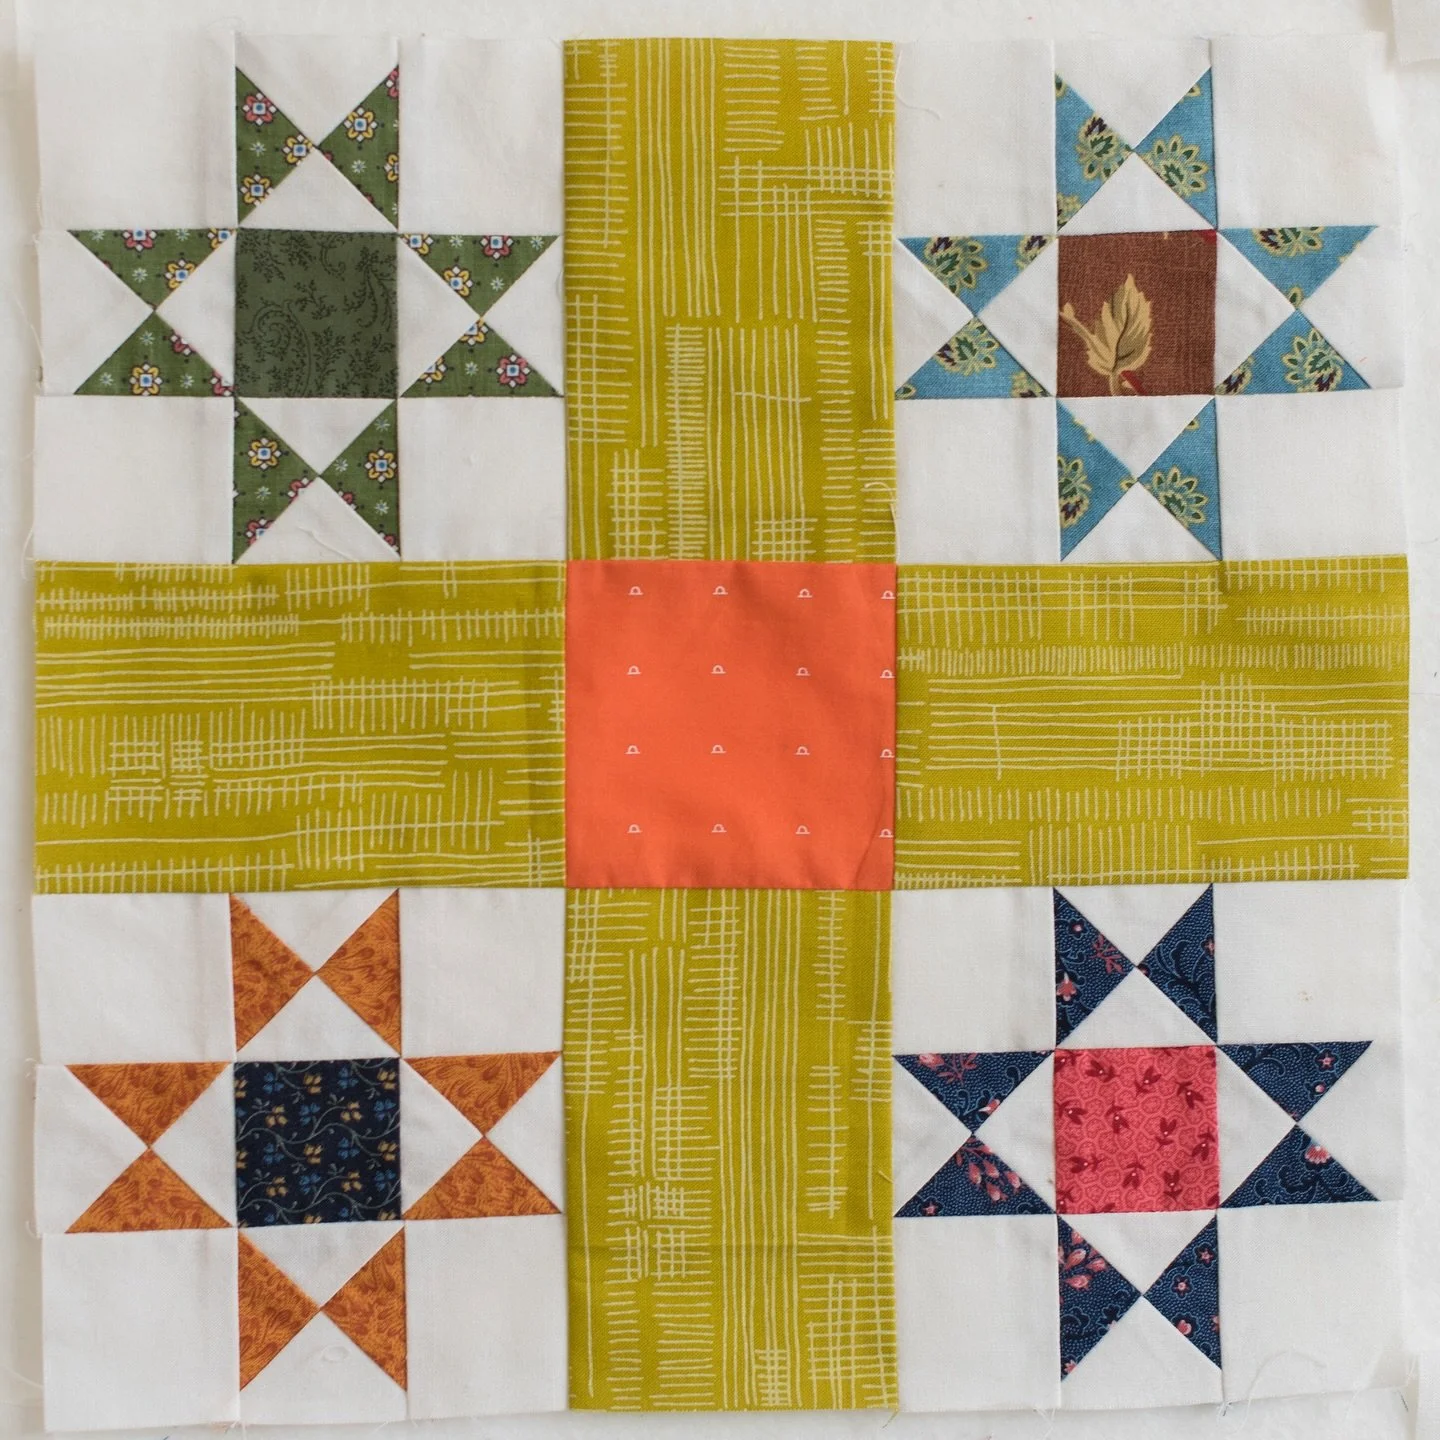
Twinkling Stars
I've had a lot of interest in and questions about the Twinkling Stars quilt recently. I thought it would be helpful to collect all of the posts I made while making it and put them in one place. I'm also including a link here in the tutorial section on the blog sidebar so you can find it easily.

The three inch finished stars are made using Gwen Marston's liberated piecing technique. The base pieces for the stars are all cut as 1 1/2 inch squares. The centers are a variety of bright prints and the star points are all solids. There are 162 stars set in an alternating checkerboard design. The background is Kona snow.The outer border is nine inches wide. I had a hard time deciding how to quilt the wide border and I am glad that I took my time and quilted it with a large feathered vine. The stars pieces are not quilted but are outlined. The entire background is quilted with close quilting.

This is definitely my favorite quilt that I've made so far.
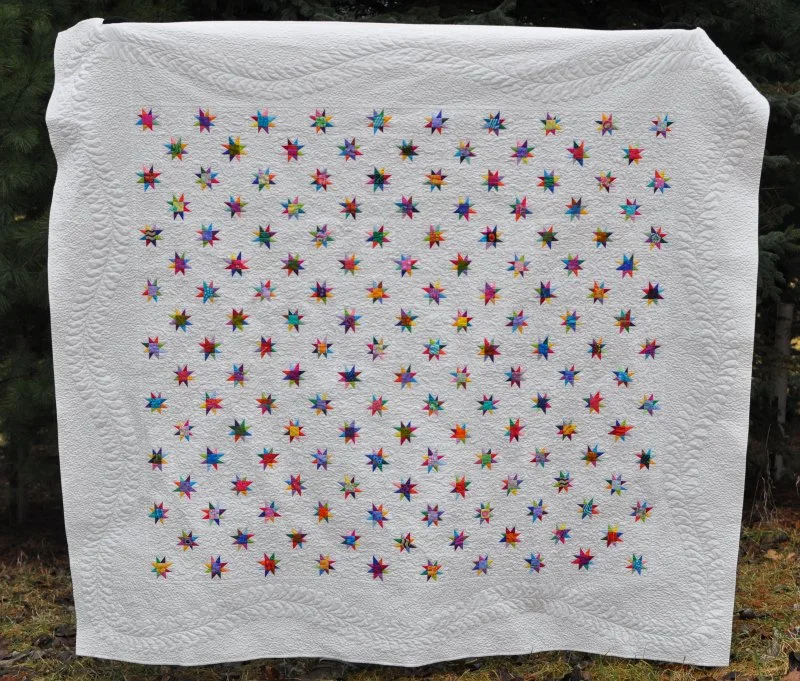
Measurements: 67" by 73".
previous posts about this quilt:
The beginning
A Star Filled Afternoon
BastedStarting the quilting
After many hours of quilting
Deciding on the big border
Quilting the feather border
The finished quilt
Silly BooDilly has a tutorial on how to make a liberated star. You can find it here.
The stars can be made any size. The ones in my quilt are three inch finished. I cut 1.5'' squares for each of the background pieces and the center. Each of the squares will then finish at 1''. The star points are just random scraps of solid fabric sewn and flipped as shown in the general tutorial.
If you start with 2'' squares your finished block will be 4 1/2'' finished. 2 1/2'' squares will give a 6'' block.
Summer Doings

Yesterday we took bikes to the high school track again. M was trying out his new super fast bike helmet. He did time trial comparisons for the old helmet and the new helmet and confirmed that it does indeed help him go FASTER on the bike. He is eager for another triathlon!
He also helped P gain a little more confidence on her bike.

Thoughtful Sunday

"Believe me, my young friend, there is nothing - absolutely nothing - half so much worth doing as simply messing about in boats."The Wind in the Willows, Kenneth Grahame, 1907
Taking it Easy


We've been busy with late summer activities around home - freezing, canning, and the like.
We were thrilled when B came home Thursday with a canoe strapped to his pick up. (You gotta love Craigslist.) This means that miss P can go out on the water with us! The three of us tried it out yesterday morning.

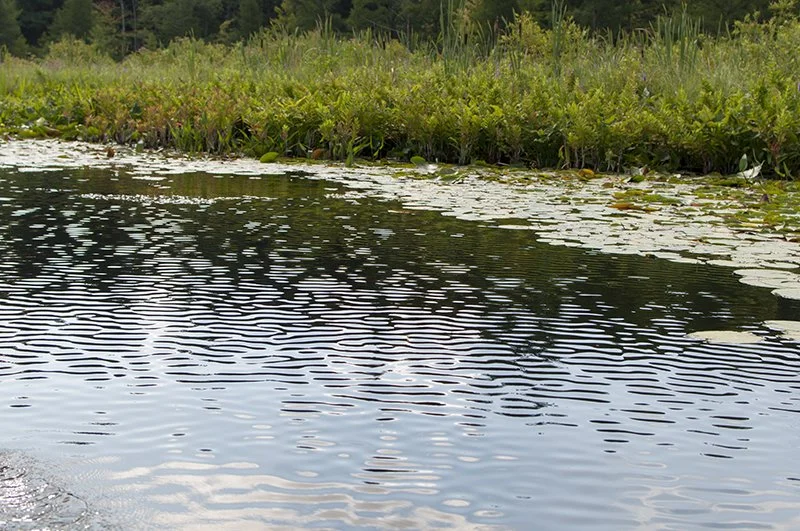

I was fascinated with the reflections of the clouds in the still water.


I took lots of pictures; it's good to do that every once in a while.


It was a fun morning outing and made returning to a kitchen table full of tomatoes to process a bit easier.
We may go out again tomorrow morning!
Also, I thought I should share with you something else that is making my home chores a little more tolerable. Earlier in the summer my twenty something year old vacuum cleaner croaked. It had already been repaired several times by B and there was just no saving it this time. So, I got a NEW vacuum. It was pricey but oh, so worth it. I just love using it. Miss P likes it because it is QUIET and has a telescoping wand that she can adjust to her height. She likes to vacuum with it and use the dusting wand. I like that it is light weight and the exhaust comes out through a filter band around the whole vacuum and not from one single spot. This is especially nice when using the vacuum on the stairs because it doesn't blow the dust that you haven't gotten to yet. I love it when tools can make things easier.
Flashback Friday

1972 - Indoor gardens at the National Garden Club Headquarters in St. Louis.
Slip-n-Slide

Adele and I have finished another pair of socks! These are for ME.

My sister gave me the book Sock Knitting Master Class: Innovative Techniques + Patterns from Top Designers for Christmas and I had been wanting to try some of the great looking patterns in there.I chose Slip-n-Slide by Chrissy Gardiner to go with this Berroco Sox yarn because it has long slipped stitches that help disguise the striping in the yarn.I like that the pattern continues down the heel flap.

They were a pretty quick knit and I learned a new technique to get the little butterfly looking stitches that go down the front and back of the sock.
I am eager to knit some of the other socks in this "master class" book. I'm sure I'll learn more fun and interesting knitting techniques as I work my way through the book.