I am just back from a great trip to Austin to attend QuiltCon 2015. The quilts in the show were fabulous. I took some great classes and attended lectures that I'll share more about later.Today I want to show you my favorite thing at QuiltCon. There was one quilt that I knew I wanted to see before I ever left home, Face #1 by Melissa Averinos. I watched the construction of this quilt on instagram as she posted photos. Her process is so interesting. After looking at all the quilts this one is a stand out favorite of mine.Face #1 by Melissa Averinos.This is what Melissa says about the quilt:"After creating a large raw-edge applique self portrait, I challenged myself to make a pieced face quilt, This image was not based on a photograph or drawing and no computers or charts were involved. I drew on my experience as a painter to improvise with fabric squares and rectangles to create the image as I would with painting. I've been making my whole life and when I finished this quilt, I cried with happiness. It's my favorite thing I've ever made."
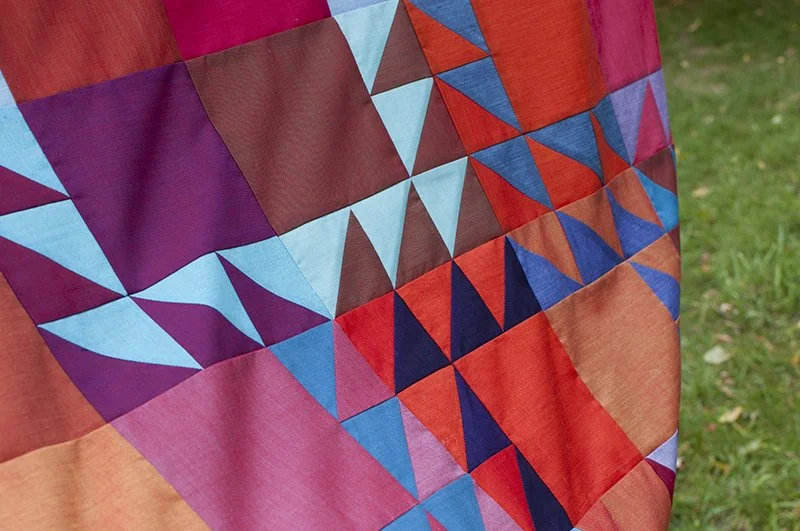
Here's a close up of one of the eyes.
I love the variation of the fabrics that she used. There are some very old calicos and novelty prints. Look at cat face, and the skeleton print. The overall design really draws you in from across the room, right up close to see the tiny fabric parts. I like that she used older fabrics and those that are not easily recognizable as current "on trend" designer fabrics.
I had to go back and visit the quilt several times a day. It is just so unbelievably beautiful.Melissa, I can't wait to see where your journey takes you next.
Scrap Management
As soon as P started back to school, it seems that my brain had some space for sewing ideas. This week I designed a bunch of quilts and started cutting up scraps. I cut a whole stack of triangles for half square triangle units that would finish at one inch. When I started sewing them I realized how small that actually was. Hmmm. I put that project in a bag and scaled up my plan. I cut an even LARGER stack of triangles that will finish at one and a quarter inches. Yeah, because that's SO much bigger.Fun times, I tell you. I may be finished with the summer blahs and be moving into full fall sewing madness!It's a good thing I have have at least FIVE quilts started and on my project table right now. I'll be able to alternate between them. When I get the crazies from tiny triangles, I can switch to tiny squares!!! Bwahahahahahahaha!!!
Ruby Reds
I finally put together theOakshott Ruby Red quilt top. I started with the Ruby Red pack of Oakshott shot cottons and paired them with some cool colors from my colorbox.I made the blocks back in the summer and at the time thought they needed some sashing between them.
I chose a deep purple for sashing that was out of stock for a while.
The sashing fabric arrived Monday morning but when I tried them together I didn't like that look either. It was a bit boring. Then, I tried setting the blocks turned in different directions. The interaction of the blocks made it much more interesting.
Here's the full view.
If you haven't tried any of the Oakshott shot cotton, you really should. It has a beautiful luminescent quality that just can't be captured in a photo. Believe me, I've tried.
Drawstring Lunch Bag
While P and a friend were working on their own sewing project this afternoon, I made this super cute drawstring lunch bag using this tutorial.I used the Little Red Kokka print I got at Brenda's yesterday and some coordinating fabrics from my stash. I love that I used some of those OLD prints and made a little room for some new fabric.The bag has a drawstring top and is lined with the darker red fabric that is also used in the top band.
Miss P is quite happy with it. She has always struggled to eat a good lunch at school so, maybe she will happier to eat her lunch away from home if she gets to take it in a cute bag.
This bag design is quite versatile; it would also be great for carrying hand sewing or knitting projects - maybe I'll make a viewmaster one from that Melody Miller fabric I got yesterday.
Antique Quilts at International Quilt Market
I was looking through last month's photos from quilt market and found these pictures of some antique quilts that I never shared with you.There were several booths of antique quilts. I loved this wall of hanging quilts.In the same booth was this unusual leather quilt with a wool felt edging. I have never seen anything like it before.
This applique quilt with just a touch of embroidery was interesting. I like the aged color of that green.
I love the close grid quilting and feathers on this basket quilt.
This French one, however, stopped me in my tracks. The quilting was incredible. I stopped for a second look but it had already sold. I'm glad I snapped a photo the first day when I saw it.
Meet Nancy
I'd like you to meet Nancy. (named by M)
D helped me with the photo shoot yesterday while M was fixing dinner. Since M will be living in an apartment next year he wants to learn how to make his favorite meals. One of his summer projects will be to copy the recipies and practice making them. I also told him that if he helps in the garden and with canning that he can take some of our yeild to stock his pantry next year. Yay for tall people being home. I can get double help!!
I just can't say enough how much I love scrap quilts. Really. They make my heart sing.
So many memories stitched into this quilt. In the photo above I see a bit of P's backpack, and some pink pajama fabric, bug fabric that I used for a baby sunhat for D....I also LOVE the backing fabric. That is such a pretty color of brown with the pink flowers. I also love the way it looks with the green. It has a sort of electrical "does it really go?" vibe going on.
I've had some questions about the quilting on this so I'll tell you how I approached that.1. I stitched in the ditch on all of the vertical block seams.2. I stitched in the ditch on all of the horizontal lines.3. I stitched in the ditch on the diagonal half square triangle lines.4. I stitched a serpentine line across the diagonals in the string pieced areas.5. I stitched the feathers in diagonal passes in the green triangles.I used aurifil 50 wt. for the green feathers, ditch stitching, and all of the bobbin thread. I used a vareigated King Tut thread in the string pieced areas.Nancy is 64.5 inches by 87.5 inches.Here are other posts about the making of Nancy:quiltingchartreuse as a neutralauditioning fabrics for the groundhalf square triangles
Happy Drawing Tops
When these Happy Drawing fabrics arrived from Cloud9 I could hardly wait to cut into them. Michelle said she wanted three tops the same size from the same pattern. This vintage Simplicity pattern from my collection was perfect to show off these great fabrics.P helped me go through some buttons jars to find buttons to suit each fabric. We found some gray leather ones for the elephant fabric, the perfect green for the owls and some white balls that reminded me of eyes for the frogs.
I guess it's a good thing these are too small for miss P or we wouldn't want to mail them to Michelle.
We do, however, have a few scraps of each fabric to play with.
Crushed
Here they are. All 130 string pieced blocks needed for a twin size quilt. I am smitten with this block on top. That row of tiny scraps gets me . I don't remember who gave me that skeleton fabric scrap but that is the last bit of that fabric that I have.Really, it slays me. I know that if I had started with yardage of that fabric I wouldn't feel the same way. It was precious and I had to include it in this quilt.Are you like that? Do some fabrics make you emotional? Is it just me? I got a little teary feeling this morning cutting a center for a tiny star out of the very last scrap of fabric left from a dress I made myself in 1975. Sigh.Look, they are crushed under their own weight.
This little stack is making me very happy. I think I'll just keep it and pet it for awhile before moving to the next step.edited to add:My method for making string pieced quilts is shown in detail in chapter one of my book, Every Last Piece. There are directions for several string quilts as well as photos and ideas for more string quilts included. You can purchase an autographed copy of the Every Last Piece from me here.
Crazy Love Quilt
I finished the binding on this Crazy Love quilt this morning. I am pleased with how it turned out. I used a blue Carolina Chambray from Robert Kaufman for the triangles and binding. I like that the zig zag of the blue makes diagonal channels of color.I chose to do minimal quilting on this to echo the diagonal lines of the blue. I quilted in the ditch on all of the seam lines and then one walking foot width to either side of the blue triangles as seen here.
You can see a corner of the pink tone on tone fabric Jennifer sent for the backing in the picture below. P was hoping there would be some extra of that fabric!
The binding on the quilt is 1/2 inch wide.It measures 64 x 79 inches.Fabrics are from the Crazy Love line coming out this spring from Jennifer Paganelli.I started my next scraptacular quilt today. It already has some Crazy Love scraps sewn in. It will be one of those quilts that includes all kinds of fabrics. After a couple of quilt finishes I found that my scrap bin is over flowing again and the tiny stars are just not putting any dent at all in that huge pile of fabric. I have started a scrap intensive quilt. I'll share more later, after I have a few photos.
$3.70
Have I told you lately how much I love a good rummage sale?I stopped at a sale on my way home from the grocery store yesterday at noon. I got this great little suitcase and a fun yellow check tablecloth. P LOVES the suitcase. It is like one that I had when I was little but this one is bigger. She uses my old one for her doll clothes and is eager to use this on a trip. The table cloth has a hole in it but I am hoping that we can use it with a strategically placed flower vase on the table.The crafting department was filled with treasures.
Someone had cut out some projects and had them bundled with the pattern jackets. I love that old flannel print.
I pawed through boxes and boxes of fabric and found some real winners.
Lots of vintage pieces, even some large pieces made with narrow width.
And some great old searsucker!
Here is the fabric haul all washed and folded.
The best part of all is that the total for all of my purchases was $3.70!Three dollars and seventy cents!! And I even got a a few things that were not pictured!Can you believe it?
The Triangle Quilt
I was able to squeeze one more UFO finish in before the end of summer vacation. I started this one two years ago!
I had a hard time deciding on the quilting for this and finally settledon a thin black thread with five rows of parallel stitching along thestraight seam lines.
I am pleased that the quilting does not detract from the clear solid colors.
The quilt measures 39.5 inches by 47.5 inches.
Vintage Yardage
I thought you might want to see some vintage fabric yardage.I found these long forgotten pieces of fabric yesterday while looking for something else in the sewing room. There is at least three yards of each.
I love that they are all the old narrow width- and just look at that lovely selvedge. Sigh.
Summer has arrived but I still don't spend much time outside because of the mosquitoes. I am eagerly awaiting the day they blow away.In the mean time I am trying to be productive with my time in the house. I have decided that one of my summer projects will be to finish as many unfinished projects in the sewing room as I can. You know, cleaning up the slow way. I am determined to get some of these piles cleared up.I am on my way with these star blocks that I made today. That is all I need to finish a queen size quilt that I started at Beaver Island Quilt Retreat in 2004!!
If I hadn't put four of the blocks in this quilt and mailed it away I would have only needed to make three more blocks. Three. That was all I needed to finish a queen size quilt.That is what I get for not finishing it at the time. I have had theunfinished top and fabrics to finish it in a pile for almost SIX YEARS.Yes, its time has come.Is anyone else up for a summer of Project UFO? Let's get those projects finished!!
Animal Crackers update
Most of you know that when I start a project I usually don't plan it all out ahead. I like to jump in with both feet and the rotary cutter. I am glad that I laid a few of these out on the floor to get the idea before I had everything cut.I have the twenty animal print squares and 80 of the star point rectangles. The block I had in my head is shown in the upper right corner of the photo. Now that I SEE how it is going together I am not going to make the block that way. I think I will cut larger squares to go in the background instead of four small squares. I was originally thinking one white block with a feathered wreath quilted in it. Now, as I look at it again I could do another print or a four patch of different colors.... I like that there will be secondary stars there. Now I have to decide before charging ahead again.I also see that instead of cutting two rectangles for the star points between the animal blocks I should have cut one piece and sewn four triangles to it.Maybe doing a little sketching before I start would be a good thing. It would have saved a bit of time here and would have ended up with a "cleaner" looking quilt.