Tutorial

Twinkling Stars

I've had a lot of interest in and questions about the Twinkling Stars quilt recently. I thought it would be helpful to collect all of the posts I made while making it and put them in one place. I'm also including a link here in the tutorial section on the blog sidebar so you can find it easily.
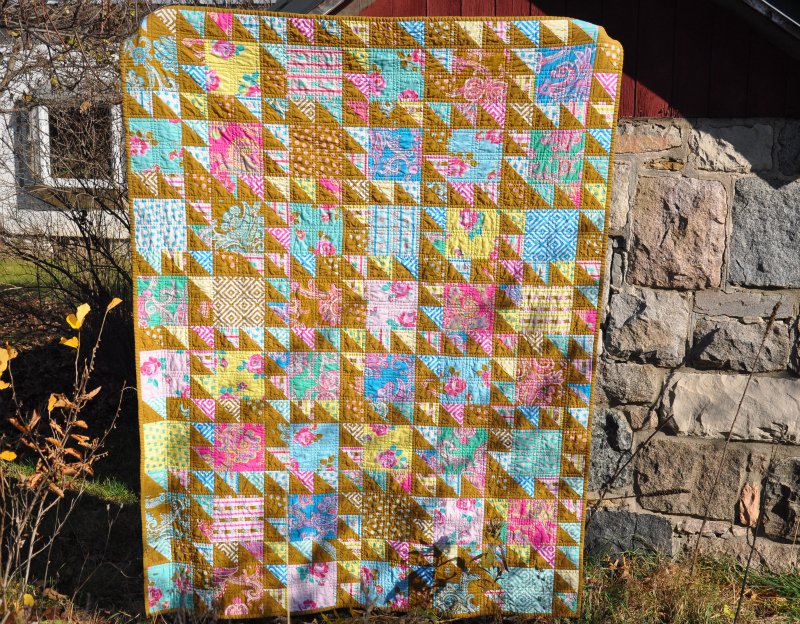
The three inch finished stars are made using Gwen Marston's liberated piecing technique.  The base pieces for the stars are all cut as 1 1/2 inch squares. The centers are a variety of bright prints and the star points are all solids.  There are 162 stars set in an alternating checkerboard design. The background is Kona snow.The outer border is nine inches wide. I had a hard time deciding how to quilt the wide border and I am glad that I took my time and quilted it with a large feathered vine. The stars pieces are not quilted but are outlined. The entire background is quilted with close quilting.This is definitely my favorite quilt that I've made so far.
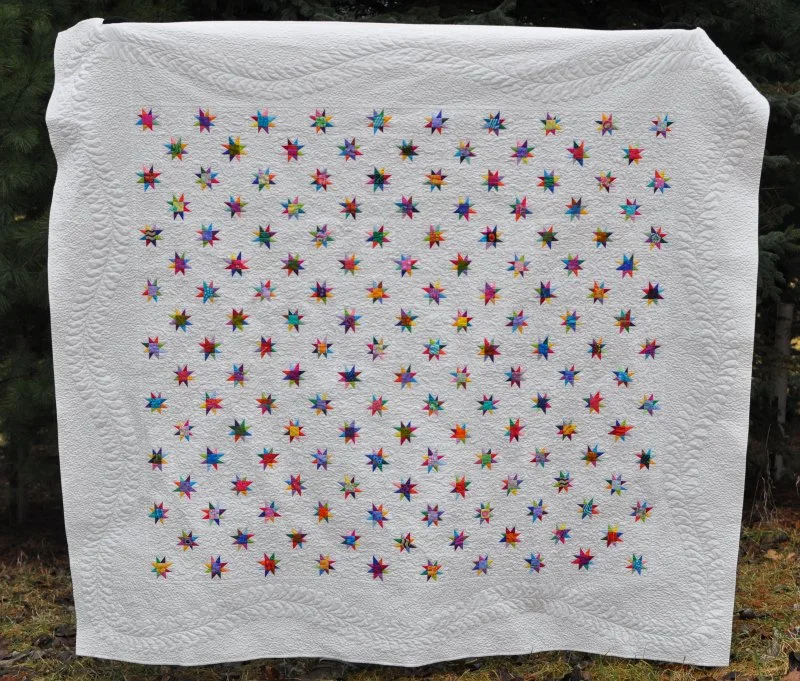
Measurements: 67" by 73".previous posts about this quilt:The beginningA Star Filled AfternoonBastedStarting the quiltingAfter many hours of quiltingDeciding on the big borderQuilting the feather borderThe finished quilt Silly BooDilly has a tutorial on how to make a liberated star. You can find it here.

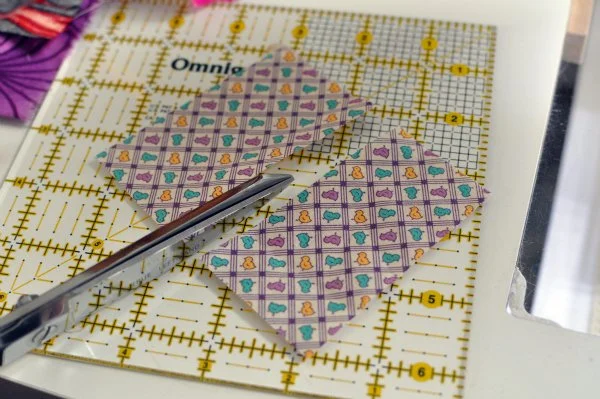
The stars can be made any size. The ones in my quilt are three inch finished.  I cut 1.5'' squares for each of the background pieces and the center. Each of the squares will then finish at 1''.  The star points are just random scraps of solid fabric sewn and flipped as shown in the general tutorial.
If you start with 2'' squares your finished block will be 4 1/2'' finished. 2 1/2'' squares will give a 6'' block.


How to Make a Wooden Spoon - guest post by P

Have you ever wanted to know how to make a wooden spoon?This is how I did it.First, trace a wooden spoon from your kitchen onto a piece of wood. Then, have someone cut it out with an electric saw. Then, you use a spokeshave to shave the wood down to the line that you traced.Then, make the handle round with the spokeshave.Next, use the spokeshave to shave wood off the back of the bowl to make it rounded. Then, use a gouge to carve out the front of the bowl. Switch to a flatter and wider gouge to smooth those gouge marks out. Last, sand the spoon to make it smooth.Ta-daaa! Now you have a wooden spoon!!!!!!!!!!!!!!!!(note - P's father has taught her how to use woodworking tools safely. The spoke shave is a fairly safe tool, gauges are a bit more dangerous and should be used with direction from someone who knows what they are doing)

Stringing Along

I've really been using up the scraps this week. I'm making six inch (finished) string blocks. I need to make 130 blocks for the twin size quilt I have planned.  I'm using quite a mix of fabrics. Leftovers from a skirt for P, a sunhat I made for D when he was little, scraps from kid pajamas, scraps from other people, new scraps - do you see some Jeniffer Paganelli in there? A couple of the blocks even have scraps from a dress I made for myself when I was in middle school. Pretty much anything goes. I am not using the very pale or mostly white fabrics so there's not too much value contrast. These are just like the string blocks I made for this quilt and this quilt. I plan to do something different with these though.  I'll be sure to show you when I get to that step.four six inch string blocks:Here's my method for making these blocks.Because I want there to be a visual direction to the blocks I use strings, or long skinny scraps. I often have strips of quilt backs after trimming, extra strips or parts of strips from cutting quilt pieces and they work great for these blocks. I am making these blocks 6 inches because that is the size of my ruler.  I work with the ruler right next to me.First I cut a bunch of strips to length.Fatter scraps are cut to narrower strip widths. Short pieces are sewn together to make strips that are long enough for the block. I usually work with scissors for a more "organic" look to the piecing but I sometimes trim one edge of these pieced strips with the rotary cutter to make it easier to sew them to the block in progress.I sew these strips together to make a chunk of fabric that is large enough for a block. As I sew each strip on I lay it where I want the seam to be on the block below. I often place it a little askew to get wedge shaped strings. I sew along the straight edge of the new strip and then trim the extra fabric away. Sometimes the bit that is cut away is wide enough to sew to another block.It is best to press before adding each new strip. I work in big batches of sewing and then pressing.Here and here are a couple of other quilts that use a similar string piecing technique.'Tis the season to bust those scraps! String piecing is quick and easy. You should give it a try!

Brenda's Stars - tutorial

I finished and washed my latest quilt, Brenda's Stars. It is heavily quilted in the linen look background and the star centers. The sashing and star points are not quilted.Brenda's Stars cornerHere's the full view.50 by 62 inches. It shrank a bit in the quilting and washing.The fabrics are from Pink Castle Fabrics. It was fun to browse through Brenda's great selection and put these fabrics together.Here are some basic directions for the quilt as I made it.Cut from the fabrics:large floral         - 20  6 1/8 inch squaresfat quarter spots - 50   5 1/4 inch squares30   1 1/2 inch squaresquilter's linen      - 80  4 1/2 inch squares20  5 1/4 inch squaresCut all of the 5 1/4 inch squares on the diagonals as shown to make quarter square triangles.Lay out the blocks as shown.You will be piecing the block into diagonal chunks. Sew the first groups together as shown. Be careful not to stretch the pieces as you sew and press.Continue sewing the pieces together into sections as shown.Sew the last two seams to make the block.Measure the size of your completed block (mine measured 12 1/2 inches). Cut 49 1 1/2 inch wide rectangles the length of your completed block (12 1/2 inches).Lay the quilt out the way you want it to be sewn together.Sew the top together, sandwich with the batting, and quilt as desired.

Mustard Melody

Here's the finished quilt Mustard Melody.It is made with a fat quarter bundle of Jennifer Paganelli's Poodle line and 2.5 yards of a Robert Kaufman Carolina Chambray in a mustard color. I don't know what the actual color name is.It has been quilted, bound, and washed. I used a half inch binding for a little bigger than usual frame around the design.Here's the full view.The block, birds in the air, finishes at 10.5 inches.The large piece in the block is cut 7.5 inches square. The half square triangles are 4 and 3/8 inch squares cut on the diagonal.There are 48 blocks in the quilt. I mostly used the largest prints for the big squares but added in a few of the smaller prints to make all 48 blocks.The quilt shrank up a little with quilting and washing and now measures 59 by 77 inches.

Painting with Tissue Paper

This week in Art Club we painted with tissue paper.  The technique is really fun and easy. All you need is some heavy paper that can take getting wet, tissue paper that will bleed (spectra tissue works really well), and a spray bottle of water.The first step is to tear the colored tissue into smallish pieces and arrange them on the heavy paper.Next, spray the project with water. Make sure that all of the tissue is wet and touching the paper (the color will only transfer where the tissue touches the paper).The last step requires patience. - Let dry.  As the tissue dries the color will bleed onto the paper below. Anywhere that the tissue colors overlap will give a blend of color that is sort of magical to watch.After the project is dry it is time to remove the tissue paper. If you remove the tissue too soon, the paper underneath may get damaged or torn.We plan to use these papers to make covers for books that the students will take home at the end of the year.  I have sewn blank papers (copy paper folded in half) together for the middle section of the book. The covers will be mat board covered in our tissue painted papers. I think we will use black duct tape for the spine.Before I do any more on the books I need to make some graduation announcements and senior recital invitations for M.  There is never a dull moment here on the farm.

Flock of Turkeys

I am glad P is around to remind us of the importance of family holidays even when it is just the five of us here. She loves all of the little details that set a holiday apart from any other day.  Last year when we had Thanksgiving dinner with friends, there were place cards for each of us on the table. P remembered this and set to work yesterday morning making place cards for our table.I had a quick idea of a way to add a turkey to spiff them up. Here is a quick tutorial if you want to make your own (If we had thought of this before Thanksgiving day I would have posted it earlier. You can just file this idea away for next year.)First, gather your tools. We used a two inch flower punch, a one inch circle punch, a standar hole punch, glue, and a fine point marker.You will also need some fancy paper. Double sided craft paper works best for the tail section.Next, cut out one of each size circle for the turkey body parts. From left to right they are the tail, body, and head.Fold the largest circle so that the back edge peeks out behind the front. Glue the folded paper together and then add the body and head as shown. Use the marker to make a face.Lastly you will glue the turkey to the card and add legs.The legs can add quite a bit of character to the turkeys. 

P's Super Easy Cat Bean Bag Tutorial

P made another cat bag today. We thought we'd share a tutorial. Here is the pattern It is on one inch grid so that you can draw your own. I hope you can follow P's directions.1. Fold the fabric over and put the cat on top of the folded part and then cut it out. Then take the pattern off.2. Put pink thread on your sewing machine.  Sew around the cat. Leave a little hole on the bottom.3. Turn it right side out. Make the face with a permanent marker.4. Stuff it with rice. (about 3 tablespoons). Sew the hole on the bottom closed.5. Hold the cat upside down by the bottom corners.6. Put one corner under the other.7. Stitch them together.Another kitty for the set.There you go. Super cute and you can even wear it on your fingers.

Happy Spring!

Happy Spring!I love spring. I love the excitement of new flowers, new growth, the earth coming back to life after the long winter.The egg has been a symbol of rebirth of the earth for more than two thousand years.  In honor of the first day of spring we decorated these "Tie Dyed Eggs" last night. It was easy peasy to get these fabulous designs. We used some old thrifted silk ties and the easy to follow tutorial at Our Best Bites.I only had five white eggs on hand so we only dyed five. I'll be saving up the white eggs and dying more.  I think they turned out great. Next time I will try starting with wet silk fabric because I think there were some air bubbles that kept the dye from transferring properly in places.I picked up a few more 25 cent silk ties today! I think we'll have an egg dying event later this week!Try it! You will love this project!Edit to add. A new and updated link for directions here.

Play Capes

Last week I made four new play capes for P's preschool. It was a great way to use up some fabric I had gotten at garage sales and it helped clean out the sewing room!My original plan involved doing a little tutorial to post with them. I tried taking pictures as I was making these but the pictures didn't really show what I was doing very well.I can share my pattern and a description of how it goes together.These are really fun to make as you can use almost any fabric. You can make them short like a capelet or long and flowing to the ground. I like that they can be used for many kinds of play.This is the pattern and how it should be placed on the fabric. If the selvedge edge of the fabric looks nice, place the front of the hood on the selvedge edge of the fabric and there is no need to hem.The length of the cape is determined by the height of the child or thelength of the fabric on hand. The fold edge of the pattern goes from the neckdown the back of the cape.1. Cut out as shown above.2. Sew the two hood pieces together on the curved edge.  I use a flat felled seam for better looks and longer wear.3. Hem and add any desired trim to the outside edge of the cape (all except the neck edge.)4. Gather the neck edge of the cape and sew to the bottom of the hood. I either stitch the seam allowance to the hood or cover the seam with bias tape for longer wear.5. Sew velcro tabs to the edge at the neck seam and embellish with a fancy button.Here is a cape I made for P last year.  (please do not sell items made from this pattern)

Marking Fabric for Embroidery

I thought I would share my easy, peasy, low tech method for marking my embroidery designs on fabric.I use freezer paper for a lot of things in my sewing room, such as, marking designs for embroidery.  First, I draw or trace out a design in pencil.   Once I have the design finalized I trace it onto the dull side of a piece of freezer paper.  I go over the design with an ultra fine point sharpie pen so that it is very dark.Next, I place the shiny side of the freezer paper on the fabric and press until the freezer paper adheres to the fabric.  Then, I hold or tape the fabric up to a window and draw over the design with a fine point pencil. A mechanical pencil with a 0.5 mm lead works well. The freezer paper acts as a stiffener for the fabric and the fabric doesn't wiggle while you draw the design.This method works great for small designs. My mother always said one should "make hay while the sun shines." With this method that is very true. I make sure I have my fabric marked before the sun goes down if I want to stitch in the evening.  Also, the design ends up reversed with this method.  If this matters you should trace onto the freezer paper with the original pattern reversed.Here is the finished cat from this drawing.

Quilt Binding Tutorial

People often ask ask how I bind my quilts. I have started binding both the large and small quilts the same way, with a single thickness binding. I have never had a binding wear through on a quilt and I like the way the thinner binding allows the quilt to drape. It gives a soft edge. If the binding were to wear through it would be easy to replace it.  I have written up a tutorial explaining how it is done. The link will be in the tutorial drop down for easy reference.

Handkerchief Doll Tutorial

As I mentioned here, my grandmother could entertain children all day with a button, a handkerchief, and a piece of string. When I was little she taught me how to make a doll from a handkerchief. The boys eagerly volunteered were given baked goods as payment for being hand models for a tutorial on how to make the doll.First, stand or sit opposite your friend. Each person take two corners of the hankie and roll them towards each other to meet in the middle as shown below.When the two sides meet, rotate the hankie 90 degrees so that each person now holds two corners that are touching.One person then folds his or her corners down about one third of the length of the hankie. These corners will be the feet of the doll.The other person then folds his corners up leaving a little of the hankie showing above the corners. These corners become the hands.The last corners that were folded up (the hands) then get crossed through the loop formed when the first corners were folded down. Each person then tugs a little on the corners in their hands to stretch the arms and legs.Last, slip a ring or tie a string just above the arms to shape the head.Now you have a finished doll.If you want to use the hankie or make another doll just remove the ring or string and shake it loose.