Accidental Design

I happened to pause while quilting and glance at the thread cone on the machine and noticed this pretty design. The diameter of the thread left on the cone and the length of the color pattern on the thread combined to make a really interesting pattern. It usually looks like random color on the cone.

I had to pause for a photoshoot. Now, back to sewing.

Summer Scheduling

I've been working and sewing like crazy lately and beginning to feel like Miss P was getting the short end of the stick. We've changed around our daily plan and have made more time for some "fun for her" stuff.

She really enjoys a good popcorn picnic with stories in the yard. We are happy that our heat wave broke for a few days and have been spending a little more time outside. 

We have been trying to have fun with our chores too. She liked giving the garlic bulbs haircuts yesterday. We have also mastered the "two minute tidy" where we set the timer for two minutes and then both tidy up very fast. We can really get a lot of stuff put away in two minutes! That's a fun thing to do right before we play a game or start to fix dinner.

I've been trying to sew before she gets up in the morning, after she goes to bed, or while she is busy with a project of her own. Sometimes, though, she wants to help with the sewing. Today we whipped out some Flea Market Fancy improv blocks.

Well, I'd better go. She says it's my turn for Spirograph. 

I May Need an Intervention

The other day when I posted pictures of the half inch hexies I was basting, Chawne asked if I needed an intervention. Well, maybe I do....That project is not the only crazy tedious thing I've been working on. Back in December after Miss Petunia got her dollhouse for Christmas, she and I started working on a few things for it. First, we decided to make a braided rug. I found three different colors of crochet cotton, white, pink, and a pink/blue/green/yellow variegated in the sewing room.  We braided, and braided, and braided. Then it sat for a while. Occasionally we would remember about it and braid some more. We filled a spool with braid.  A few days ago I thought we should start stitching it.

We take turns stitching; I go around the corners but she is pretty good at stitching on the straight sides.

It is slowly growing into a longish rug for the hallway. I think it is turning out pretty great. Miss P wants us to stich faster so it can be finished!

Other noteworthy items:- M now has a triathlon racing bike and fancy shoes clamp to the pedals. I'm too old for that sort of foolishness. I wouldn't remember that my feet were stuck to the pedals and would fall over at stop signs.  We went to the high school track where he tried it out and Miss P gained a little confidence on her two wheeler.  The track was a big hit; it's much easier to ride there than on our dirt/gravel driveway.

Miss P's baby celebrated her first birthday (again).

We'll use any excuse for a cake around here.  P and I also made a baby gown for the baby as a birthday gift! Fun times.

A couple of evenings last week we went up to the lake to try to beat the heat and get cooled off at the end of the day. Friday, the lake water was so warm it was like swimming in bath water - not as refreshing as I had hoped but still fun because we all went together.

Hand Stitching Prep

The other night I emptied the scrap bin and cut hexagons in groups of six. I just held the paper hexagon template to the front of the fabric and cut a hexagon with quarter inch seam allowance with my scissors. Some pieces of fabric were large enough that I could fold cut six at a time with my sharp Ginghers. The Kona sample pack of the new colors I got at Quilt Market was perfect for the centers.

I was also compelled to try some hexies in the 1/2 inch size. They are so cute. I don't think I'll be making a whole quilt from them but they will be fun for smaller projects.

For those of you who are not familiar with English Paper Piecing, it is a traditional method for hand piecing quilts. The fabric is basted around a paper foundation and held to shape by the paper so that the pieces can then be sewn to each other.

Some people use glue or a fabric glue stick to baste the fabric to the paper foundation. I prefer to thread and baste them without stitching through the papers. This way the basting can stay in after the papers are removed. The basting stitches will keep the seam allowances in place until the quilt is put together with the backing. Here's a picture of one that I have basted. I take two stitches to start  - the second stitch traps the thread tail and keeps it tucked toward the center. Then, since I'm left handed I proceed counter clockwise turning down the seam allowance and taking one tiny stitch to hold the fold together. On the last corner I take two stiches so that I can again trap the thread tail. This method is pretty quick.

The next step is to stitch them together into flower shapes. They could be sewn together in any sort of pattern but I'm making flowers for this project.

I'm getting a bunch of these ready and put in a bag for portable sewing. It'll be a great project for the car.

American Chestnut

It's been hot and muggy here for quite a few days. I went out for a quick stroll after a two minute rain shower this evening. Really, I dashed out to get the little chicks out of the rain and by the time I was back inside and had dried off my feet the rain had stopped. Still, it was nice while it lasted. We are weary of moving the soaker hose around the gardens.Anyway, I mentioned that I went for a short stroll-- I noticed that the air behind the barn was thick with a heavy pollen odor.

The American Chestnut is putting on quite a show.


Antique Quilts at International Quilt Market

I was looking through last month's photos from quilt market and found these pictures of some antique quilts that I never shared with you.

There were several booths of antique quilts. I loved this wall of hanging quilts.

In the same booth was this unusual leather quilt with a wool felt edging. I have never seen anything like it before.

This applique quilt with just a touch of embroidery was interesting. I like the aged color of that green.

I love the close grid quilting and feathers on this basket quilt.

This French one, however, stopped me in my tracks. The quilting was incredible. I stopped for a second look but it had already sold. I'm glad I snapped a photo the first day when I saw it.

Pink Pixie Hat

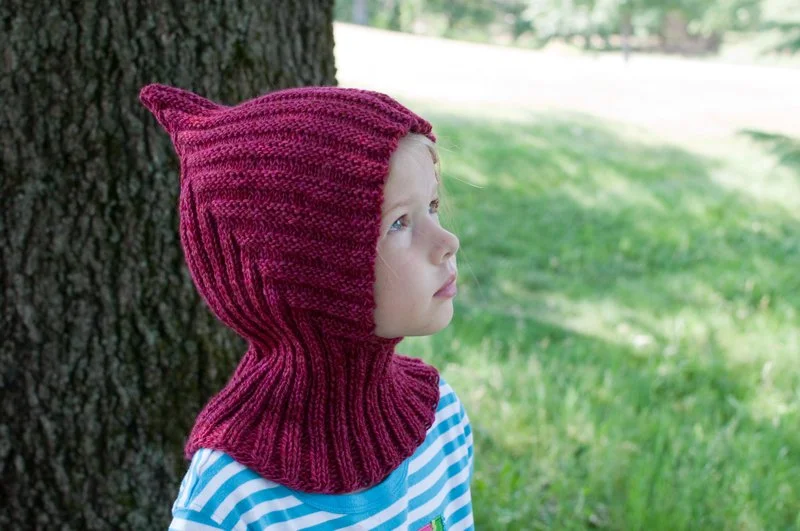
I finished a larger version of the pixie hat for P to wear next year.

This one fits much better. The neck/scarf section is longer and will stay tucked into her coat better.

For this version of the Lyalya Hoodie I used Cascade 220 yarn. I do like the look of the more solid color yarn with this pattern. Miss P is thrilled with it.

I thought I might like one of these for myself but when I tried it on it made M laugh. I guess a second grader can pull off a pointy pixie hat look better than I can. 

How to Make a Wooden Spoon - guest post by P

Have you ever wanted to know how to make a wooden spoon?

This is how I did it.

First, trace a wooden spoon from your kitchen onto a piece of wood. Then, have someone cut it out with an electric saw. Then, you use a spokeshave to shave the wood down to the line that you traced.

Then, make the handle round with the spokeshave.Next, use the spokeshave to shave wood off the back of the bowl to make it rounded.

Then, use a gouge to carve out the front of the bowl. Switch to a flatter and wider gouge to smooth those gouge marks out.

Last, sand the spoon to make it smooth.

Ta-daaa! Now you have a wooden spoon!!!!!!!!!!!!!!!!

(note - P's father has taught her how to use woodworking tools safely. The spoke shave is a fairly safe tool, gauges are a bit more dangerous and should be used with direction from someone who knows what they are doing)