patchwork

Log Cabin Mini

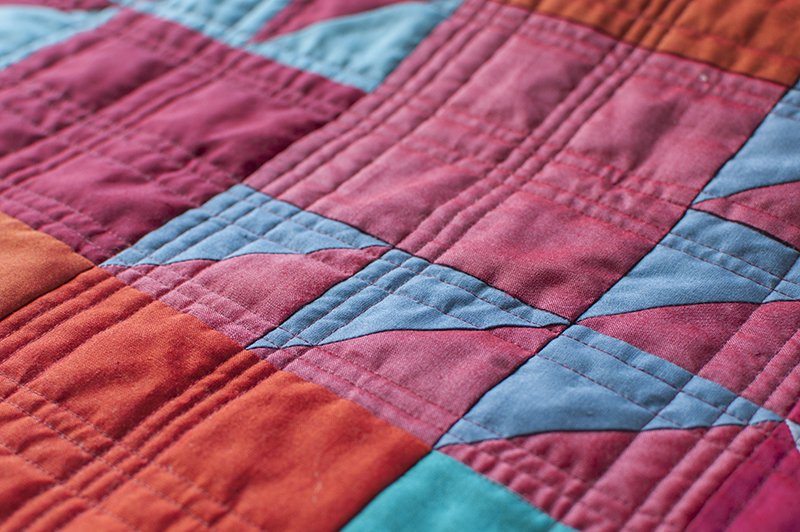
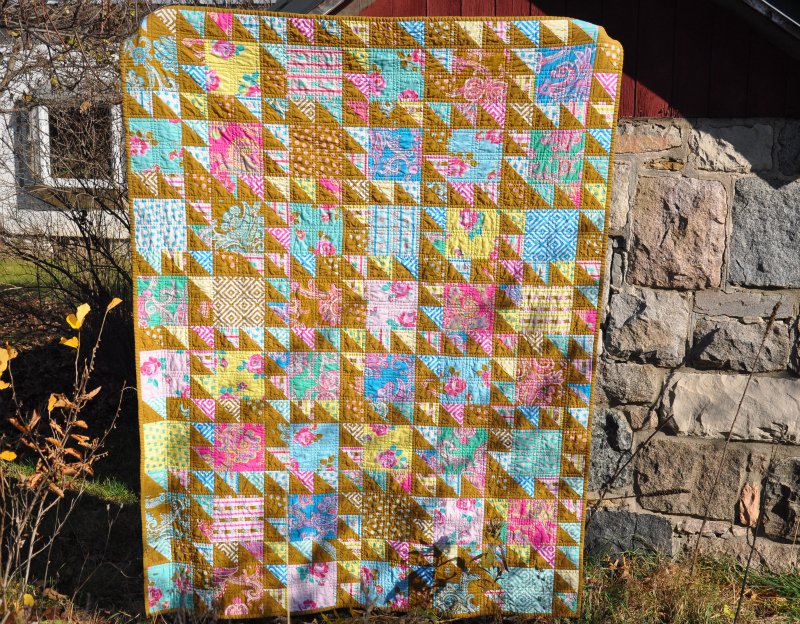
I started this little quilt last summer. It's a fun variation of a log cabin. The blocks are made in an improvisational or intuitive way that I teach in my intuitive log cabin class.  

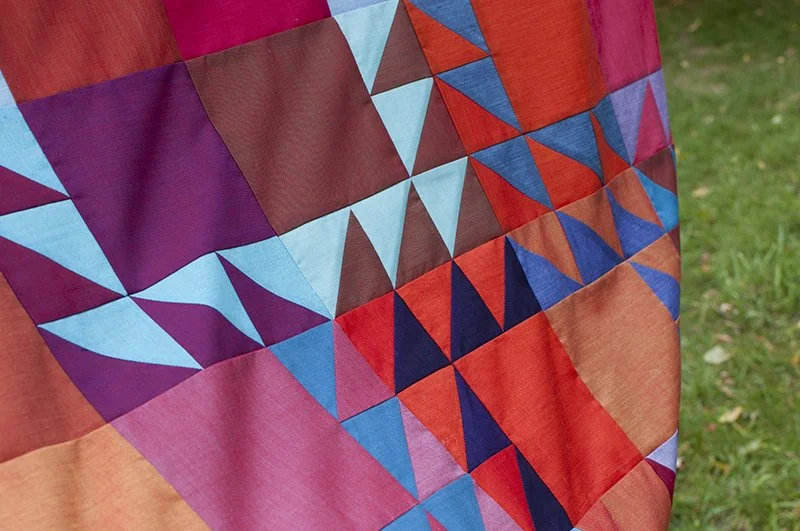
I love the way some of the same or similar color fabrics come together and make a different visual shape, like the yellow and green angles in the photo below. 

I enjoyed hand quilting this one. I carried it in my project bag and took my time working on it while waiting at lessons and such. 

The deep purple binding gives it a nice finish.

Finished size 16'' by 14.5''. 

Hazel Hedgehog - the most exciting thing she has EVER done

Miss P is thrilled that she will be an aunt in July! Shortly after she heard the news she started planning all of the things she would make for the new baby. First up - a  quilt. She was already a fan of Elizabeth Hartman's patterns, so narrowing the choice to one of her designs didn't take long. She always told me they were SO CUTE! It was a close call between the kittens and the hedgehogs. Hazel Hedgehog was the final choice because the baby's mom is a hedgehog fan.She decided that if she was going to put all of that work into it she didn't want the baby to outgrow it quickly. She upsized the baby quilt to be four rows of four blocks.The four by four layout requires 16 blocks, an even number, just right for making two hedgehogs of each color. The baby can play "match the hedgehogs".Miss P went through my fabrics and chose lights and mediums of eight different colors for the faces and bodies. The spines for each would be different. I helped by cutting everything with the rotary cutter but she did the sewing by herself.This project required quite a bit of planning ahead to be finished in time for the baby shower. She sewed two blocks at a time over MANY weekends. It was an exciting day when all of the blocks were finished.Next up was the sashing and pin basting.Then came the quilting.When the last stitch of binding was finished she said, "Now I can say that I have made a quilt!! This is the most exciting thing I have EVER done!!!"Miss P asked me to thank Elizabeth Hartman for designing this cute pattern, and for encouraging her along the way, even if she didn't know she was doing it.Congratulations to her for getting it done! She finished just in time for photos the day before the shower - as one does. I am so proud of her! 

Heirloom Coverlet

I love old quilts and especially love this coverlet my grandmother gave me when I was in high school.It was started by her mother and lacked several blocks from being complete. She shared it with me and asked if I would like her to finish it for me.Of course I wanted her to finish it for me!It's a simple block but just look at those fabrics!I love this old searsucker print, isn't it interesting?Can you tell which blocks my grandmother added?Those 1970s fabrics have quite a different look.

The Splendid Sampler - Wings

Have you started the Splendid Sampler sew along, a year long sew along organized by Pat Sloane and Jane Davidson yet?I have finished the second block, Wings, designed by Jane Davidson.I had a hard time deciding if I wanted to add the embroidery detail. Here is is with the first block before I added the antennae.I have enjoyed scrolling through the #TheSplendidSampler hashtag on Instagram to see all of the different versions of the blocks. Come join the fun and add your photos.

Postage Stamp Quilt

I've been working hard to finish projects lately.This postage stamp quilt that I put together last fall is the most recent finish. See this post for details about the piecing process.The cheery colors and fun fabrics are making me deliriously happy as we wait for spring to arrive. It is still dreary and brown outside but the chickens have been out scratching in the garden and we have had a few sunny "no coat" days! Spring is coming. I'm sure of it. I snapped these photos this morning just before it started to pour rain and I am now listening to rumbles of thunder as I type. It is a happy day.I recently purchased a roll of Quilter's Dream wool batting and have  wanted to try it.I LOVE the way the wool quilts. It may be my new favorite batting. It has just the right amount of puff and isn't heavy. They say it is washable but I haven't washed this yet. The wool also springs back a little better than the cotton after being folded. I'll be sure to let you know if I have any problems with it but so far it's a winner.I quilted it in a simple point to point quilting pattern that follows the shape of the squares.I worked across the quilt back and forth repeating the following two stitch patterns.This simple quilting design doesn't detract from the postage stamp pattern while giving it just enough oomph.The "S" curves make an interesting twisted square shape.The backing is this fun Ikea fabric that I've been saving for years.It is quilted with a subtle variegated thread.I think it's time to start a new quilt!The finished quilt measures 46'' by 58''squares are 1.5'' finishedbatting - Quilter's Dream woolquilted with Aurifil 50wt #4651

Tiny Pieces

I'm back from a whirlwind trip to Houston for fall Quilt Market. I haven't fully digested it all yet but I wanted to share some of my favorites from the antique booths.You all know I have a weakness for quilts with tiny pieces. Have a look at these. I put my lens cap in the photos for size comparison.I love a good feathered star. There was a double row of the little sawteeth all the way around the quilt.These snowball blocks were pretty sweet.How about these little fans? Sigh.It makes me want to cut and sew all my scraps.This star block was interesting in that not all of those star points worked out the same. This was made by a "make it work" quilter. The slice of muslin at the point on the right sure adds interest to the quilt. 

Butterfly Basting

I made enough progress on some other projects that I decided to pull out an old WIP. It is pressed and ready for pin basting.I am eager to have this quilt on my bed! It is so bright and colorful, AND it will actually be big enough to cover the sides of our super thick mattress.I plan to quilt in in a pretty brown/tan thread with something that looks breezy. I'm not sure what that is yet, though.Do you have any thoughts on breezy looking quilting designs?Previous posts on this project:Spring Butterflies - Miss P paired the fabrics for the blocksColor Play - arranging the blocksMore Color Play - a different lookButterfly Migration - the quilt that inspired this one.

Ruby - the finished quilt

The Ruby Oakshott quilt is finished and I thoroughly enjoyed the quilting process on this one. It was a delight to watch the fabrics move past the presser foot. I was mesmerized by the subtle color change of the fabrics as the machine moved them along.I did some close line quilting (quarter inch spacing) to cause the fabric to bend and show the different colors of the warp and weft.Have I mentioned how much I love this fabric?  Oakshott Fabrics is a small family owned company and I want them to succeed. Here's a little video about them that you might find interesting. I don't have a deal with them but they did send me these red fabrics, seriously though, I'd tell you if they weren't good. I've actually ordered more fabric from them, (cough) twice this month.M came in the sewing room when I had the pieces for this quilt cut and piled on my sewing table and noticed the color change as he walked across the room. He snatched up a couple of pieces for closer examination and then declared, "This fabric is AWESOME!"I have to say that he has NEVER said anything like that about any of my fabrics or projects before. Now, if fabric can get a teenage boy to take notice it's got to be good.In thinking about how to finish this quilt I decided that I wanted it to end with the edge of the piecing, that is, to have no bound edge. I finished it with a facing, like you would use in garment construction.It took a bit of fussing to figure out how to do a facing and get the sharp looking corners that I wanted. I'm happy with the finished look.I didn't take photos of the steps for adding the facing -  now that I have figured out a process that works for me, I'll photograph it if I do it again.Here you can see the facing. I edge stitched the facing to the outer edge of the quilt so that it would more easily fold to the back. I hand stitched the inner edge of the facing to the back of the quilt.I like the clean looking edge.

Ruby Reds

I finally put together theOakshott Ruby Red quilt top. I started with the Ruby Red pack of Oakshott shot cottons and paired them with some cool colors from my colorbox.I made the blocks back in the summer and at the time thought they needed some sashing between them.I chose a deep purple for sashing that was out of stock for a while.Ruby Reds 3The sashing fabric arrived Monday morning but when I tried them together I didn't like that look either. It was a bit boring. Then, I tried setting the blocks turned in different directions. The interaction of the blocks made it much more interesting.Here's the full view.If you haven't tried any of the Oakshott shot cotton, you really should. It has a beautiful luminescent quality that just can't be captured in a photo. Believe me, I've tried.

That brings the finished quilt top number to SIX that are ready for quilting. I'd better get busy.


Rossie Made Me Do It

I've really been busy sewing since school started. It's a great feeling to be able to sit and get things done! Here's another finished quilt top to show for my hard work!This quilt, Rossie Made Me Do It, was made using my swiss chard blogger bundle for Pink Castle Fabrics. I got a half yard bundle and used two thirds of it. The pattern is Honey from Elizabeth Hartman's Modern Patchwork. I plan to finish my quilt with a zig zag border instead of trimming the side blocks.  I like the scrappy look to it.

I think this quilt would also look great as a real scrap quilt. It would be a bit more tedious to make, though. For this quilt, you sew the white to other fabrics together in strips and then cut them into triangles. For a scrappy quilt you would have cut the triangles and then sew them individually to the white "grout" strips.
I started this quilt while at a retreat with the Ann Arbor Modern Quilt Guild in August. I brought the bundle to work on but didn't have a plan yet. Rossie suggested that I make the quilt on the cover of Elizabeth's book. I think it was a good suggestion. Thanks Rossie.
Now, back to sewing. Today I'm putting together a king size Point Me commission quilt using Denyse Scmidt's pattern. I'm on a roll!
My unquilted tops pile is really growing though. I feel a big quilting session in the near future.

Medallion!

Last week I attended Gwen Marston's 2012 quilt retreat. The theme this year was medallion quilts. I love the look of medallion quilts but I was a bit intimidated by making my own. It is not a style that I'm very comfortable working in.I was floored by the number of medallion quilts that Gwen had to show in her presentation, given that the quilts in her book, Liberated Medallion Quilts, are currently in a traveling show.  She shared many different styles and fabric palettes. She is an amazing quilter and I am grateful that I have been able to attend her retreats.When packing, I went through my pile of unfinished projects looking for something that I could use for the center of the quilt. I found several applique pieces that I had done about 10-15 years ago. Not knowing really what I was going to do or what might inspire me when I saw Gwen's presentation, I chose three applique pieces and fabrics to go with each of them.In the end, this purple batik block was the one I worked with while at the retreat. The center applique design was from Elly Sienkiewicz's Baltimore Beauties and Beyond: Studies in Classic Album Quilt Applique, Vol. 1.I started with the applique and thinking that sawteeth look good on pretty much anything, I added those first. Then I made the star blocks. The size of the finished star blocks dictated the size of the greenish border that came between the sawteeth and the stars. A narrow purple border with green corner stones came next.At this stage, I decided to set it on point - which doubled the area of the quilt. I added strips of half square triangles and then let the large scale of the the fabric do the work in the rest of the corner. The last round in the medallion is border of the same purple fabric used earlier. I love the way it made the little green corner squares appear to float.I am thrilled with the results of the medallion building workshop. Maybe some day I'll make medallion quilts from those other long forgotten applique pieces. I am inspired to try different techniques and border styles. As always after retreat, my head is spinning with ideas.It was lovely to spend a few days relaxing and sewing at the retreat.White Birch Lodge, Elk Rapids, MI.

The Back Story

Each quilt I make has some sort of inspirational moment - something that makes me actually start the quilt.This quilt started with the back, this one yard piece of baby flannel.I picked this fabric up at a garage/rummage sale many years ago. Back then, I made pajamas for the boys out of most of my thrifted flannel. I made a few more baby items when miss P was small but this one somehow got left behind. The last few times I have cleaned my sewing room I put it in the purge bag. Each time I also took it out thinking that it would make a good backing for a baby quilt. Well, this last time as I took it out of the give away bag I told myself "If you are going to put this on the back of a baby quilt you had better do it NOW."And that's what I did. I pulled three solid fabrics in the colors of the flannel print and added scraps from the top of my scrap basket. The scraps are mostly from my recent quilts - Brenda's Stars, and the two quilts I made for Jennifer Paganelli.Here it is in all of it's washed, crinkled, and sunshine glory. I love the mix of squares and half square triangles.I think it makes a pretty happy looking baby quilt. Not bad for a clean up the sewing room inspired quilt.It measures 36 by 42 inches.  

Pinwheels and Strings

Last night I finished hand stitching the binding on this Pinwheels and Strings quilt.This scraptastic quilt is heavily quilted and finished with a half inch binding.I have started putting more quilting on quilts that will be used and washed. My early quilts didn't have nearly as much quilting on them and I have found that with wear and washing some of the quilting threads have broken. More quilting means that there is less stress on any single quilting thread.Also, I like the half inch binding better for wear too. After quilting I trim the batting and backing to 1/4 inch bigger than the top. That way I can avoid clipping any of the quilting threads and they will not be able to slip out from under the binding seam.  Straight quilting lines will have an extra quarter inch of stitching to help keep it from pulling out.The finished quilt measures 83.5 x 60 inches.And I think I can still pull a few more scraptacular quilts from the scrap bin!

String PInwheel Top

Yesterday, miss P was home with a fever. She worked on making some Valentines while I pieced this string pinwheel top together.I'm pretty happy with it so far. I think I'll use a multi color thread for the quilting over the strings and maybe a blue for the pinwheels - or maybe the pinwheels will be left unquilted. I haven't decided yet.I need to order more batting so I have some time to think about it.

String Quilt Update

I've been working on the string quilt! It turns out I couldn't read my own handwriting and I needed 140 six inch blocks instead of 130. I whipped out 10 more of those yesterday and went on to phase two - sewing triangles to one corner of each block. Phase three - making four patch pinwheels from the six inch blocks. Here's a big 12 inch block comprised of four of the smaller ones.I think I'm really going to like this one when it's finished.I hope you are having a great Crafturday.

Crazy Love Quilt

I finished the binding on this Crazy Love quilt this morning. I am pleased with how it turned out. I used a blue Carolina Chambray from Robert Kaufman for the triangles and binding. I like that the zig zag of the blue makes diagonal channels of color.I chose to do minimal quilting on this to echo the diagonal lines of the blue. I quilted in the ditch on all of the seam lines and then one walking foot width to either side of the blue triangles as seen here.You can see a corner of the  pink tone on tone fabric Jennifer sent for the backing in the picture below. P was hoping there would be some extra of that fabric!The binding on the quilt is 1/2 inch wide.It measures 64 x 79 inches.Fabrics are from the Crazy Love line coming out this spring from Jennifer Paganelli.I started my next scraptacular quilt today. It already has some Crazy Love scraps sewn in. It will be one of those quilts that includes all kinds of fabrics. After a couple of quilt finishes I found that my scrap bin is over flowing again and the tiny stars are just not putting any dent at all in that huge pile of fabric.  I have started a scrap intensive quilt. I'll share more later, after I have a few photos.

Twinkling Stars

I finished the binding on this quilt a few days ago. I was waiting for a good weather day for photos but it has been dreary and rainy everyday. I am tired of waiting and want to share this before the year is over. It is my last "finish" of 2011".I started this quilt in September 2010.As I said before while making it, I am thrilled with this quilt.The finished quilt is 67 by 73 inches.Here's a peek at the back and my photo helper.I think it has found a new home. Or maybe it'll be a bed topper. Or maybe I'll just carry it from room to room with me!You can see the rest of my 2011 finished projects here.Hope you have a great New Year's Eve. We are having game night with some friends.

Mustard Melody

Here's the finished quilt Mustard Melody.It is made with a fat quarter bundle of Jennifer Paganelli's Poodle line and 2.5 yards of a Robert Kaufman Carolina Chambray in a mustard color. I don't know what the actual color name is.It has been quilted, bound, and washed. I used a half inch binding for a little bigger than usual frame around the design.Here's the full view.The block, birds in the air, finishes at 10.5 inches.The large piece in the block is cut 7.5 inches square. The half square triangles are 4 and 3/8 inch squares cut on the diagonal.There are 48 blocks in the quilt. I mostly used the largest prints for the big squares but added in a few of the smaller prints to make all 48 blocks.The quilt shrank up a little with quilting and washing and now measures 59 by 77 inches.