We've been working hard on wedding prep this summer, mostly that involves lots of cleaning in the barn.I took advantage of a clean barn wall yesterday to take some pictures of my latest quilt finish. This quilt will be for the wedding photographer; we have worked out an artist trade. The pattern is Lucky Strike by Vintage Modern Quilts.Megan, the soon to be bride, picked the pattern and fabrics to suit the wedding photographer's mid century aesthetic. She chose fabrics from my stash and says the inspiration for the fabric pull was "beachy." There are two prints and the rest are solids. The pattern calls for 9 half yards but we used about 18 fabrics. There was a bit of figuring before diving in to the cutting to make sure I could get all of the bowling pins cut from the smaller fabric pieces.
 The pins are quilted with a loopy figure eight design in a pretty peach thread and the background has randomly spaced vertical lines in white thread to match the background.
 There are a few scattered turquoise "KAPOW" style starbursts to add to that vintage feel.
 I am really pleased with the finished look of this quilt.Finished quilt: 63'' by 80''Batting: Quilter's Dream woolQuilting thread: Aurifil #2021, Glide coral 51625, Floriani turquoise pf293
Framed
Do you remember my new custom Sizzix die? I used some of the little one inch squares I cut with it and made a mini version of Don't Fence Me In. I love this design; even small scale it is a great way to showcase quilting motifs.
 Rather than loading it on the longarm, I quilted it on my domestic Bernina. I stitched in the ditch around each of the little 1/2 inch half square triangles.
 The tiny stippling around the wreath helps give the feathers and triangles a bit more definition.
 After cleaning up in the barn I think I have located another quilt photography location! What do you think? I'll try some larger quilts there and see how they turn out.
 The finished quilt is 12" by 12".Quilted with Aurifil #2021.The Ann Arbor Modern Quilt Guild is participating in a mini quilt swap with the Chicago Modern Quilt Guild. This quilt is for my secret partner in the swap. I hope she likes it.
Crafturday

Coal Seam
Coal Seam Coal Seam is a result of experimenting with inserting slivers of orange fabric into triangles of black fabric. When deciding on the layout, I tried lining up the orange strips from one triangle to another and was amused to see that I could have cut the triangles from a long strip of black with a skinny strip of orange through the center. That would likely have resulted in a less whimsical collection of triangles and it's not the way my brain works when I am sewing.
 I like to cut and sew parts and see where that journey takes me. I pieced them together with the Orange lined up partly because that was NOT the way they were originally constructed.
 The quilt is hand quilted with black thread. I extended the lines of the triangles to the edge of the quilt.
 There is also a small piece of the orange in the binding.
 This quilt was started in a workshop with Luke Haynes this winter at QuiltCon.I had to quilt it quickly because Gwen Marston asked me if she could include it in her latest book, Free Range Triangles. She was already at her deadline so I stitched with a 'flaming needle and burning thread' as my mother would say.I shipped it out to the publisher before I even took a photo of it. I have it back now and can share it with you. The quilting is still a bit sparse near the edges of the quilt. I plan to add some more quilting in white thread.I am eagerly awaiting my copy of Gwen's new book.
Sizzix - a time saver
You guys, look what came in the mail!!!! My new sizzix custom die!This die has the blades to cut twenty one inch squares at a time. I can place small scraps over the die cutting surface and then run them through the Sizzix. Here's what it looks like after cutting.
  I can quickly separate the squares from the cut away trash. I had these quares cut and stacked in no time this afternoon. Since I'll be sewing these across from point to point and trimming one side to make half square triangles, I am able to use squares that are missing one corner.
 I put five layers of white backgound fabric through the sizzix and cut one hundred squares at once!!! This new Sizzix die will save me days of cutting time.To make sewing point to point easier, I put a piece of washi tape in line with the sewing machine needle. I can now line up the point of the square on that line and follow it as I sew across the square.
 Zippity zip and I have lots of sewn half square triangles. This is only the beginning.
 Now, I'm ready to sew miles and miles of tiny sawteeth strips!
 I'm crushing hard on that strip of alternating teeth on the right.
La Passacaglia progress
 I'm still slowly working on my La Passacaglia rosettes.I seem to switch back and forth between knitting socks and English paper piecing in the evenings.
Sister Shirts
My son is getting married on Labor Day weekend and miss P is thrilled to finally be getting a sister! She has been wanting a sister for FOREVER and now that both of her brothers are engaged can hardly believe that she will be getting TWO sisters in one year.When laying out the fabric to cut out Miss P's latest Flashback Skinny Tee from the beautiful knit from BariJ's new line, Anna Elise, P suggested that I make matching sister shirts for herself and Megan, her soon to be sister. I was pleased that I had just enough fabric for both shirts.Megan's shirt is made from the Sailor Top pattern from Fancy Tiger Crafts that I used for my latest shirt.I made a minor adjustment on this one for a wider back and a little more room under the arms. It seems to have passed the wearability test.
 These two sillies had fun with their photo shoot.
 Only a few more weeks until they are really and truly sisters!
 Thanks, Bari, for making their first sister shirts possible!
A New Flashback Tee
You may remember me mentioning Miss P's favorite shirt ever- Rae's Flashback Skinny Tee pattern made with Gillie Wishes from Bari J's Emmy Grace line for Art Gallery Fabrics. Bari recently asked if I'd like to play with some fabric from her new line, Anna Elise, and I jumped at the chance for another knit top for P. Yesterday, I made another Flashback Tee for P, this one is a size 9/10. It is hard to believe my daughter is that big! We love the way the Art Gallery knits wash and wear. They are so soft and really hold their shape.
 The stripe design in this Tribal Study print were perfect for a fussy cut touch on the neckband. I'm feeling pretty chuffed at how that turned out.
 Miss P is pretty thrilled with it too.
 It even passed the cartwheel and headstand test.
 Thanks Bari!
 Bari sent a generous cut of the knit and with careful pattern placement I was able to cut out TWO tops. Stay tuned for an adult knit top!
La Passacaglia Progress
While Miss P was busy in her lessons and classes at cello camp last week, I was sitting in the back working away on my English paper piecing. I stitched all of the pieces that I had prepared. After sewing all of these together I knit most of the foot of a sock.I call that a successful week away at camp!
Every Last Piece - feature quilt of the Week - Square Root
 The featured quilt this week is Square Root, another from the gallery section of Every Last Piece. This quilt is composed of four patch and nine patch blocks. The background is a plain muslin fabric and all of the other sqaures are scraps from other projects. I chose scraps that read as dark to give the finished design more impact.This was one of the first quilts I quilted on my longarm. I did an all over loopy design on it.
 There are no patterns in the book for the quilts pictured in the "gallery." They are there to provide inspiration and ideas for the designs presented later in the book.I chose this quilt to share with you now, because my friend Trudi Wood sent me this photo on Instagram and it made my day. (photo shared with permission) She is making her own version of the quilt. She figured out the layout in EQ, sized it up for a bigger quilt, and has added a border to it. She says she'll use reproduction 30's fabrics. I love that fancy feather quilting she has planned for the border.
 After reading the book she says, "I've been thinking very differently about my scraps AND my stash!"I hope there are others out there inspired to make scrap quilts after reading Every Last Piece!If you are making anything inspired by the quilts in my book please use the hashtag #everylastpiece so I can see what you're doing.
Wardrobe Sewing - The Fancy Sailor Top
Yesterday afternoon I put the finishing stitches on a new top for myself. It has been a long time since I've sewn anything new for myself. I bought the Sailor Top pattern from Fancy Tiger Crafts early last fall but didn't get around to making it until last week. The fabric I used is London Calling, a light weight lawn from Robert Kaufman.
 I love the thinner drapier fabric for this top.
 The pattern is listed as a beginner pattern and went together pretty quickly.I love the narrow yoke at the top.
 I know I'll get a lot of wear out of it.
 I want to make a few more of these.I'm off to scout some pretty knit and rayon fabrics to try with this pattern.
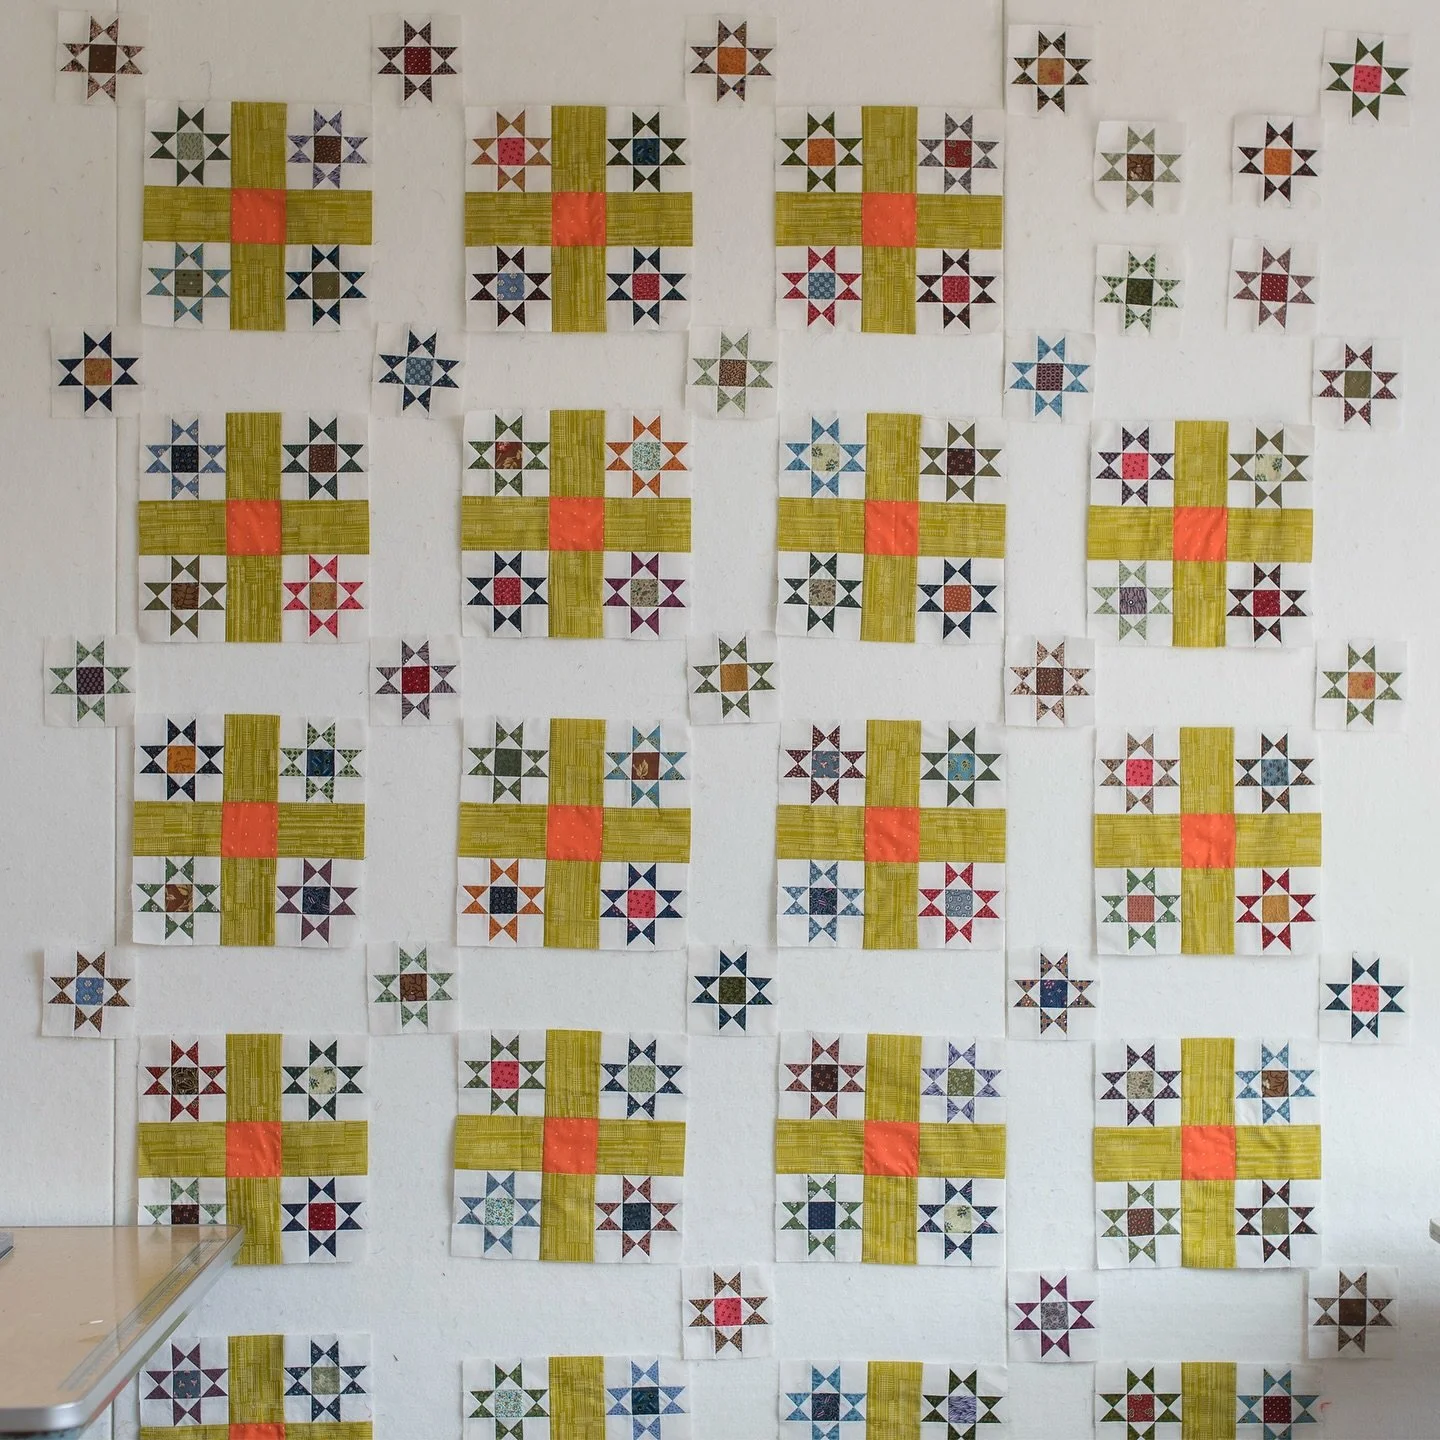
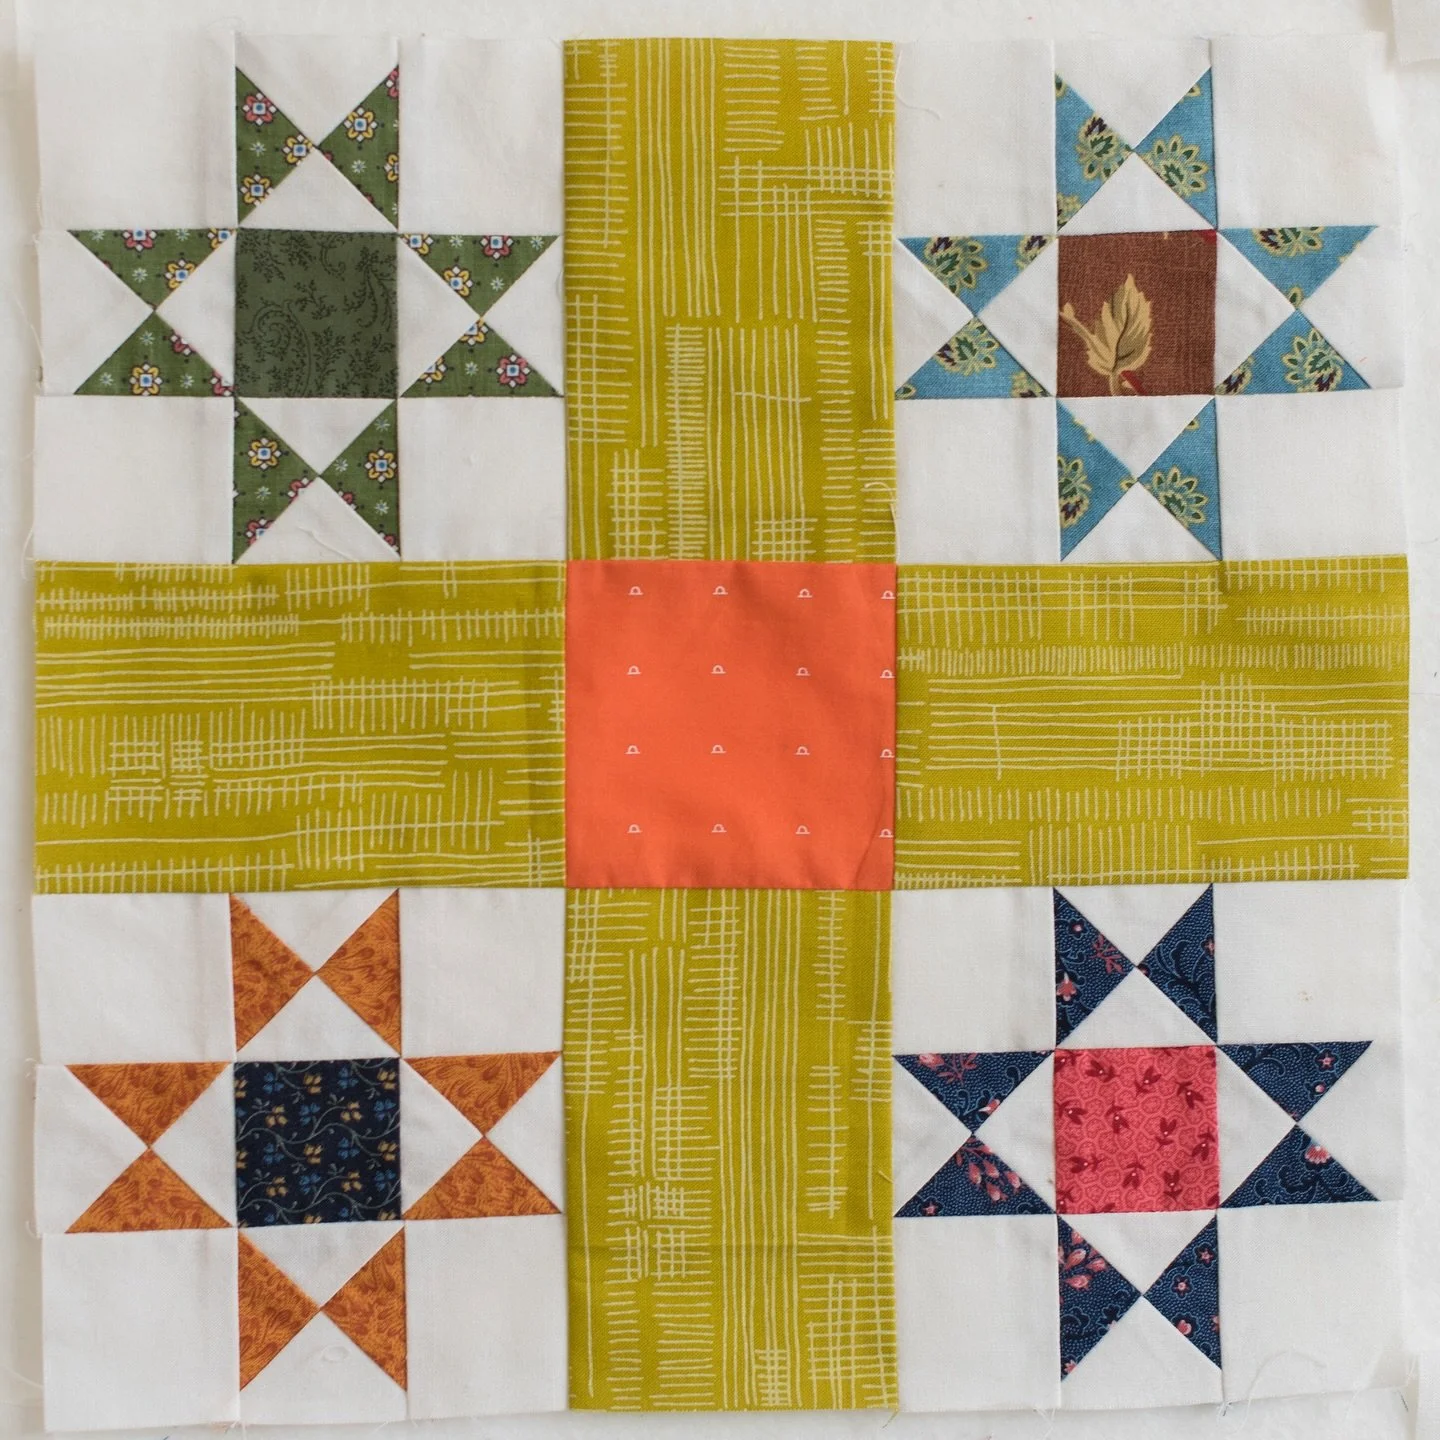
Four Patch Fun
 Remeber last week when I told you I'd been cutting up my smaller scraps? Well, I worked until I had most of the tiniest bits cut into 1'', 1.25'' and 1.5'' squares. I also used the sizzix to cut triangles that will finish as 1'' HST
 To save time cutting scraps in the future I'm getting a new sizzix die for cutting 1.5 inch squares. I've also ordered a custom die for cutting the wee little one inch squares. I am so excited about the one inch square die! They are making it to cut TWENTY SQUARES AT A TIME!!!! I have plans to make miles and miles of half inch sawteeth strips. The new die will certainly speed the cutting process.Have you ever seen any of those amazing antique quilts that feature tiny sawteeth? They stop me dead in my tracks and make me weak in the knees. I am inspired to make a quilt inspired by some of of those old beauties made from tiny pieces of fabric.I spent some of the day yesterday sewing the little one inch scrap squares together. I like the look of smaller block compositions as seen above.I'm also taking the time to twirl all of the seems on the back when pressing. I think it will give a better look to the finished quilt. It sure helps the corners match up and the blocks are very flat. The small squares are also not distorted by the bulk of the seam allowances.
 I'll keep making these and play around with setting ideas for a while.----Disclosure - product links in this post are affiliate links.
Every Last Piece - feature quilt of the week - The Color Purple
 This week's feature quilt is The Color Purple, from the gallery section of Every Last Piece. My sister and I worked on this one together for my niece's high school graduation. We each used purples from our fabric scraps and kona snow for the solid background. It has a very controlled but scrappy look. The large and small square diagonal rows are very prominent. My niece used this quilt in her dorm room at UNC Chapel Hill for four years. I know she is eager to get it back so that she can use it again.This quilt pattern, Double Four Patch by Judy Hopkins, is quick and easy to put together from 2.5" and 4.5" squares of fabric. In fact, this was the third quilt of this same design I have made. Here are two other versions that I made for my nephews before I started blogging.I was quite happy to use so many of my scraps in one quilt when I made this first version. The lights and dark pattern is less obvious here but there are so many memorable fabrics in this early quilt -so many fabrics that I recognize from clothes I made growing up. I see scraps from pajamas I made for my boys twenty years ago! My nephew used this quilt four years at NMT and then through graduate school at VA Tech.
 This is the second of this pattern I made. The lights and darks here are a little more obvious but still all the fabrics are scraps. This quilt has also gotten years of use in my nephew's room at home and his dorm room at UVA and next year will be in his room in a house he is sharing with THIRTEEN other boys. Yikes. I hope this helps him know where his bed is! I hear that next year he will be able to look out of his window and see a house that Georgia O'Keefe used to live in.
 It sort of makes me want to take a quilt and go back to college! Well, not really. I had my first quilt and a wool afghan made by my grandmother in my dorm room at Va Tech.Thank you M and G for photographing these and letting me share them today!
String Pieced Blocks
 This week I finished a stack of 140 string pieced blocks - enough for a quilt! I worked on these on and off for a couple of years.It's a good thing I'm not in a hurry for this quilt; it will probably take a long time for me to decide on a setting plan.
WIP Wednesday - the tiny squares edition
 Last night I started cutting scraps into one inch squares and 1 1/4 inch squares. I'm not sure where I'm headed with this but I'm having fun.I'm reminded of my weakness for cute novelty prints.What are you working on this week?
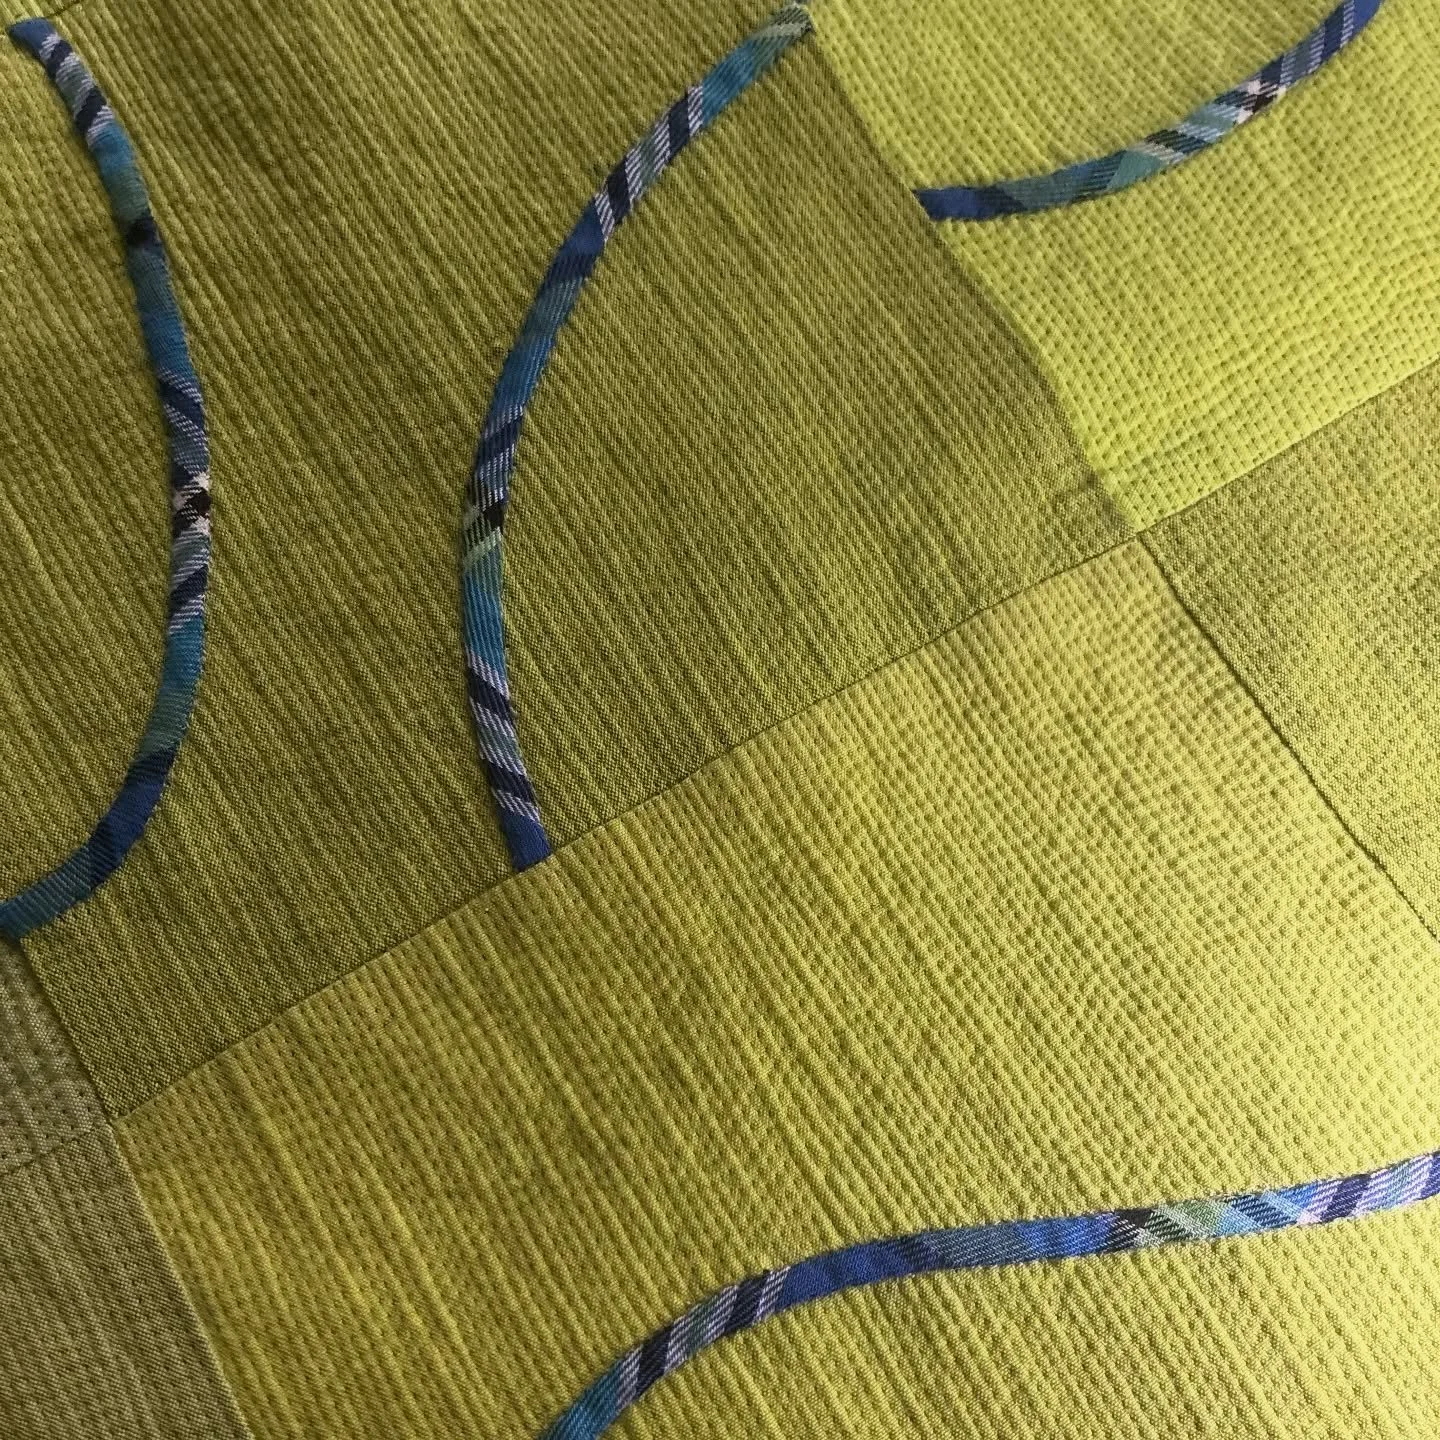
Thoughts on Quilting Design
I've been making quilts for a long time and have made quite a few of them over the years. As with most things, my tastes have changed as have my techniques. The way that I actually quilt the quilts is one of the things that has changed the most. My early quilts are mostly straight line quilted. Then, I learned some free motion work. I also used heavier threads in my work early on.With the thinner thread, I find that I need to do a bit more quilting and also think about the pattern of the stitching.Here's a quilt that I made a few years ago for my niece. She graciously let me borrow it to be photographed for my book. She has been using it for a few years and you can see that almost every stitching line has broken. This is why I have become more thoughtful about planning the quilting on my more recent quilts.On this quilt, the straight lines are stitched on the bias or diagonal. If I had stitched more lines closer together there would not have been as much stress on any individual line of stitching.Straight line stitching on grain would also be less likely to break because there is less stretch in the fabric with the grain.Curved quilting designs also can take a bit more stretch of the fabric, they can "give" when the quilt is used.After seeing several of my earlier quilts after years of use, I started to be more mindful of the quilting. I try to plan designs that are mindful to the piecing of the quilt top and have also moved to more dense quilting designs and motifs. I have learned a lot of quilting techniques over the years and I have found that I now enjoy the quilting of the quilt as least as much as the piecing of the top.Here's a more recent quilt with heavier quilting. I thought the background needed a smaller quilting design so that the the individual stars could stand out more and be the focal point of the quilt.
 In the coming weeks I'll be sharing the new quilts from my book and since there was limited space in the book for close up photos, will post more photos here and share a bit about each one.
WIP Wednesday - the spring break stitching edition
Last week we during spring break we spent a lot of time in the car. I was glad I had prepared some hand stitching to work on. I was able to make and attach the star round on these three rosettes of my La Passacaglia quilt. I also have two new center sections. It fascinates me that the same print can look so different in each center depending on how it is cut.
Hilltop Star Gazer
A couple of weeks ago, I made this fun little quilt for the Dear Stella booth at quilt market. The feature fabrics are the new Hilltop collection by Wee Gallery. The backgroud fabric is Net in Smoke, also from Dear Stella.
 The pattern is Star Gazer by Lunden Designs. I love the cute foxes and owls.
 The boys aren't here as much as they used to be and I do miss their help with quilt photoshoots. I struggled with the wind on several days to get photos of this quilt before I had to send it to Dear Stella. It was either too sunny or too windy to use the clothesline. I finally decided it was time to train a new assistant to help with photos.Even in the shelter of the barn we struggled with the wind. My new helper did a good job.
 She is also working on her arm strengthening exercises.
 Finished measurements 41.5'' x 51.5''Quilted with Aurifil 50 wt. #2021Batting -Quilter's Dream wool
WIP Wednesday
I finally got these string pieced melons pieced together. The setting fabric is from Alison Glass' Handcrafted line. It needs a good pressing and then I'll decide on the quilting plan.
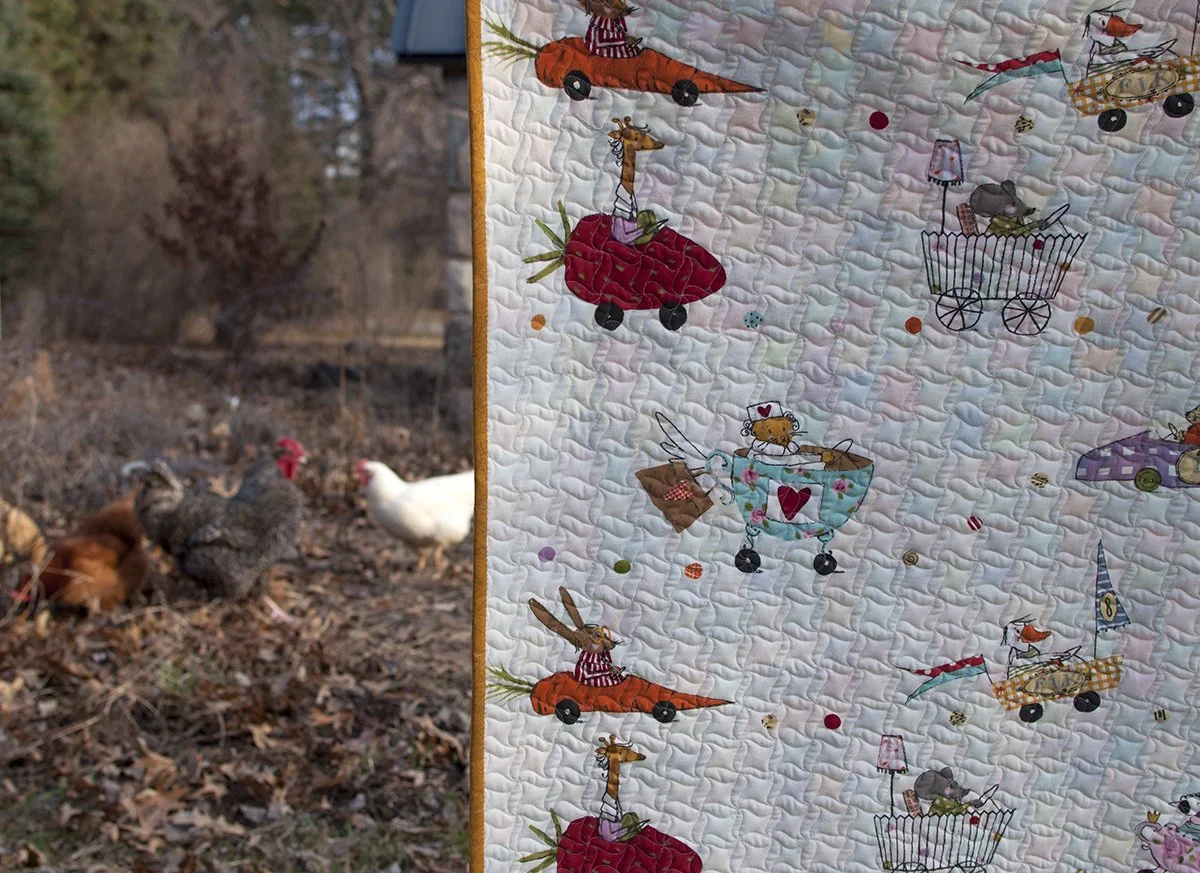
Postage Stamp Quilt
I've been working hard to finish projects lately.This postage stamp quilt that I put together last fall is the most recent finish. See this post for details about the piecing process.
The cheery colors and fun fabrics are making me deliriously happy as we wait for spring to arrive. It is still dreary and brown outside but the chickens have been out scratching in the garden and we have had a few sunny "no coat" days! Spring is coming. I'm sure of it. I snapped these photos this morning just before it started to pour rain and I am now listening to rumbles of thunder as I type. It is a happy day.
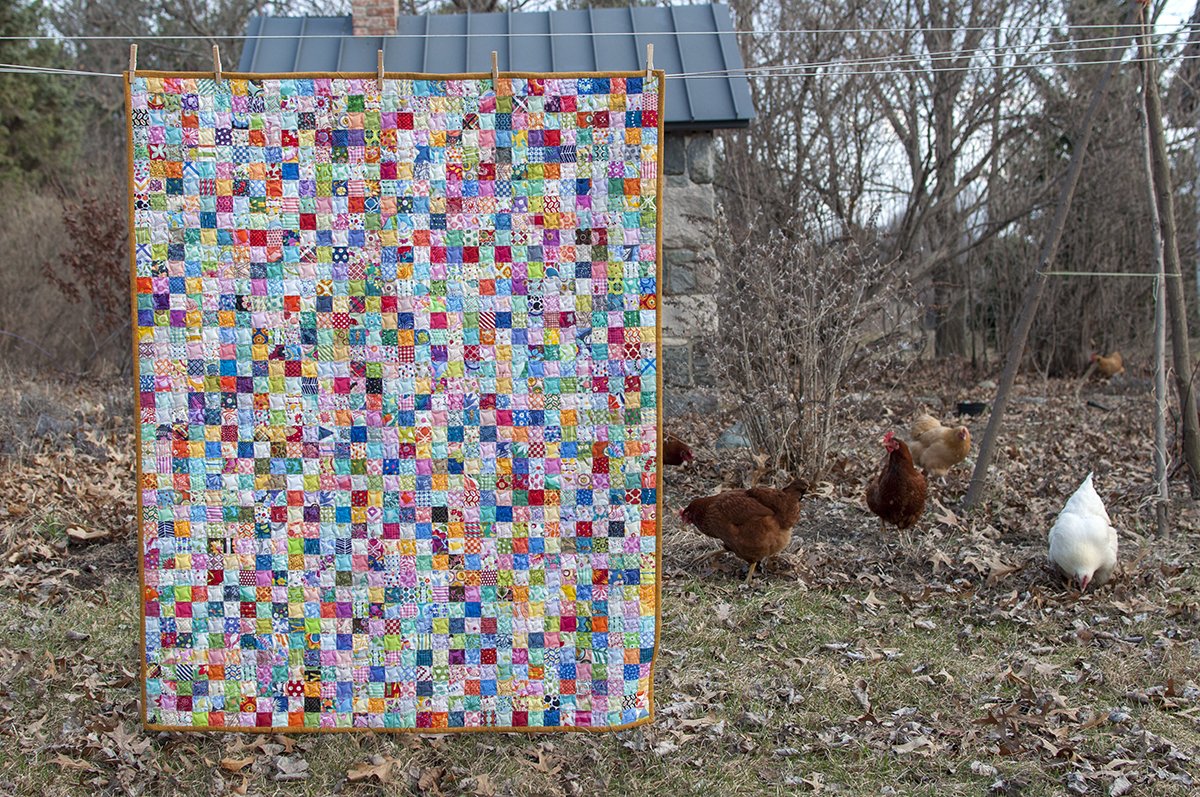
I recently purchased a roll of Quilter's Dream wool batting and have wanted to try it.
I LOVE the way the wool quilts. It may be my new favorite batting. It has just the right amount of puff and isn't heavy. They say it is washable but I haven't washed this yet. The wool also springs back a little better than the cotton after being folded. I'll be sure to let you know if I have any problems with it but so far it's a winner.

I quilted it in a simple point to point quilting pattern that follows the shape of the squares.

I worked across the quilt back and forth repeating the following two stitch patterns.
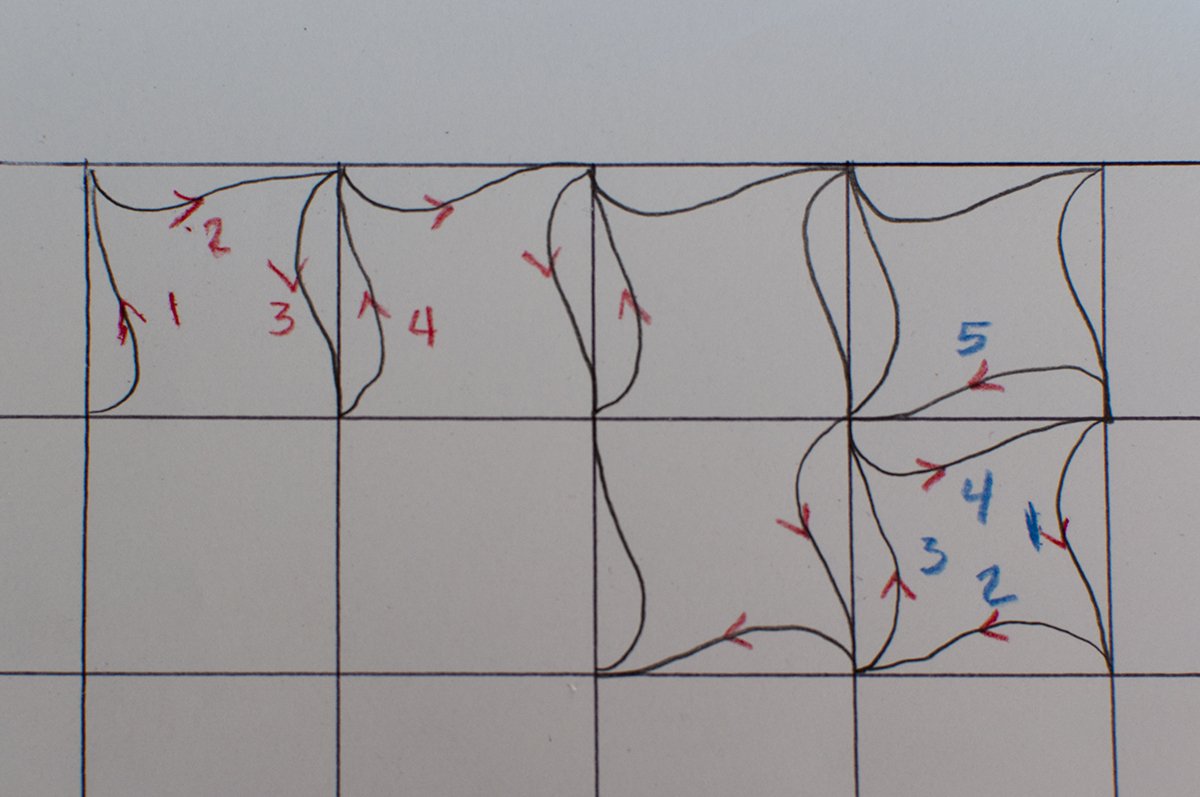
This simple quilting design doesn't detract from the postage stamp pattern while giving it just enough oomph.

The "S" curves make an interesting twisted square shape.

The backing is this fun Ikea fabric that I've been saving for years.
It is quilted with a subtle variegated thread.

I think it's time to start a new quilt!
The finished quilt measures 46'' by 58''
squares are 1.5'' finished
batting - Quilter's Dream wool
quilted with Aurifil 50wt #4651