Retreat Work

I had the pleasure of attending the Holly Girls quilt retreat last week. Pat Holly and Sue Nickels taught us the finer points of machine applique and border design.

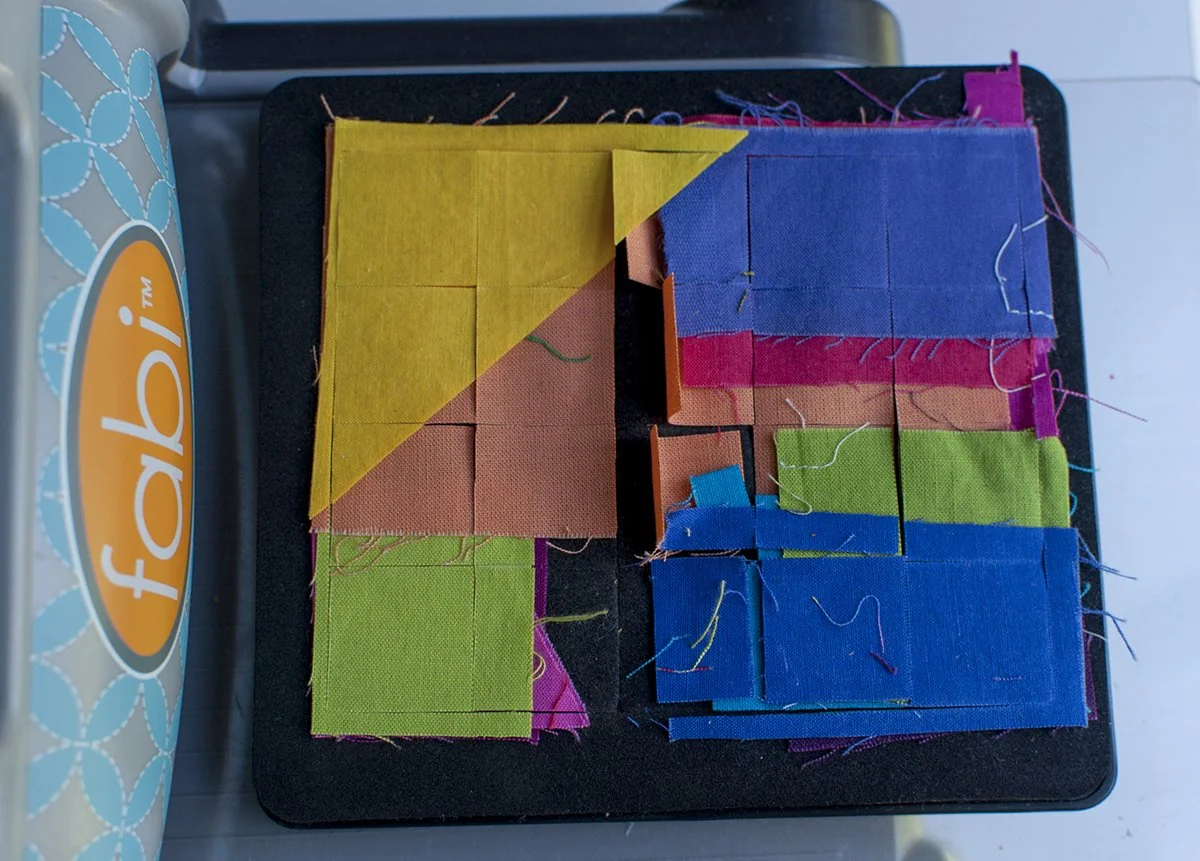
I packed my boxes of tiny scraps to work on and since the Red and White Quilts book arrived while I was packing, I threw in some red and white yardage. At first, I was busy piecing more tiny sixteen patches from the scraps. After a few lessons, demonstrations, and show and tell I was ready to start an applique project.

This will be a strippy quilt inspired by Susan McCord's fabulous quilts. The strip on the right was my first design and uses a motif from the border of her Floral Urn quilt. The strip on the left is a two color version of her fabulous leaf vines that can be seen on several of her quilts.

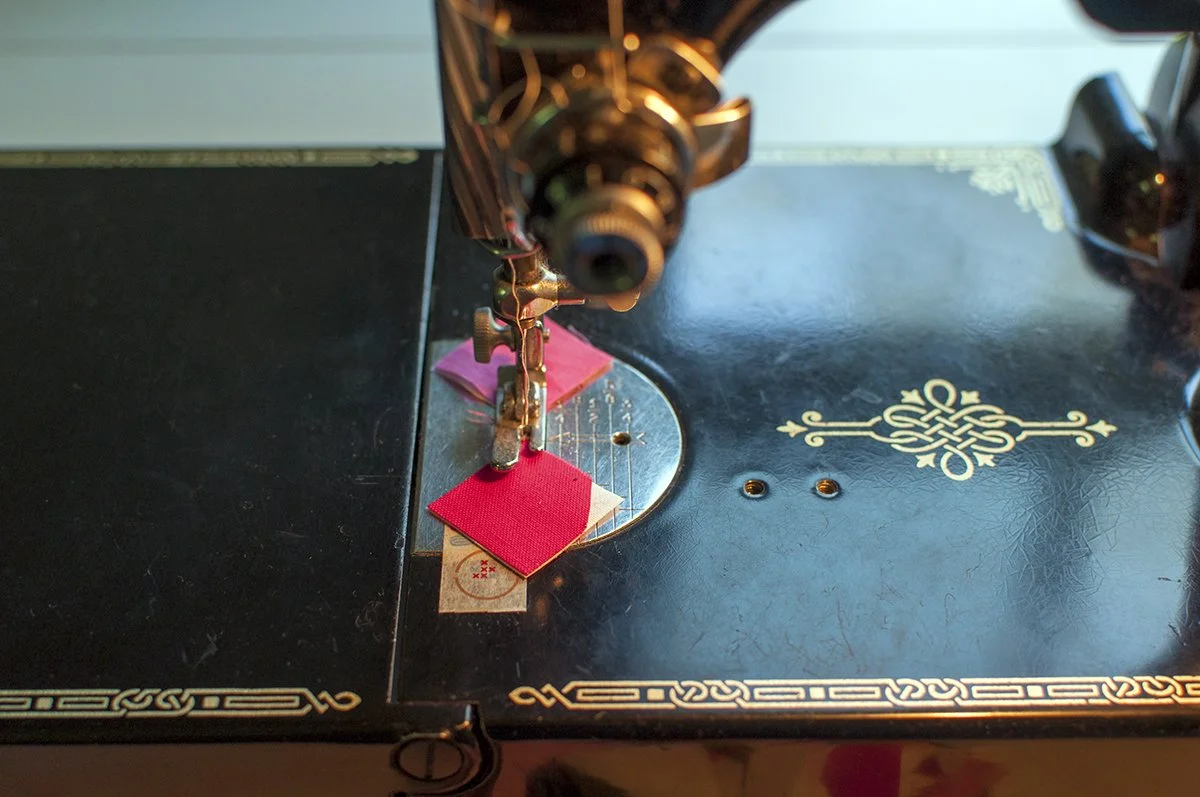
Pat told us that after stitching 100 skinny points and small circles we will have mastered the machine applique technique for points and circles. I think these two border strips will help me become a master at machine applique.

I hope I can follow through and get these stitched down. I plan to design two more applique strips and set them alternately with solid red strips.

Pillow Talk

Two years ago I gave my daughter-in-law two pillow forms for Christmas and told her I would make some pillows for her. After much delay they are finally finished.Megan chose the color palette and pulled a selection of fabrics from my stash. She also requested velvet backing for the pillows.

The larger pillow is a block from Jane Davidson's Rock Pools quilt. The pattern is in her self published book Desert to Sea.

The smaller pillow top was made in a class with Sherri Lynn Wood last fall.

I sometimes have a hard time squaring up large blocks so I want to share how I trimmed these pillow tops to size.To trim the large blocks I used Karen Kay Buckley's Perfect Adjustable Square. It comes is a beautiful box that keeps all of the parts safely stored together.

Inside there are pieces that go together to build squares from 4 inches to 24 1/2 inches. This device makes it easy to find the center of a square without marking the diagonal lines.

I highly recommend this set for squaring up large blocks. It is well worth the price to know you are getting it right with little effort. 

A Joyous Day

Sunday morning I got up and wanted a few moments of solitude before the bustle of the day started so I went out for a stroll around the barn.

On the front porch I was greeted by marigold garland strands awaiting their final placement. Thanks to the many family members who pitched in to pick marigolds and string the garlands. It reminded me that this day was to be filled with loving thoughts from many friends and family.

I thought I was the first one up but  Sophia, who was arranging all of the wedding flowers, had already been hard at work. All of the flowers for the day were cut from our fields and gardens as well as the from the home of the bride's family.

Here are the bride and groom after the ceremony when they opened the barn for the reception.

Miss P made the cake toppers, and did a wonderful job capturing the wedding attire of the bride and groom.

Friends and family helped with the preparations by fixing the barn, folding cranes, planting and weeding marigolds and other flowers, letter pressing invitations, floral arranging, wedding music, preparing cookies and cakes for the dessert buffet, and even shooing a couple of chickens who thought the flower bedecked arch was a buffet set out just for them.

The day was joyous and beyond anything I could have imagined. I loved seeing my son so happy and it was wonderful to spend time with family on such jubilant occasions.

Every Last Piece - feature quilt of the week - Paris on a Shoestring

This week's feature quilt is Paris on a Shoestring. It is a variation of Nancy, one of the quilts that is patterned in my book. Both quilts use the same string pieced triangle units.

I had this fabulous Paris Maps print that I wanted to use and I wanted to keep it in the largest possible pieces. Instead of making four large star blocks, I pieced this quilt in rows leaving each area of the map print as a single piece of fabric.

There are a lot of ways to put together quilts using the string pieced triangle units.

This quilt also features a scrappy binding. I cut lots of scrap pieces to the 2 1/4 size that I like to use and sewed them together as usual.

Finished size: 47'' by 47''.

There is still quite a large pile of string pieced triangles and squares that I plan to combine into one quilt.

Lucky Strike Quilt - an artist trade

We've been working hard on wedding prep this summer, mostly that involves lots of cleaning in the barn.I took advantage of a clean barn wall yesterday to take some pictures of my latest quilt finish.  This quilt will be for the wedding photographer; we have worked out an artist trade.

The pattern is Lucky Strike by Vintage Modern Quilts.Megan, the soon to be bride, picked the pattern and fabrics to suit the wedding photographer's mid century aesthetic. She chose fabrics from my stash and says the inspiration for the fabric pull was "beachy." There are two prints and the rest are solids. The pattern calls for 9 half yards but we used about 18 fabrics. There was a bit of figuring before diving in to the cutting to make sure I could get all of the bowling pins cut from the smaller fabric pieces.

The pins are quilted with a loopy figure eight design in a pretty peach thread and the background has randomly spaced vertical lines in white thread to match the background.

There are a few scattered turquoise "KAPOW" style starbursts to add to that vintage feel.

I am really pleased with the finished look of this quilt.

Finished quilt: 63'' by 80''
Batting: Quilter's Dream wool
Quilting thread: Aurifil #2021, Glide coral 51625, Floriani turquoise pf293 

Framed

Do you remember my new custom Sizzix die? I used some of the little one inch squares I cut with it and made a mini version of Don't Fence Me In. I love this design; even small scale it is a great way to showcase quilting motifs.

Rather than loading it on the longarm, I quilted it on my domestic Bernina. I stitched in the ditch around each of the little 1/2 inch half square triangles.

The tiny stippling around the wreath helps give the feathers and triangles a bit more definition. 

After cleaning up in the barn I think I have located another quilt photography location! What do you think? I'll try some larger quilts there and see how they turn out.

The finished quilt is 12" by 12".

Quilted with Aurifil #2021.

The Ann Arbor Modern Quilt Guild is participating in a mini quilt swap with the Chicago Modern Quilt Guild. This quilt is for my secret partner in the swap. I hope she likes it.

Coal Seam

Coal SeamCoal Seam is a result of experimenting with inserting slivers of orange fabric into triangles of black fabric. When deciding on the layout, I tried lining up the orange strips from one triangle to another and was amused to see that I could have cut the triangles from a long strip of black with a skinny strip of orange through the center. That would likely have resulted in a less whimsical collection of triangles and it's not the way my brain works when I am sewing.

I like to cut and sew parts and see where that journey takes me. I pieced them together with the Orange lined up partly because that was NOT the way they were originally constructed.

The quilt is hand quilted with black thread. I extended the lines of the triangles to the edge of the quilt.

There is also a small piece of the orange in the binding.

This quilt was started in a workshop with Luke Haynes this winter at QuiltCon.I had to quilt it quickly because Gwen Marston asked me if she could include it in her latest book, Free Range Triangles. She was already at her deadline so I stitched with a 'flaming needle and burning thread' as my mother would say.I shipped it out to the publisher before I even took a photo of it. I have it back now and can share it with you. The quilting is still a bit sparse near the edges of the quilt. I plan to add some more quilting in white thread.I am eagerly awaiting my copy of Gwen's new book.

Sizzix - a time saver

You guys,  look what came in the mail!!!! My new sizzix custom die!This die has the blades to cut twenty one inch squares at a time. I can place small scraps over the die cutting surface and then run them through the Sizzix.

Here's what it looks like after cutting. 

I can quickly separate the squares from the cut away trash. I had these quares cut and stacked in no time this afternoon. Since I'll be sewing these across from point to point and trimming one side to make half square triangles, I am able to use squares that are missing one corner.

I put five layers of white backgound fabric through the sizzix and cut one hundred squares at once!!! This new Sizzix die will save me days of cutting time.To make sewing point to point easier, I put a piece of washi tape in line with the sewing machine needle. I can now line up the point of the square on that line and follow it as I sew across the square.

Zippity zip and I have lots of sewn half square triangles. This is only the beginning.

Now, I'm ready to sew miles and miles of tiny sawteeth strips!

I'm crushing hard on that strip of alternating teeth on the right.

Barn Update

I am really enjoying the barn photography these days.

I go out and check on the progress D and B are making every so often but I tend to look down at all of the interesting bits that that have been left behind.

I look down because looking up makes me nervous. D climbs around in there like a monkey. Here he was putting in the new electrical wiring. I'm afraid he'll forget he's up there and take a step backward. I know he really won't but it still makes me nervous.

He's done a lot of climbing to get these Christmas lights up. The floor still isn't finished but at least there's light now! I guess they can work after dark to get the flooring done.

If we can only get rid of the mosquitoes I think we'll be ready for the wedding in September. 

Scenes from the Barn Basement

As part of the barn renovation, wedding preparations we are putting new wiring in the barn.

B was about to start taking out the old wiring this morning. Before starting, he came in and suggested that I take my camera out to the barn.

The lighting was low but I managed to get a few shots that capture the neglected state.

Who knows how long that Orange Crush can has been there?

I had a little company while I was working.

Don't worry, the wedding festivities will be on the main level, it is much cleaner and tidier up there. We'll also be giving it a final scrub down before the event. None of these photos show the area where the new flooring and supports have been put in.It is really difficult to capture the upper level of the barn in photographs. The space is so huge and open. I was in there the other day, sitting on the swing and enjoying the spaciousness and new floor. I had the idea that next summer I can use that space for kids sewing camp and maybe even some adult sewing workshops. I mentioned it to B and he is keeping that in mind when putting in the new wiring and outlets. Doesn't that sound dreamy? There is such a lovely cross breeze out there when the doors and windows are open.

Sister Shirts

My son is getting married on Labor Day weekend and miss P is thrilled to finally be getting a sister! She has been wanting a sister for FOREVER and now that both of her brothers are engaged can hardly believe that she will be getting TWO sisters in one year.When laying out the fabric to cut out Miss P's latest Flashback Skinny Tee from the beautiful knit from BariJ's new line, Anna Elise, P suggested that I make matching sister shirts for herself and Megan, her soon to be sister.

I was pleased that I had just enough fabric for both shirts.Megan's shirt is made from the Sailor Top pattern from Fancy Tiger Crafts that I used for my latest shirt.

I made a minor adjustment on this one for a wider back and a little more room under the arms. It seems to have passed the wearability test.

These two sillies had fun with their photo shoot.

Only a few more weeks until they are really and truly sisters!

Thanks, Bari, for making their first sister shirts possible!

Every Last Piece - feature quilt of the week - Wind Farm

This week's feature quilt is Wind Farm, which I made for my niece's high school graduation in 2012.

The base blocks were built and squared up with a 6.5'' square rotary cutter ruler. A triangle was stiched to the corner of each square and four squares are sewn together to make a wind mill block. When building the blocks I used all but the lightest lights and the darkest darks from my scraps.

I like the way the blue fabric in the blades shows continuity throughout the quilt.I'd like to make another one with less variation in the value of the fabrics making up the string pieced blocks and higher contrast of the windmill blades and the background.

My sister and I made a second string piece quilt for my nephew's high school graduation in 2012. We each built half of the background blocks from our scrap stash. I then, added the corner triangles and put the quilt together. This was a great design to work on together. My sister and I live across the country from each other and have very different scrap stashes. By mixing all of the blocks together, there is still a cohesive look for the quilt.

In this variation of the design, the triangle corners are pieced the same way as the blocks for my Aurifil mini block but are larger.

You can purchase an autographed copy of the Every Last Piece from me here. 

A New Flashback Tee

You may remember me mentioning Miss P's favorite shirt ever- Rae's Flashback Skinny Tee pattern made with Gillie Wishes from Bari J's Emmy Grace line for Art Gallery Fabrics. Bari recently asked if I'd like to play with some fabric from her new line, Anna Elise, and I jumped at the chance for another knit top for P.  Yesterday, I made another Flashback Tee for P, this one is a size 9/10. It is hard to believe my daughter is that big!

We love the way the Art Gallery knits wash and wear. They are so soft and really hold their shape.

The stripe design in this Tribal Study print were perfect for a fussy cut touch on the neckband. I'm feeling pretty chuffed at how that turned out.

Miss P is pretty thrilled with it too.

It even passed the cartwheel and headstand test.

Thanks Bari!

Bari sent a generous cut of the knit and with careful pattern placement I was able to cut out TWO tops. Stay tuned for an adult knit top!

Suzuki Family Camp at Blue Lake

I'm back home from a fun filled week with Miss P at Suzuki Family Camp at Blue Lake.

It was an intense week of cello and music and no internet or phones.

Here's the breakdown in numbers.Miss P participated in:
2 four day music camp sessions that included
30 hours of cello class,
Two cello play-ins,Two fiddle concerts,
One chamber recital,
andTwo end of session concerts.

We also enjoyed:

Two faculty concerts,Three camp fires with s'mores,
Riding bikes around the camp,
Dropping ants into antliontraps

Catching tadpoles and dragonflies,

Creative time in the Art Barn,

Swimming in the camp pool,
Playing with friends made previous years at camp,
Catching minnows at Duck  Lake, and

Two trips to Pekadill's for ice cream.

Luckily the storm that brought tornadoes to other parts of Michigan this week missed Blue Lake.

Miss P is excited to practice this summer and has a list of new pieces that she will be working toward. We are eager to return next year.

Every Last Piece - feature quilt of the Week - Square Root

The featured quilt this week is Square Root, another from the gallery section of Every Last Piece. This quilt is composed of four patch and nine patch blocks. The background is a plain muslin fabric and all of the other sqaures are scraps from other projects. I chose scraps that read as dark to give the finished design more impact.

This was one of the first quilts I quilted on my longarm. I did an all over loopy design on it.

There are no patterns in the book for the quilts pictured in the "gallery." They are there to provide inspiration and ideas for the designs presented later in the book.I chose this quilt to share with you now, because my friend Trudi Wood sent me this photo on Instagram and it made my day. (photo shared with permission) She is making her own version of the quilt. She figured out the layout in EQ, sized it up for a bigger quilt, and has added a border to it. She says she'll use reproduction 30's fabrics. I love that fancy feather quilting she has planned for the border. 

After reading the book she says, "I've been thinking very differently about my scraps AND my stash!"

I hope there are others out there inspired to make scrap quilts after reading Every Last Piece!

Wardrobe Sewing - The Fancy Sailor Top

Yesterday afternoon I put the finishing stitches on a new top for myself. It has been a long time since I've sewn anything new for myself.

I bought the Sailor Top pattern from Fancy Tiger Crafts early last fall but didn't get around to making it until last week. The fabric I used is London Calling, a light weight lawn from Robert Kaufman.I love the thinner drapier fabric for this top.

The pattern is listed as a beginner pattern and went together pretty quickly.

I love the narrow yoke at the top.

I know I'll get a lot of wear out of it.

I want to make a few more of these.

I'm off to scout some pretty knit and rayon fabrics to try with this pattern.