P really enjoyed her grandmother's visit earlier this fall. She loved sitting next to her at the table and watching her embroider butterflies on a pillowcase. After grandma left P really wanted to make a special gift to give for Christmas.I was working on some embroidered tea towels to give as gifts and P decided that is what she wanted to do for her grandmother. She drew out a very detailed picture that included people, flowers, and sky. I looked at it and told her it was a lovely drawing but that at the speed she embroiders would take a VERY long time to finish. I suggested that she finish one of the projects she has started and we could make a gift from that. No, she REALLY wanted to give grandma a tea towel.I remembered some drawings she had done the day before of some vegetables. We looked at those and I suggested that we take those designs and applique them to a towel.Carrots, a parsnip, and a beet.
 P chose the fabrics and threads and helped at my sewing machine. I think it turned out pretty cute.
 She drew these vegetables because they grow in our garden. We ate a lot of them while grandma was here.
 We had a wonderful time in the sewing room together thinking aboutgrandma and being excited about the surprise we were making for her. Ah, THAT is what it's all about.I'll share a few more of our hand made gifts tomorrow.
My Little Angel
 P an I were looking through this Christmas book and really liked some of the simple and classic decorations that were described. We decided to try making the angel shown in the book but to use felt instead of paper. P was able to practice some stitching. She couched the rick rack, did some spectacular beading, learned to stitch X's, and even learned how to make French Knots.
 I think they turned out pretty cute. I do wish I could have gotten the face and head on mine to look a bit more like the picture in the book. P really likes her angel because it has such a happy smile.
 I hope you have a happy smile on your face today too.
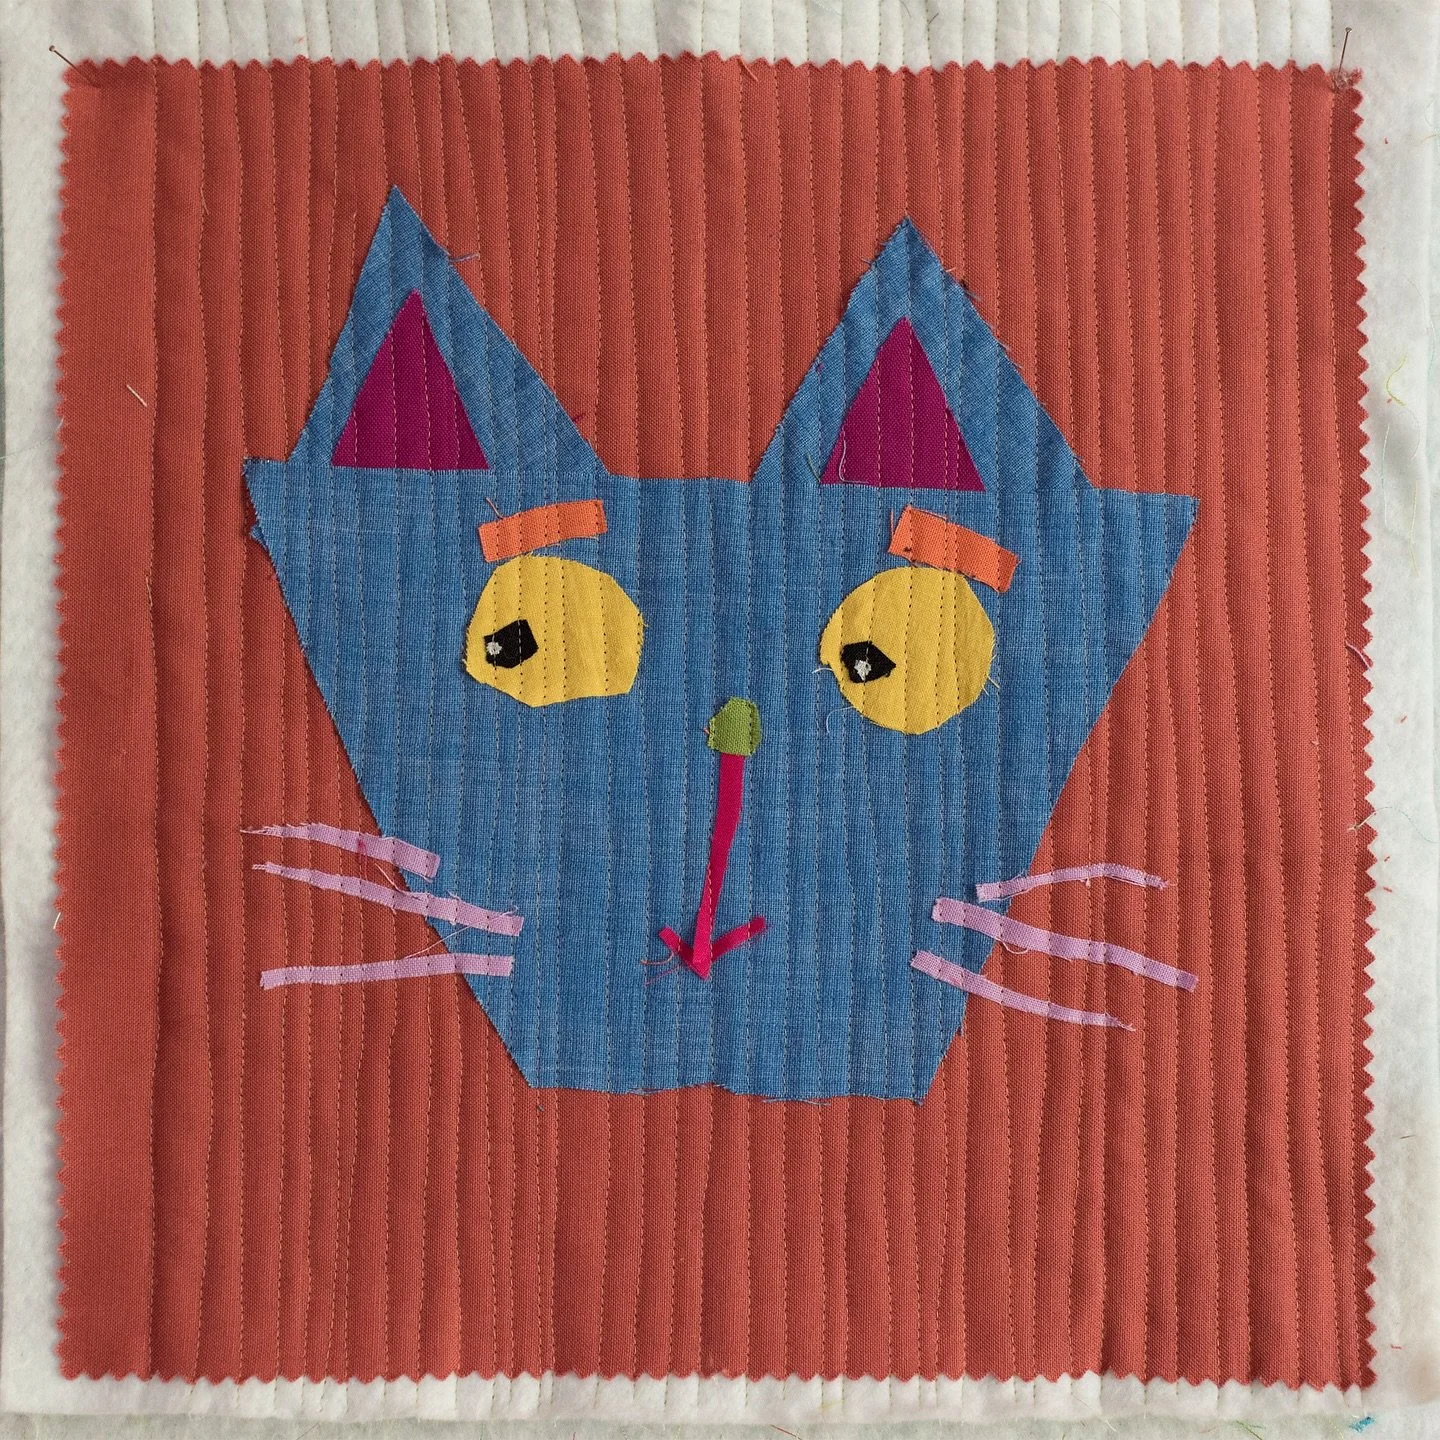
P's Super Easy Cat Bean Bag Tutorial
P made another cat bag today.  We thought we'd share a tutorial. Here is the pattern It is on one inch grid so that you can draw your own. I hope you can follow P's directions.
 1. Fold the fabric over and put the cat on top of the folded part and then cut it out. Then take the pattern off.
 2. Put pink thread on your sewing machine. Sew around the cat. Leave a little hole on the bottom.
 3. Turn it right side out. Make the face with a permanent marker.
 4. Stuff it with rice. (about 3 tablespoons). Sew the hole on the bottom closed.
 5. Hold the cat upside down by the bottom corners.
 6. Put one corner under the other.
 7. Stitch them together.
 Another kitty for the set.
 There you go. Super cute and you can even wear it on your fingers.
Something in the Air
I love the flurry of creative activity that occurs in the last days before Christmas. Everyone in the family seems to be working on projects.D made this origami crane. Tiny. VERY tiny. P has cranked out a few of these little cats on her sew handy sewing machine and filled them with rice. I think they turned out super cute!
 Here is a peek at one of my recent projects.
 I'm still working on this one.
 Yep, we love all of the holiday crafting.It's time to put my feet up and knit....I hope you are keeping warm and doing things that you like to do.
Patterns from Nature
 P and I cleared out all of the waxed leaves to make room for our Christmas decorations. Before tossing them in the compost I traced some to use as embroidery patterns.
At Least Ten Quilts
You may have noticed that I really like quilts. I like making them. I like looking at them. I like sleeping under them.I really like quilts that have a LOT of quilting in them. After washing they get very crinkly and drapey. They make me want to snuggle up under them.This quilt has a lot of quilting in a mix of traditional and modern designs. I put traditional feathered wreaths in the yellow blocks and then quilted all of the background white with a more modern swirl design. The animal print blocks were left free of quilting as were the triangle star points. This makes those star points float a bit on the design. I like how the combination looks here. I finished and washed it just in time for a show tomorrow. I love how it looks and feels after the wash. I would tell you how big it is but I forgot to measure it before setting up my booth tonight. If I still have it when I come home tomorrow I'll let you know.
 My grandmother always said that you should have at least ten quilts in your cedar chest when you get married. She also said that when she was first married and had a house heated with a wood stove she slept with five quilts on their bed in the winter. Later, when I was grown and used to visit her in the winter I would sleep in her guest bed under two or three quilts that she had made. We sleep under two quilts during our Michigan winters. I still have a lot of quilts to make if the next generation of the family is going to have the proper number of quilts.I had better get busy!
Progress Report
I've been busy this week - really.Do you want to see proof?The Ishbel - one more row before the bind off! Then blocking.  The Animal Crackers quilt - partly quilted.
 Now, it is back to the grindstone. I have the last batch of applesauce for the season on the stove!I have a few more pumpkins to cook but I'll do those on chilly days to help heat up the kitchen. (We haven't had our corn delivered for heating the house yet.)B has planted garlic and rye. After we harvest the carrots and beets and store them in the cellar the gardens should be just about ready for the winter rest. Whew.
Halloween Treats
Yesterday, P and I made the treats we will give out to her preschool class. If you are a preschool parent from P's class avert your eyes until a new post appears or the Halloween party has past.P loves to have small tablets of paper with her when we are out. They are great for restaurants when we are waiting for food or any time when we need a quiet activity. So, we made small books to give out at the preschool Halloween party.I wanted to make fancy fall covers for them and was inspired by this quilt, that Tia made. I love the way she quilted the veins on the leaves. I snitched her idea and did the same in felt for the book covers. These books were pretty easy to make. We used the paper cutter to cut small rectangles of paper for the pages. After the covers were made we used the basting stitch on the sewing machine to sew the pages and cover together. Easy Peasy.
Animal Crackers
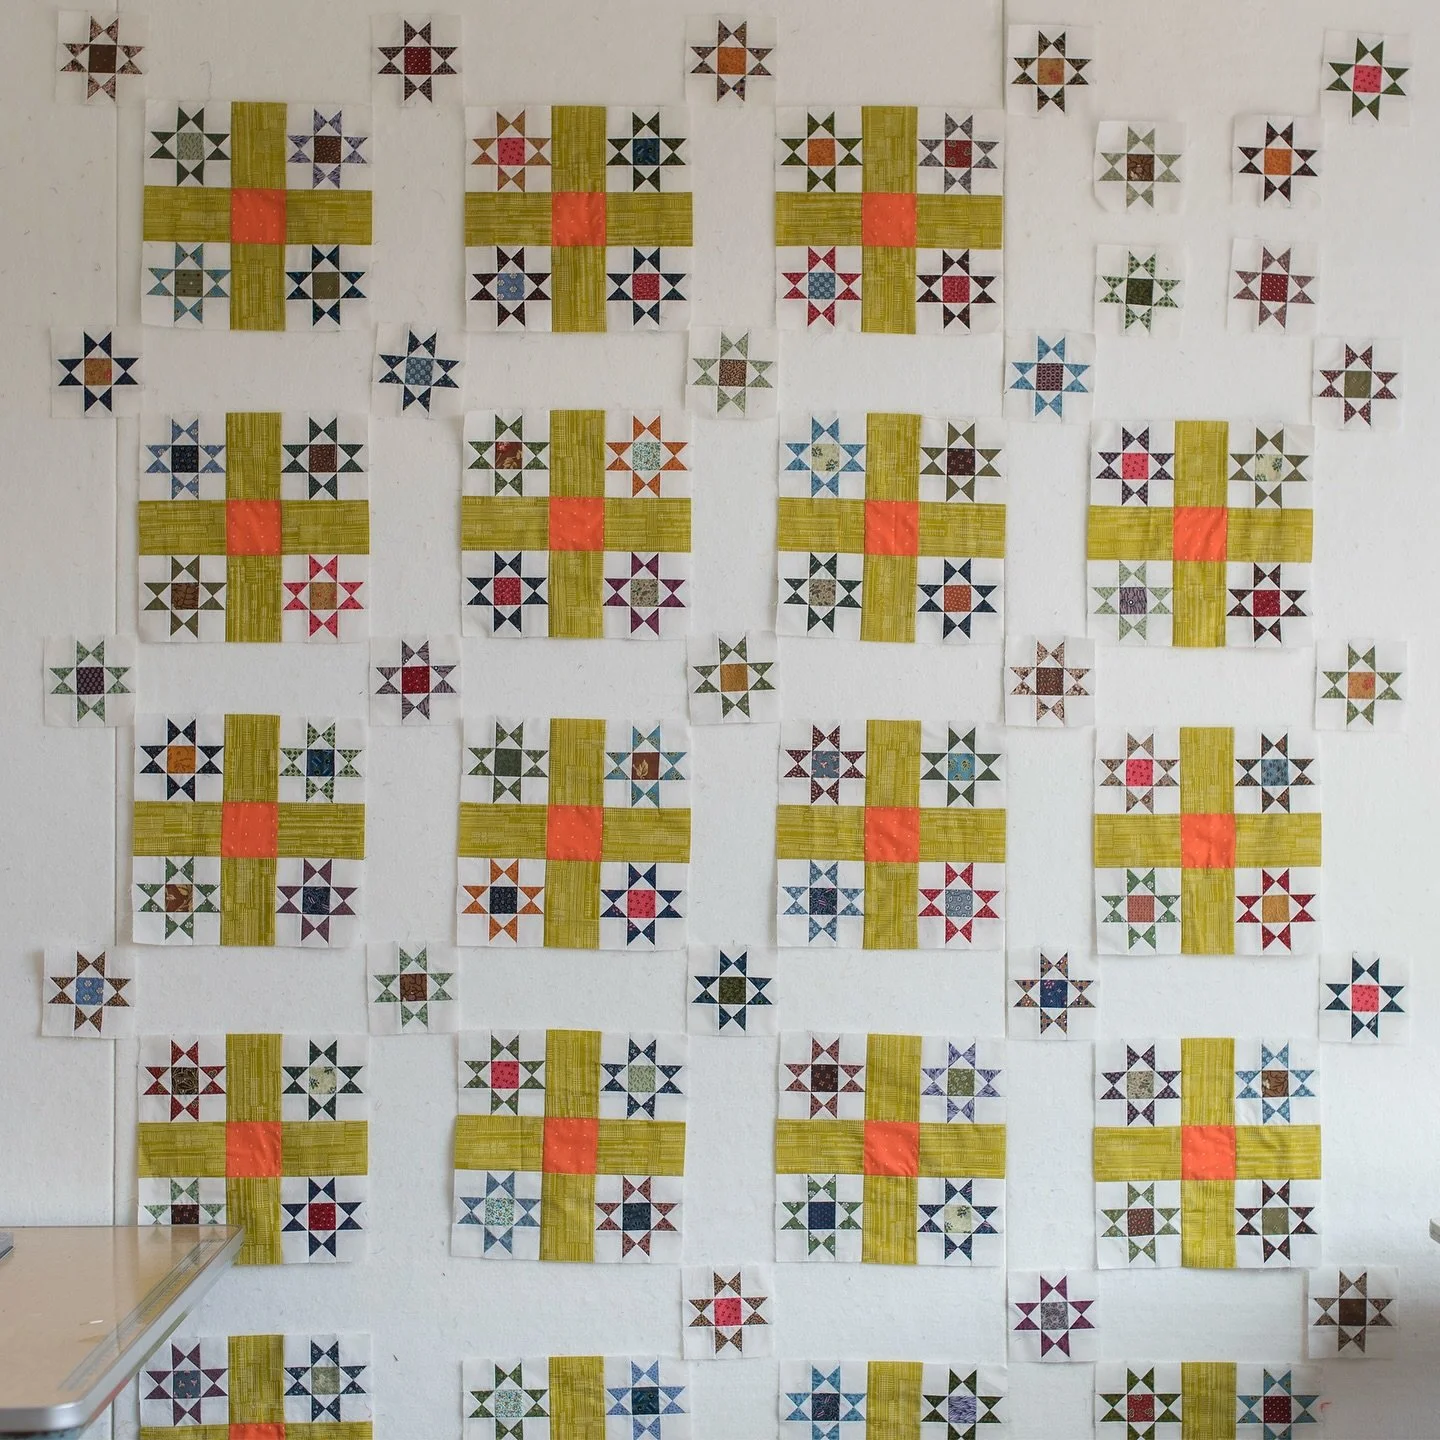
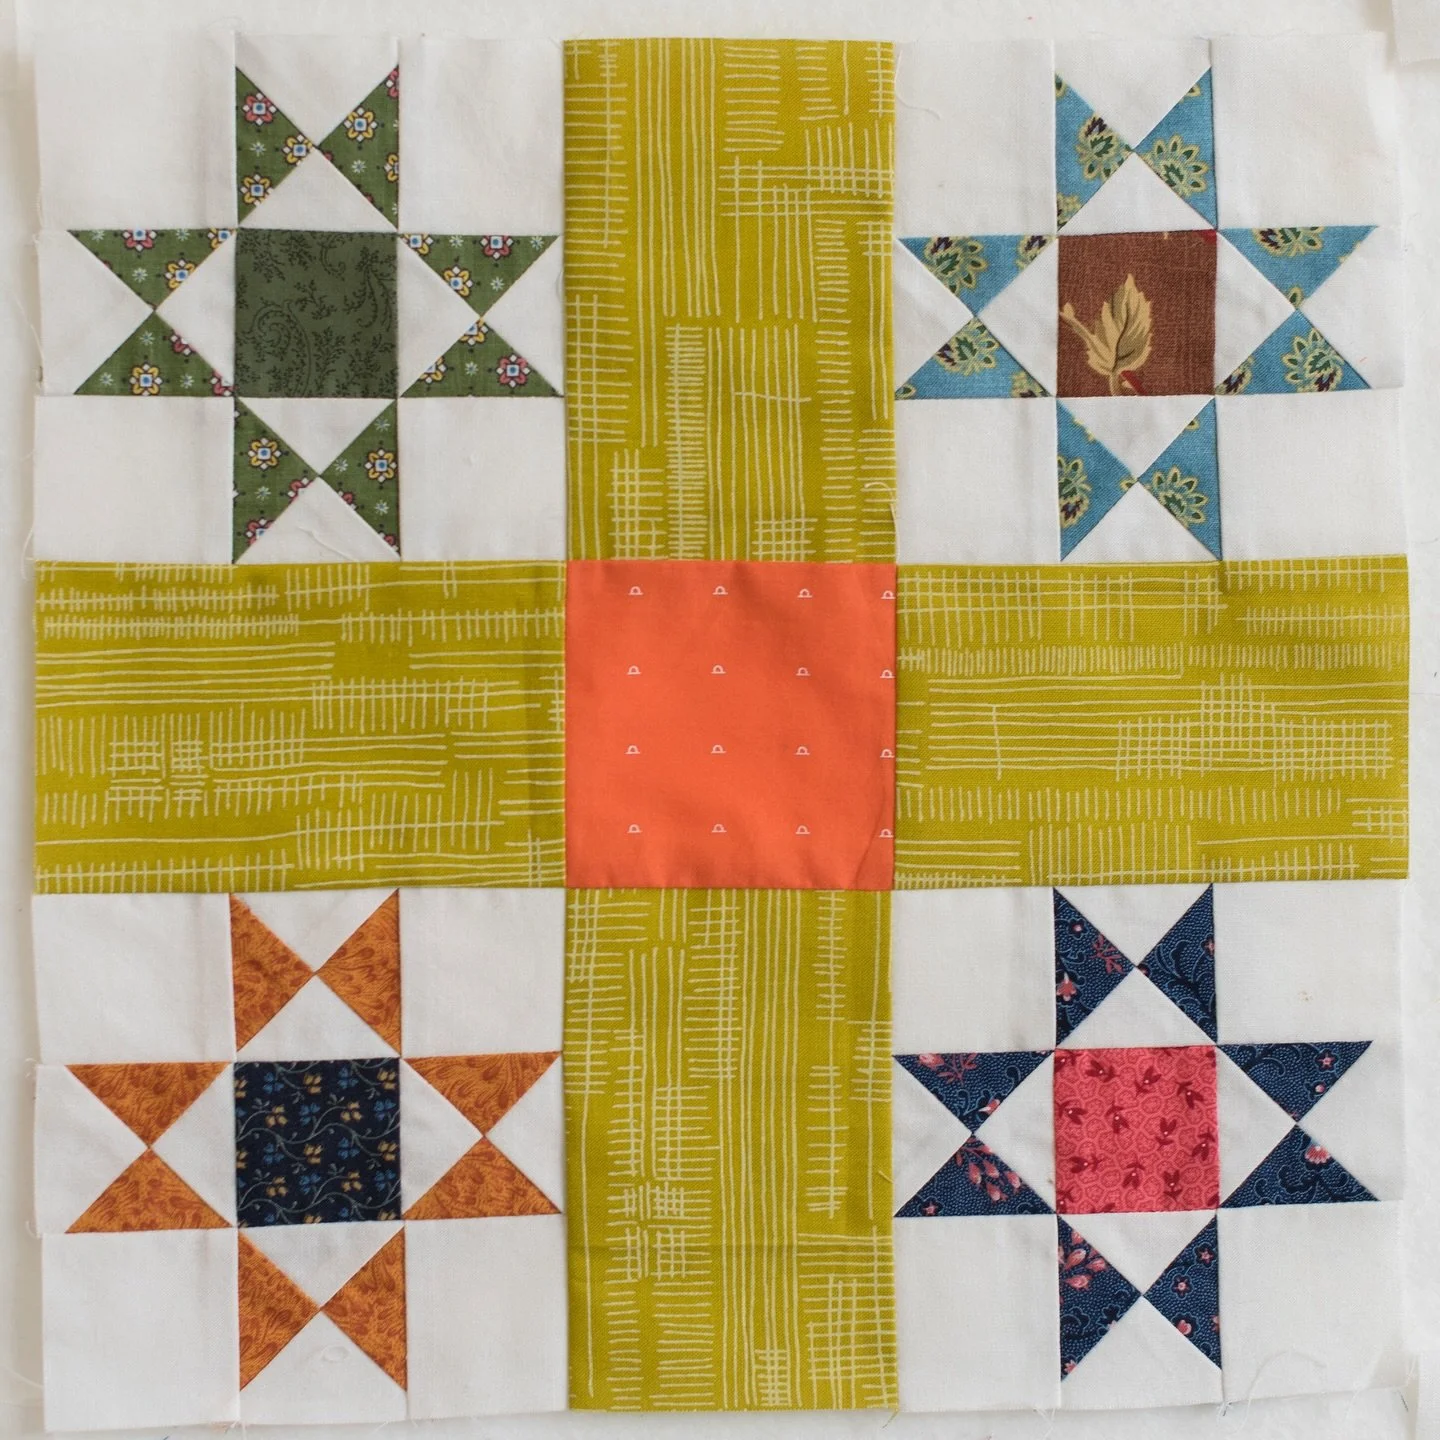
After much deliberation about what to do with those alternate star blocks I finally finished the Animal Crackers quilt top.I really wanted to keep moving on this quilt so I didn't want to go to the fabric shop to find a fabric that would work. I liked the white as an alternate block but fell that the quilt wanted a bit more movement than that. A different fabric there would bring out the secondary star in the design. The yellow I had was the right color but a bit to vivid and overpowered the animal print. Following the suggestion from Tine on flickr I tried the back of the yellow print. It was just right. The top is now in the fast growing "to be quilted" pile. I need to work on that pile I guess.I think you might also guess that a certain someone thinks this quilt would look great on her bed. If she keeps this up she will soon be like the princess and the pea with a bed piled high with quilts.
Animal Crackers update
 Most of you know that when I start a project I usually don't plan it all out ahead. I like to jump in with both feet and the rotary cutter. I am glad that I laid a few of these out on the floor to get the idea before I had everything cut.I have the twenty animal print squares and 80 of the star point rectangles. The block I had in my head is shown in the upper right corner of the photo. Now that I SEE how it is going together I am not going to make the block that way. I think I will cut larger squares to go in the background instead of four small squares. I was originally thinking one white block with a feathered wreath quilted in it. Now, as I look at it again I could do another print or a four patch of different colors.... I like that there will be secondary stars there. Now I have to decide before charging ahead again.I also see that instead of cutting two rectangles for the star points between the animal blocks I should have cut one piece and sewn four triangles to it.Maybe doing a little sketching before I start would be a good thing. It would have saved a bit of time here and would have ended up with a "cleaner" looking quilt.
A Brighter Day
 Today was a brighter day. The sun came out and P and I rushed out for a walk around the fields. That was just what we needed. We came in refreshed and started in on our projects. She is still working on coloring and cut outs.I, however, started something new.
 I am using every last bit of that animal print, some scraps, and some non scrap (gasp) fabrics. It feels good to have the scrap bin under control so that I feel like I can use larger pieces of fabric. The whole little quilt is planned around the animal print.I bet you are on the edge of your seat waiting to see how it will look! I know I am.
Completed Web
Here is the finished spider web quilt. I had a really hard time deciding how to quilt this one. I first quilted spirals in each web imitating the pattern of a web spun by a spider. Then I set it aside for quite a while until I decided on the quilting design for the background. I finally settled on a leafy vine as a setting for the webs.
 It is now being enjoyed as our new couch quilt. I do love these scrappy quilts. I even pieced the binding from scrap strip pieces.
Easy Peasy Lemon Squeezey Swirly Twirly Skirt!
The other day while I was sewing and P was cutting things at her desk she commented that she wanted us to make a skirt for her. She wanted a twirly skirt. We looked through all my fabrics and I didn't have enough of any fabric that she liked to make the really twirly skirt in this tutorial but she did find a pink print that she really liked. 
Today we fashioned a skirt from the half yard of this fabric that I had. I squared it up and cut a 14 inch strip across. I sewed the whole width of fabric into a tube and made an elastic casing at the top. The bottom is finished with rickrack and a folded band of pink fabric so there is not an extra hemming step. Easy peasy lemon squeezey.
She tried it on and it made her want to dance. I call that success.
Retreat Projects
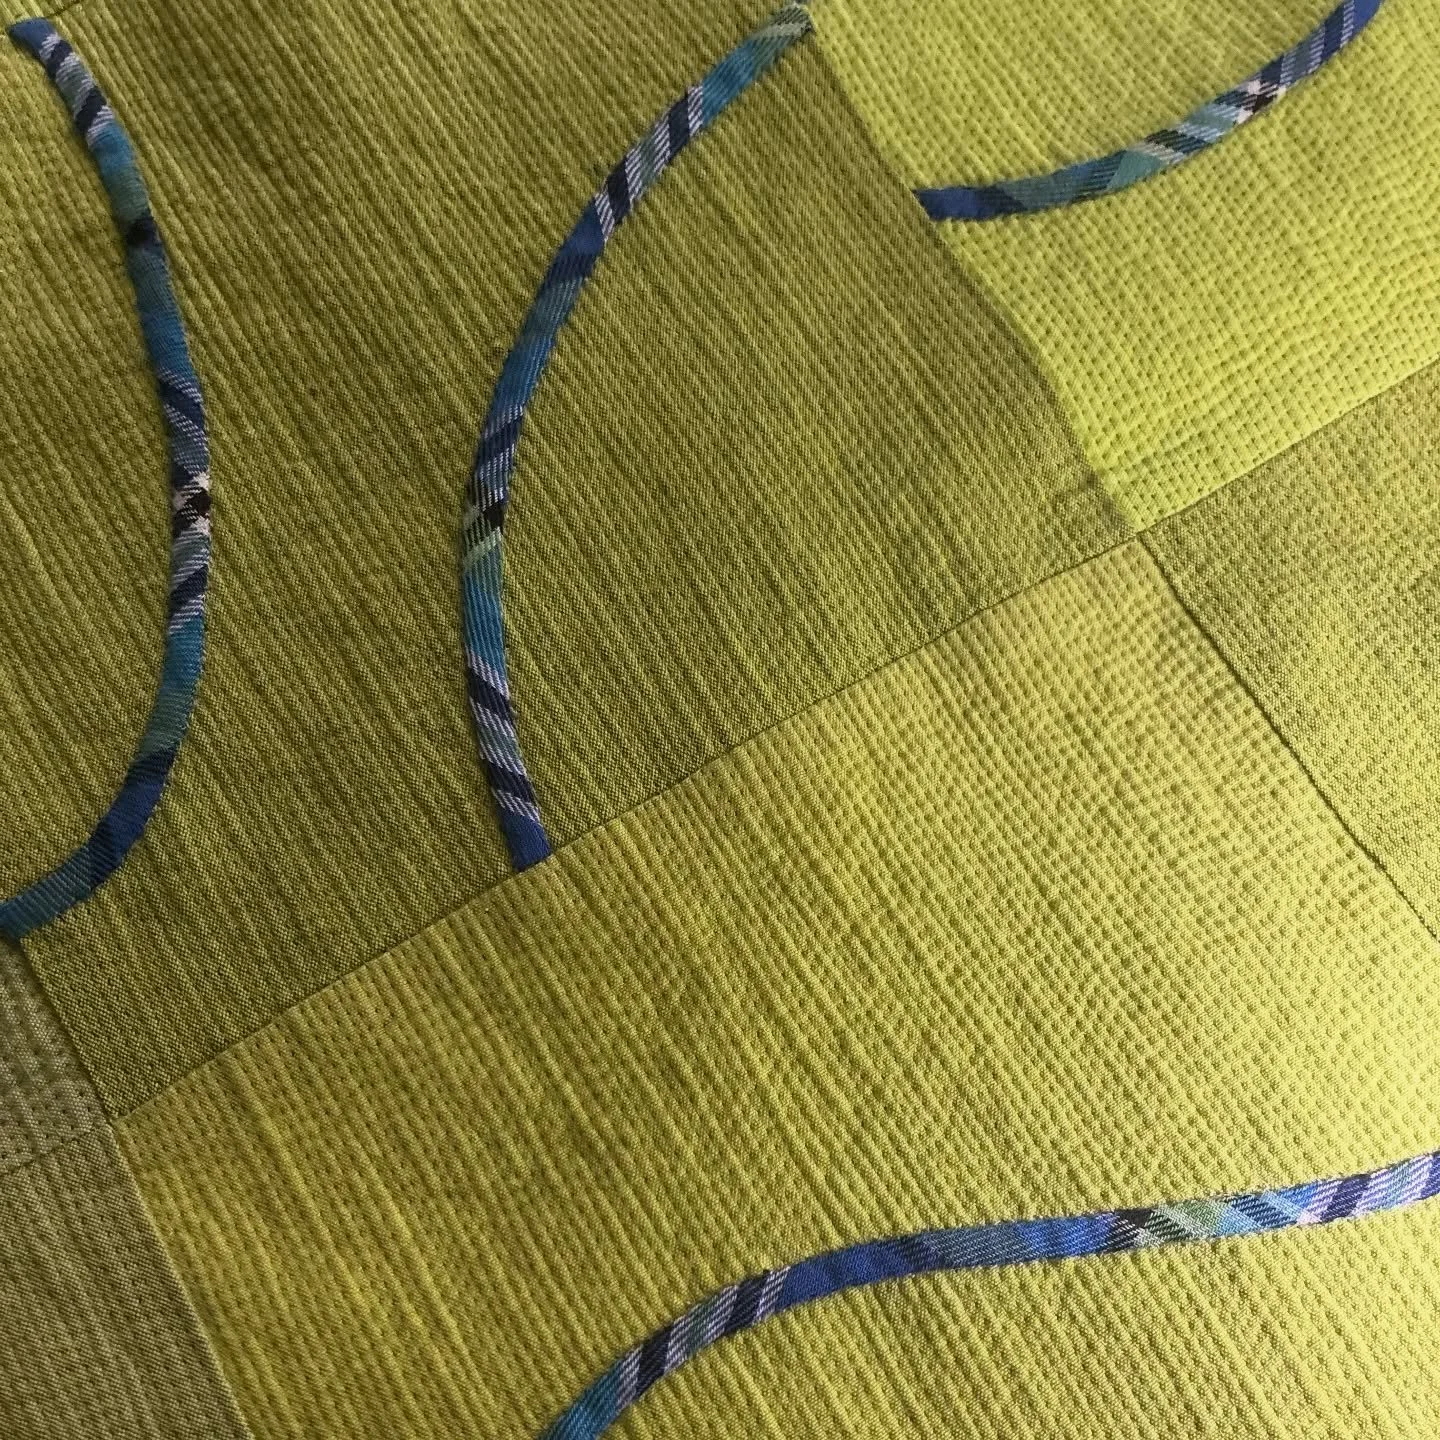
One of the great things about going to quilt retreat is the uninterrupted thinking time. Often, I get stalled on a project here and put it aside for months or even years. Sometimes when in the daily routine of home it is hard to keep a train of thought going for more than a few minutes at a time.This year, with the theme "Mixing it Up" we were to mix applique and piecing in one project. I couldn't decide what I wanted to work on so I packed several unfinished projects, my suitcase of scraps, and my collection of solid fabrics.I had six basket blocks that I made at retreat three years ago. I never knew what to do with them because I didn't think they would make a very large quilt. I decided to add the vines and make a strippy quilt. I only had scraps of bright fabrics so I pieced them together to make the vines and inner border.  The dots, or berries, just sort of happened. When some of the other ladies returned from a trip to town with that bright green and black dot fabric I knew that it needed something like that to finish it off. I made my own trip to town and bought some. It is a happy quilt that I never would have planned from the start but I really like how it turned out.
 After finishing the basket top I moved to the next project. I had started the center applique piece in a workshop a few years ago but never got past cutting out the vase and a few flowers. I finished planning the applique design but still have a good bit of the sewing left to do. Once I had the center design set I started working on the borders. I'll be adding a double round of saw teeth with a white border in between. I plan to quilt a feathered vine in the plain border.
 I am pretty happy with how this one is looking too.
 I also made design decisions on a few other projects and now can get to work on them here. Sometimes the figuring out what to do next can be the hardest part of a project. It is good to get over that hurdle on a few things.
Retreat Ambiance
I thought I might set the stage a bit today by sharing some pictures of the location of our quilt retreat.Traverse Bay. Shells on the beach.
The "Craft Boat"
Elk Lake.
White Birch Lodge.
Stitching by the water.
Back in the Sewing Room!
It seems like ages since I have spent any time working in my sewing room. Yesterday, I set aside some time and played a good bit at the sewing machine. I had been wanting to make a new travel bag for toiletries for over a year. My old one was getting to be rather disgusting. I finally took the time to figure out how to make the bag roomy and box shaped. I also quilted the fabric for more stability. I could have used interfacing but, I didn't have any and quilting it was probably more fun! It was fun to make because it is a one piece design except the handle and can be made with 2 fat quarters of fabric. (one for the outside and one for the lining.) This is the perfect size piece to practice different quilting patterns.
  It was such fun to make that I made another, and another. Each of the three I have made so far have different quilting. These are also good for using up small pieces of left over batting. Yep, I can see some more of these in my future.
Progress on the Cobwebs
Spring cleaning in the house has been mixed with bits of progress on other projects. I have finished the spider web quilt top. The blocks ended up about 10 inches square. If I were to do this quilt again I think I'd try for larger blocks. Mine ended up this size because the triangle guide was made by cutting a forty five degreecorner off of an 8 and a half by 11 inch piece of paper.
 When it is flat on the floor it doesn't look puckery like it does hanging on the line. I think all those bias cut edges are a little stretched and saggy in the photo.
 I am pretty happy with it. It is pinned and ready for quilting.Kim suggested that I make this couch size so that is what I did. P now says she wants this for her bed. She says she NEEDS another quilt, and this one has pink in it!After graduation I may fix a little tutorial on how I made the blocks. They are not foundation pieced.
Spider Web Quilt WIP
The spider web quilt blocks are made and ready to be pressed. I had the quilt all arranged on the floor before the triangles were sewn together but it was too dark and the photo was no good. You will have to wait to see more.P, however, was impressed with the stack of blocks waiting to be pressed."That stack is SOOOO big. It goes from the bottom ALL THE WAY to the TOP!"She keeps me in stitches.
Spider Web Update
I thought I'd share the progress I have made on the spider web quilt. I am wishing I had made them a little bit bigger. They will shrink a bit when they are sewn together. Still, I am happy with it.
An Apple a Day or How I set aside a stressful project and start something new that will use tons of scraps and help clean my sewing room the slow way
Remember this project? the apple cores? It was driving me nervous. I have cut back to something like an apple a day. Each day I sew two pieces together and then move on to my daily sewing. Maybe someday, years from now I will finish it. Sarah sent me a big bag of scraps and I was eager to start using them. I have been wanting to make a scrappy spider web quilt and this was just what I needed to get me started, new scraps.
 This is what the basic block will look like. Please excuse the thread bits. They were everywhere. Scrap quilts are a messy business.
 When the blocks go together a spider web design starts to appear.
 I have eight triangle sections finished and many others in the works.This is the perfect project for me now as it can be sewn in tiny bits of time which is all I can get these days.