Last week I checked out Heather Ross' Weekend Sewing from the library. I have been reading about it and seeing projects made from it and wanted to have a look myself.I love that the pajama pants pattern includes sizes from child to adult. I made matching pants for me and P. out of flannel I have had for over five years. I think I get bonus points for using the old stuff don't I? I used Kwik Sew 3042 for P's top.
 I love the way these pajama pants fit. They have a trim cut and are not as baggy as some others I have tried.P is thrilled with her new pajamas!Today I have officially started my holiday sewing. I stitched up another pair of pjs for someone's Christmas gift!
 I have my eye on some other flannel that has been in the sewing room for a while for some more pj pants for myself. I just may start to see some progress from this "cleaning up the slow way" business.I am still on the hunt for a pajama top pattern that I like for myself. I am not so good at scaling up a pattern from child size 5 to adult. Just ask D. I once made him a pajama top that was more like a tent.
Seeing Stars
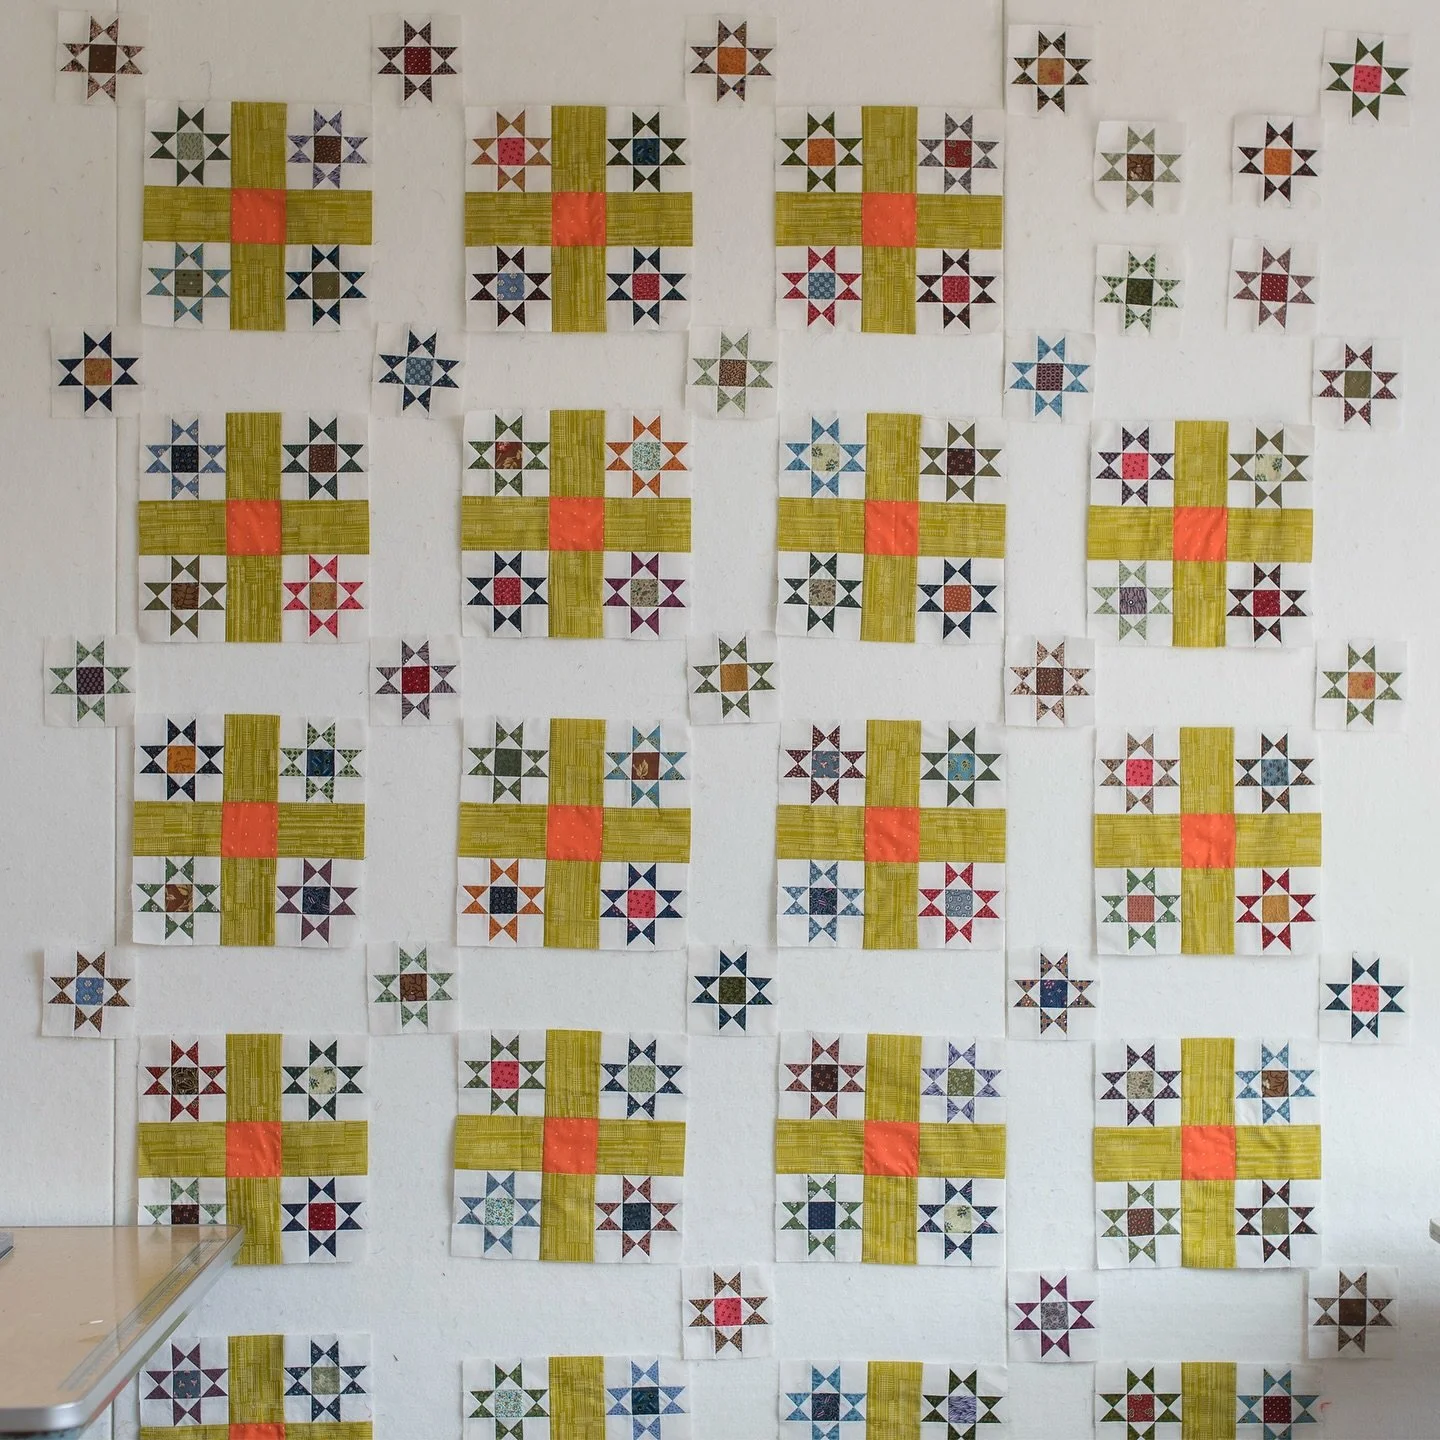
 This is what I did while at my quilt retreat last week. I made tiny stars.Three inch stars.Seventy five three inch stars.I was inspired by this fabulous quilt by Gwen Marston.
 It is simply stunning. The stars just sparkle in a sea of beautiful hand quilting.
 I wanted to try a few other things while I was there but I just couldn't get away from the stars.
 I took two suitcases of fabric because I never know what I will want to do until I am there. I didn't use much of what I took just lots of tiny pieces.My stars have print centers and solid points.I decided to use a different setting than Gwen used and calculated that I need 153 of the little stars. I am half way there!
 I am having a lot of fun making them.
Hand or Machine?
 I finish most of my quilts with machine quilting. Sometimes I think a quilt is worthy of the time it takes to hand quilt it. This top already has many hours of work in the hand applique center and the pieced borders.I love the way the double saw tooth border turned out. It really is straight but for some reason it looks a little wonky there in the upper left.
 I am leaning towards machine quilting this. It might be because I am feeling a little unproductive lately and want to finish up these lingering projects and start NEW fun things.One of my ideas for this is to machine quilt an old fashioned grid over the applique and everything. But, something in me sort of wants to hand echo quilt around all those flowers. But then, again, hand quilting the saw teeth with all of those seams does NOT appeal to me at all. Maybe I should let it rest for a week or two until I settle in to the new fall rhythm.The first week of school has just about done me in. I am NOT used to getting up quite so early. The bus comes just after 7:00. Yikes. That is early to get a five year old up and ready for school. The return bus gets here at about 4:00. That makes for a very long day for a kindergartener. You would think I would be able to get lots done during that time. But, no, I have been running around doing errands most of the time. Maybe I'll feel better about it after I am more caught up. I had saved up a lot of things until school started thinking that I could take care of them easier without little Miss P. So, I guess I have been productive, just not at the things I am wanting to do. One of those errands is an appointment with the eye doctor. Maybe some new glasses will help.How are you handling the change of season, back to school routine?
Saw Teeth
 School is back in session and I have some time to myself. I am working on another project that's been banging around in the sewing room for a few years. I finally finished the hand applique center and am working on the borders.Saw teeth. I have ALWAYS wanted to do a saw tooth border on a quilt. This one is getting a DOUBLE border.I am using two inch squares cut on the diagonal.One border is already stitched on.
 It will have a narrow white strip and then the second saw tooth border.
 Today will be spent sewing tiny pieces of red and white fabric together to make long border strips. I will be thrilled if I can get the top finished!
The Triangle Quilt
 I was able to squeeze one more UFO finish in before the end of summer vacation. I started this one two years ago!
 I had a hard time deciding on the quilting for this and finally settledon a thin black thread with five rows of parallel stitching along thestraight seam lines.
 I am pleased that the quilting does not detract from the clear solid colors.
 The quilt measures 39.5 inches by 47.5 inches.
Beach Ball Bonanza
 Here it is. Pieced and pressed.
 I chose the circle design because it made me think of beach balls on a summer day. With fall fast approaching, this quilt is a reminder of the bright colorful days of summer.
Baskets, Berries, and Vines
 Here is the finished basket quilt. I love how cheery it is.
 It even won a blue ribbon at the fair!
 It is machine pieced, machine and hand appliqued, and machine quilted.
 53 inches wide by 64 inches tall - a great size for a bed topper.
Project Improv - The Zinnia Quilt
I've been missing the zinnias this year. P and I saved a huge bag of seeds from our flowers last year and planted a long row this spring. Not a single zinnia sprouted. It was very sad, so very sad. I think we must have had a hybrid variety last year. I'll have to look for a variety that we can save the seed from next year. While we had all of the scraps out and in a big mess we pulled out some zinnia colored bits to make a zinnia quilt. Now we will be able to have a riot of pink, yellow, and orange, and red all year long.
Family Fun with Scraps
 We've tried out a few more variations for the drunkard's path.I love projects like this where the whole family gets involved. D and M have each tried a different layout. B suggested a completely random design that involves rolling a four sided die 120 times.I think this design looks a little boring and flat. P says that she can't see the pattern here.
 Here is a little block that P is putting together. She pulled these pieces from my pile of cut fabrics. She has sewn them on her hand crank chain stitch machine. We have had to sew each square a couple of times. It is a good thing that chain stitch is easy to take out! She want to turn this into a tiny doll quilt but with not batting. I think I'll have her make it like a pillowcase and turn it. She hopes to have it finished to enter in the fair on Sunday.
Straightening Up
 I finished sewing all the blocks for drunkard's path today. What do you think about this layout? As I said before there are too many choices.Today also involved a bit of cleaning up. D helped me move a big file cabinet. It was sort of right beside/in front of one of the windows in my sewing room and cast a big shadow. It is now on the far side of the room in a corner. My room seems a bit brighter and the space in the middle is bigger. Yay.Miss Petunia and I also did a big clean out of her desk in preparation for the start of Kindergarten!
Drunkard's Path - a day at the beach
 Well, it turns out that this pattern is easier to sew than the apple core. Or maybe I am more patient with it than I was with the other quilt. P helped pair the fabrics for this quilt and I have more than half of them sewn together. I do like that once the paired fabrics are sewn the finished block shape is a square. The final layout and sewing will be just like other quilts - quick sewing of squares.We did a quick mock up on the floor of some of the blocks. Like half square triangles there are many different ways to put them together. Currently I am leaning toward the circle design shown here.We also finished cutting up the tiny scraps and got everything neatly back into the scrap suitcase.
Scrap Management - or What Was I Thinking?!
I have had some quilt designs forming in my head for a while now. Modern, minimalist, and solid colors have been the focus. I have refrained from starting anything new until my UFO pile is tamed. I've been feeling very productive this summer. This weekend I finished binding the basket quilt (pictures to come after it has been washed) and pin basted the half square triangle quilt.Well.... I was in the sewing room doing a little tidy up and ran across some drunkard's path templates that I have had for more than 15 years and never used. I think something snapped right then. Before I knew it the scrap suitcase was open and there was fabric everywhere.Soon I had two neat piles ready to sew into a new scrap quilt. Not the minimalist quilt that was in my head but something that should be fun!
 Cutting from the templates had the added bonus of creating another stack of quarter circle pieces for a different project. These are smaller than the ones needed for the pattern because they were cut away from the square pieces. I may sew them into circles to applique on another quilt.
 In addition to the neat piles ready for sewing I also had a ginormous pile of very small scraps. I didn't want to throw them out but I didn't want to put the tiny scraps back in the suitcase either. SOOOOOOO, I have been cutting them into 1.5 inch squares. I'll try keeping the basket of them next to the sewing machine and sew them together as leader and ender fabrics while sewing my other projects. Who knows what that will turn into.
 Back to the drunkard's path...I knew I had a moment of insanity - well much longer than a moment considering how many pieces I cut for this quilt - when I sat at the machine to start sewing.Curved. Piecing.WHAT WAS I THINKING?Remember this project? Back in April of 2009 I cut back on my progress and it eventually got buried and I have no idea where it is right now. Someday I am sure I will run across it again.I actually do have some of the new pieces sewn together and I'll really try to keep with it this time. I am trying for a baby quilt so there is hope.If nothing else my scrap case is neater.
The Color Purple
 I did a little secret sewing earlier in the summer which I can now share with you.
 This is a twin quilt my sister and I made for our niece for her high school graduation gift.
 Between the two of us we had a lot of purple fabric scraps. We each made half of the blocks.
 We hope she enjoys using the quilt in her dorm. She says it has ALL of her favorite colors.The design is the same as this quilt I made for my nephew a few years ago.
Daily Walks
I'm trying to take a walk every day.  I love this tree house just up the road from us.
  I will feel a little less guilt tonight when I dig into the freshly cooked blackberry cobbler.
Grandmother's Garden Trellis
 Here it is. The finished star strippy quilt. I am really happy with the quilting in the floral strips. I think the echo quilting was just right to fill in around the feathered vine.
 I love the contrast of the straight grid quilting with the curves of the vines. It reminds me of a vine growing up a trellis in a garden.
 I like the repeating patterns of the stripes, similar but not exactly the same.
 The quilt fits a queen size bed but would also make a nice coverlet for a king size.It measures 90 x 90 inches.
 The back has a pretty floral fabric with a stripe of the fabrics used in the stars. The quilting really shows up in the pieced area.
Butterfly Migration
Look! The butterfly quilts had a chance to meet!

JEK's quilt, on the left, was the inspiration for my butterfly quilt on the right. I knew I had to make it as soon as I saw a picture of her quilt.

Isn't that a clothesline of happiness?

I am glad JEK had it with her on her trip.
Quilted Strips
I've been quilting on the strippy quilt and it is almost finished. I am really pleased with the grid quilting on the star strips. And I must say that the dual feed on the new machine makes straight line quilting a dream.
 All I have left to do is the background quilting around the feathers and maybe some curlicues in the narrow blue strips. I tried a little meandering next to the feathers but I am not thrilled with the results.
 Maybe some lines echoing the basic curve of the vine would be better.I think I let it rest tonight and look at it with fresh eyes tomorrow.
Knee Socks!
I started a new pair of socks yesterday! These will be my first pair of hand knit knee socks. These are the Norwegian Stockings in Nancy Bush's Folk Socks: The History & Techniques of Handknitted Footwear
The Vines
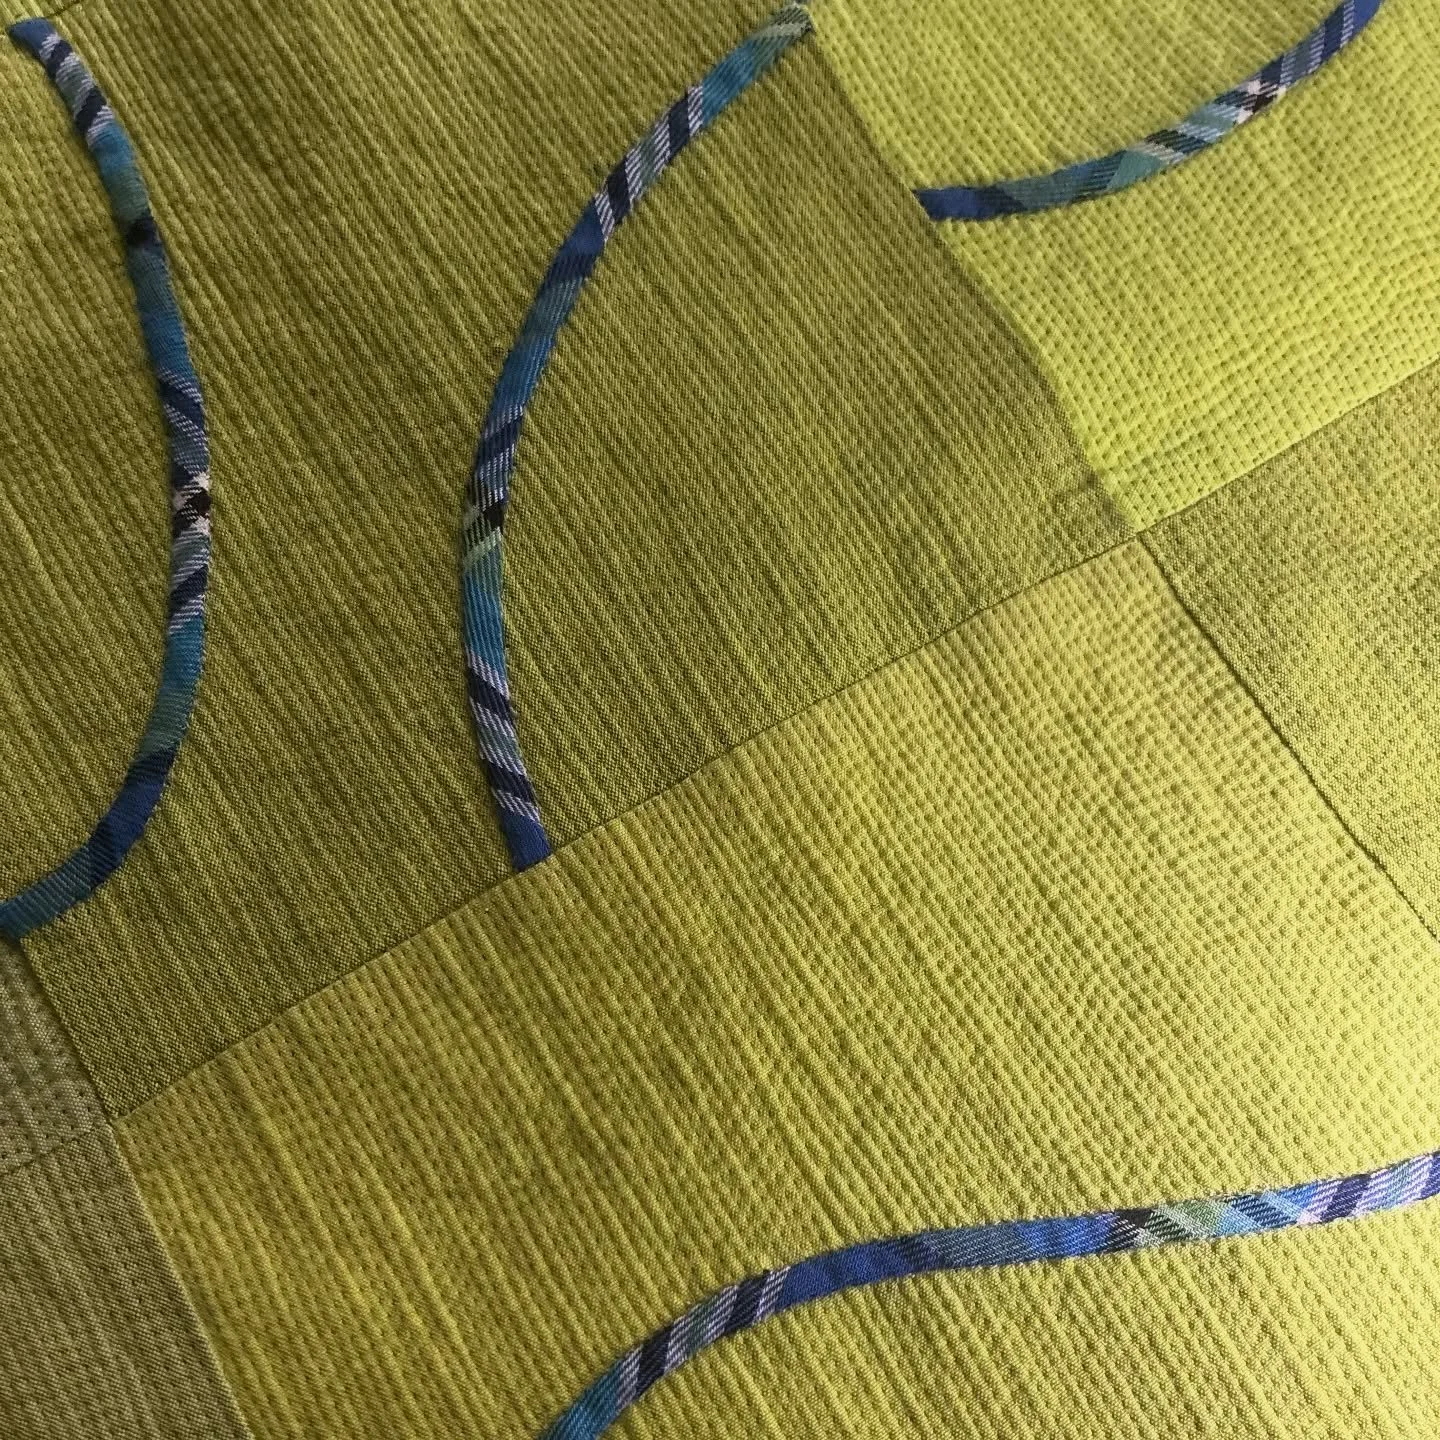
When machine quilting, I usually don't mark the quilt first. I enjoy coming up with designs that I can draw "free hand" at the machine. I thought this quilt called for something formal like a feathered vine seen on many traditional and Amish quilts. I tried to free hand a feathered vine on practice piece and it just didn't work at this scale. These strips are 9.5 inches wide, a pretty big space to fill evenly without marking. I, then, drew out a pattern, a "free hand" vine that is the same distance to each side of the strip. The length of the waves are not necessarily equal but the width is the same. I marked the sides and the center line as a guide on the fabric. I stitched the center with a double line about an eight of an inch apart. After trying and failing at free handing the feathers on the machine on a sample, I marked each feather before sewing on the quilt.The template for the vine can be placed four different ways by flipping it around. That will give a little bit of variation in the vines while still having them all almost the same.I am pretty happy with the result. I still have three more strips to do but each one gets a little easier.
 I plan to do some filler quilting in the areas around the vine. That should make the feathers visually "pop". The thread I am using is a really pretty brown that matches the fabric beautifully. It matches so well that it is almost impossible to see the lines I have sewn when I need to backtrack.I hope you had a great weekend doing something fun.
Beach Buckets
I started this little quilt at Beaver Island Quilt Retreat in 2007. Less than three years from start to finish - not too bad.
 In working through my unfinished projects I have noticed that the quilts I start at retreat are the ones that end up not being finished right away.
 It is not because I don't want to finish them. It is more that I am so productive at retreat that I start or sometimes even finish three or four quilt tops during the week. I come home energized with ideas that I want to try so I usually keep working on one of those quilts and then move that energy to more new projects.
 Right now I am empowered to get things finished so I am going with that.This little quilt was hand quilted with perle cotton thread and is 22.5 inches by 22.5 inches.I had better keep busy. Retreat time will be here before long and then I'll have even more quilt tops to finish!