I'm so happy about my trip to the post office today. I have most of my Christmas packages ready to send and also a few commission works to mail away. I finished this Happy Land quilt yesterday while the pumpkin pie was in the oven. This was made with Thomas Knauer's 70's vibe quilt pattern. I quilted it with groups of wavy lines.
 The fabrics are all from the Happy Land line by Sis Boom.
 I hope you have a great weekend!
Little Birds for Tia
 I've been working hard to finish WIPs and get caught up on sewing commitments. This week I made these fun little birds for Tia. I can't wait to see what she does with them. I think she'll be adding some applique.I seem to have quite a pile of quilt tops to quilt and bind. I hope I can quickly make a dent in that stack. Focus, focus.
Happy Land
I've been in Happy Land this week. Thank you all for the birthday wishes. It is really nice that you take the time to leave me a note. Birthday celebrations and sewing - some of my favorite things.Yesterday I finished up a commission quilt top out of Jennifer Paganelli's Happy Land fabric.
 I used Thomas Knauers pattern that is great for mixing up a riot of fabrics like this. I love the mix of squares and rectangles.I'm still thinking about how to quilt it. Hmmm. I think it needs something curvy.
Little Stitches - Aneela Hoey
While at Quilt Market, I had the pleasure of meeting the lovely and talented Aneela Hoey and also picked up a copy of her book, Little Stitches: 100+ Sweet Embroidery Designs 12 Projects
 Aneela's book is full of sweet designs to dress up existing clothes or home dec items or add to just about any sewing project. There's even a pull out section with iron on tranfers of the designs included in the book. So many cute little animals, delightful girls, and fun every day objects to stitch.I know Miss P wants more of these designs embriodered on some of her other clothes. Just look at all those book marks! I think I'll let her do some of the embroidery though.
 She loves the spruced up top!
Flower Power
 Hey, look, my quilt is in the latest issue of Generation Q! I picked up an advance copy while at market and even got Thomas Knauer to sign it. That's him on the cover with his daughter.
 They'll be shipping very soon.
 My pattern, Flower Power, "is easier than you think".
 You can get Generation Q at your local quilt shop. If they don't have it ask them to order it! Later, they will be available at Barnes and Noble.
Halloween Elf
Here is our little Halloween elf. I made the top from B's old terry/velour bathrobe using Rae's Flashback Skinny Tee pattern. I also added some pink braid from my trim collection.The pattern for the hat is Lyalya Hoodie by Natalia Schaffer. (knit earlier in the year and blogged here.)Pretty close to the design she imagined, I think. She is thrilled with the soft, warm top.
Flashback Skinny Tee
P is a skinny girl. Seven years old and all of 40 pounds. Usually when a shirt or top fits her in the shoulders it is way too short and doesn't even reach the top of her pants. Not a great look. So, she usually wears shirts that look a bit big on her.Enter Rae's Flashback Skinny Tee pattern. It seemed like this pattern was made for Miss P. I cleaned out my dresser on the weekend and found an old shirt of mine that P liked. We cut it down and made a great new shirt for her. This is the first shirt that has actually FIT her in years! She loves it. The pattern is super easy and I was able to keep the existing sleeve hem and neck finish of the original shirt with careful placement of the pattern pieces.
 She likes the top so much that she had to wear it for the rest of the day - which was spent threshing the black beans that we grew this year.A few weeks ago we pulled up all of the black bean plants and wrapped them in old sheets and put them on our upper porch to finish drying (we didn't want the beans to fall from the pods into the garden). Yesterday was the perfect crispy warm fall day for threshing.First we wrap a big bundle of plants in a tarp. Then, P's favorite part, we thwack it with a stick to pop the beans from their dry pods.
 Then we pick out all of the plant parts making sure there are no beans left in the pods.
 What is left on the tarp is a pile of black beans mixed with chaff.
 On a breezy day we will pour this mix from bucket to bucket and let the wind carry away the chaff and we will be left with black beans to store for future meals.
 Yesterday was a perfect fall day!I also found the perfect pattern for the top of P's Elf costume for Halloween! She'll be a skinny elf in a Skinny Tee!
Point Me - FINISHED
 Here's the finished king size Point Me quilt.I'm thrilled with the quilting on this one, it was a great quilting plan for my domestic machine. A also think the organic nature of the quilting compliments the minimal design of the pieces flying geese section of the quilt.

It is so big that I can't hang it on the line or have someone hold it for photos.

D helped get it spread flat and squared for trimming when he was home on the weekend. We lined up the quilting lines parallel to the floor boards and then did some 3,4,5 triangulation trickery to get the bottom and top perpendicular to the sides. I used the carpenter's laser level to help mark a straight edge on each side.
 Finished size: 108 wide by 101 tall.
Odds and Ends
I have a few small recent projects to share with you.Here's a pink pixie hat for a friend's daughter. Bee blocks for Jennifer, she requested words of encouragement and healing.
 Just one more pair of bee blocks and I'll be finished for the year. Tia has requested bird blocks!It has been getting colder so I want to make sure that we all have warm slippers for the winter. I'm making a pair of "frankenslippers" that will use up a lot of the small ball ends I found when I pulled out my selection of worsted weight yarns. It will be good to clear these out of my sewing room. Yay for cleaning up and using what I have!
 These fun vintage fabrics came in the mail yesterday. I did a little fabric swap with Katie. Don't you love those little Kangaroos? The two fabrics on the left are the old 36 inch wide yardage.
 What fun little projects have you been up to this fall?
Ruby - the finished quilt
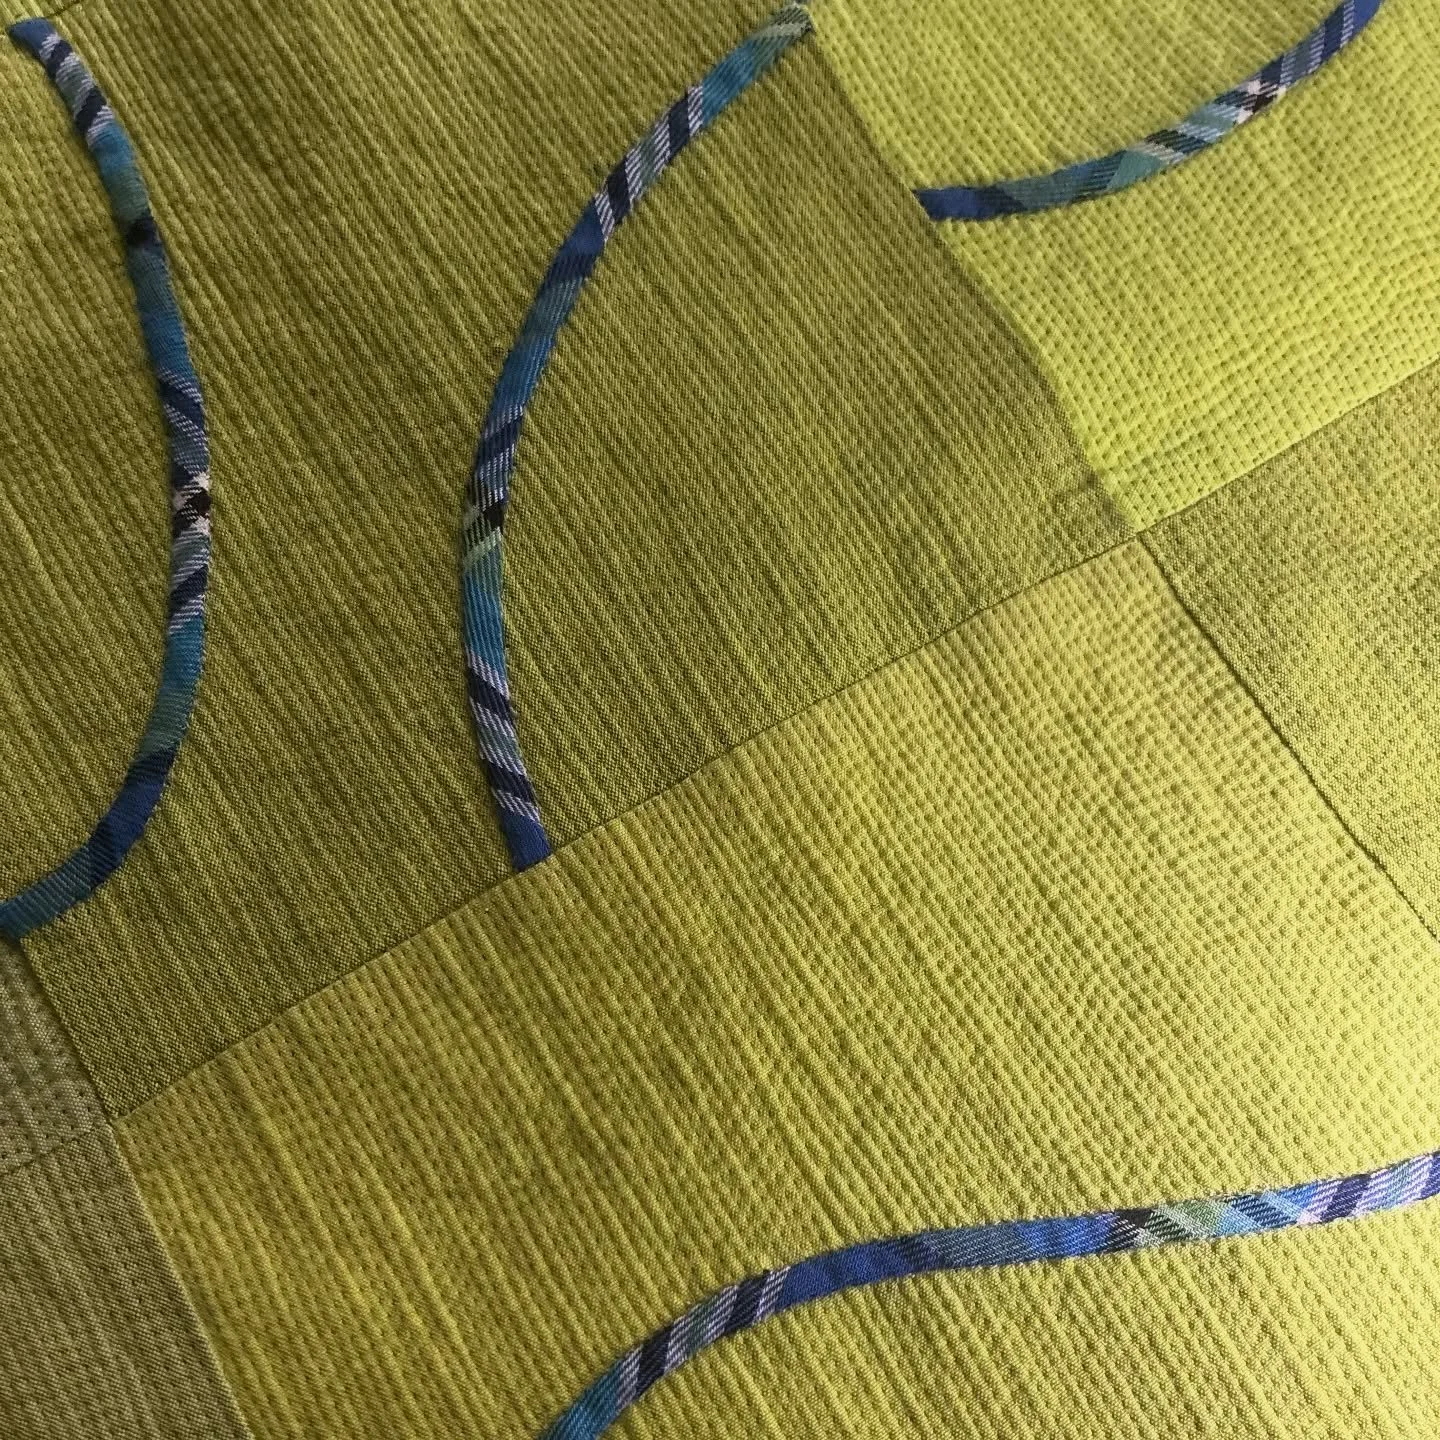
The Ruby Oakshott quilt is finished and I thoroughly enjoyed the quilting process on this one. It was a delight to watch the fabrics move past the presser foot. I was mesmerized by the subtle color change of the fabrics as the machine moved them along. I did some close line quilting (quarter inch spacing) to cause the fabric to bend and show the different colors of the warp and weft.
 Have I mentioned how much I love this fabric? Oakshott Fabrics is a small family owned company and I want them to succeed. Here's a little video about them that you might find interesting. I don't have a deal with them but they did send me these red fabrics, seriously though, I'd tell you if they weren't good. I've actually ordered more fabric from them, (cough) twice this month.M came in the sewing room when I had the pieces for this quilt cut and piled on my sewing table and noticed the color change as he walked across the room. He snatched up a couple of pieces for closer examination and then declared, "This fabric is AWESOME!"I have to say that he has NEVER said anything like that about any of my fabrics or projects before. Now, if fabric can get a teenage boy to take notice it's got to be good.
 In thinking about how to finish this quilt I decided that I wanted it to end with the edge of the piecing, that is, to have no bound edge. I finished it with a facing, like you would use in garment construction.
 It took a bit of fussing to figure out how to do a facing and get the sharp looking corners that I wanted. I'm happy with the finished look.
 I didn't take photos of the steps for adding the facing - now that I have figured out a process that works for me, I'll photograph it if I do it again.Here you can see the facing. I edge stitched the facing to the outer edge of the quilt so that it would more easily fold to the back. I hand stitched the inner edge of the facing to the back of the quilt.
 I like the clean looking edge.
Ruby Reds
I finally put together theOakshott Ruby Red quilt top. I started with the Ruby Red pack of Oakshott shot cottons and paired them with some cool colors from my colorbox. I made the blocks back in the summer and at the time thought they needed some sashing between them.
 I chose a deep purple for sashing that was out of stock for a while.
The sashing fabric arrived Monday morning but when I tried them together I didn't like that look either. It was a bit boring. Then, I tried setting the blocks turned in different directions. The interaction of the blocks made it much more interesting.
 Here's the full view.
 If you haven't tried any of the Oakshott shot cotton, you really should. It has a beautiful luminescent quality that just can't be captured in a photo. Believe me, I've tried.
That brings the finished quilt top number to SIX that are ready for quilting. I'd better get busy.
Atomic Sunday

Progress Report
I've had this Frippery Washi top finished for a while but hadn't gotten any photos until today. The fabric is from Thomas Knauer's new Frippery line. The pattern is Rae's Washi. On this version I did the plain scoop neckline. I'm please that I was able to get the stripes to match at the side seams!
 The Point Me quilt is quilted. I still need to trim, bind, and wash it. I like the added interest of the unquilted strips. When it's finished I'll try to get a picture of the whole thing.
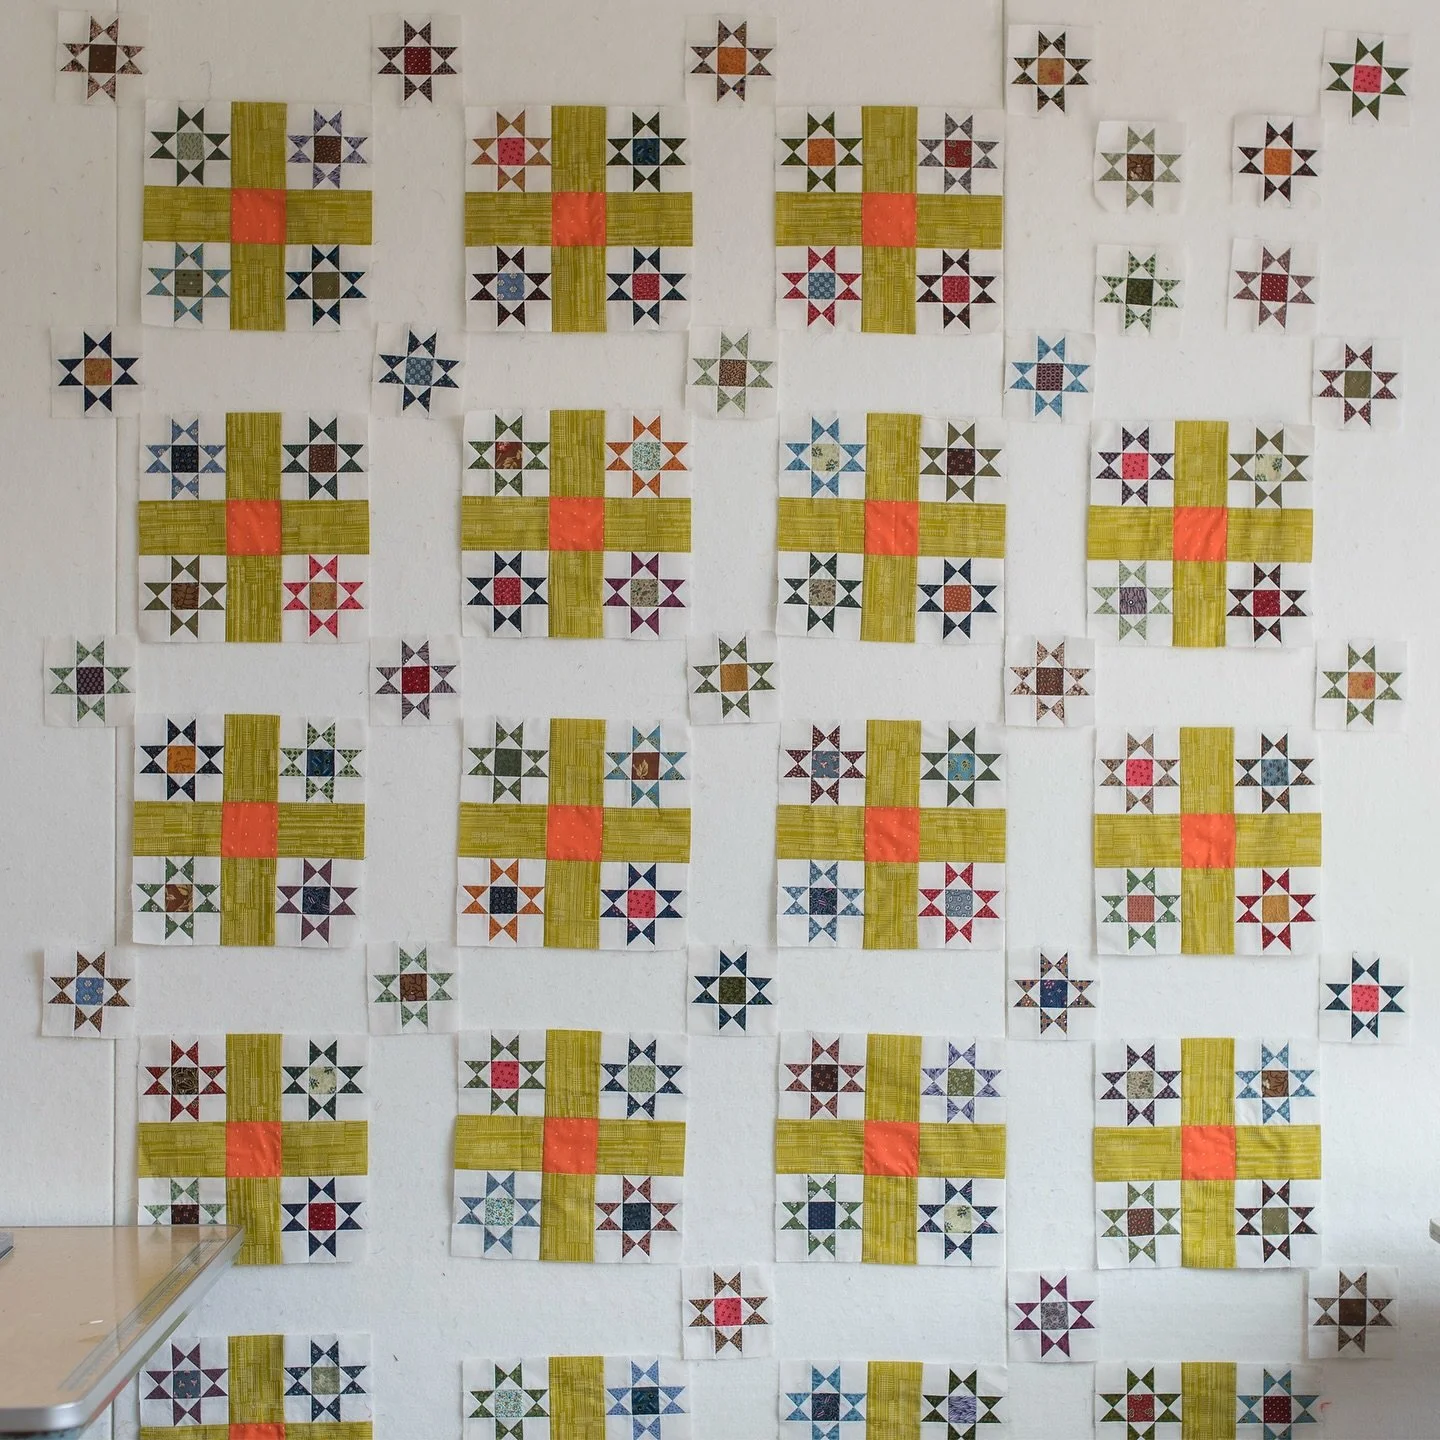
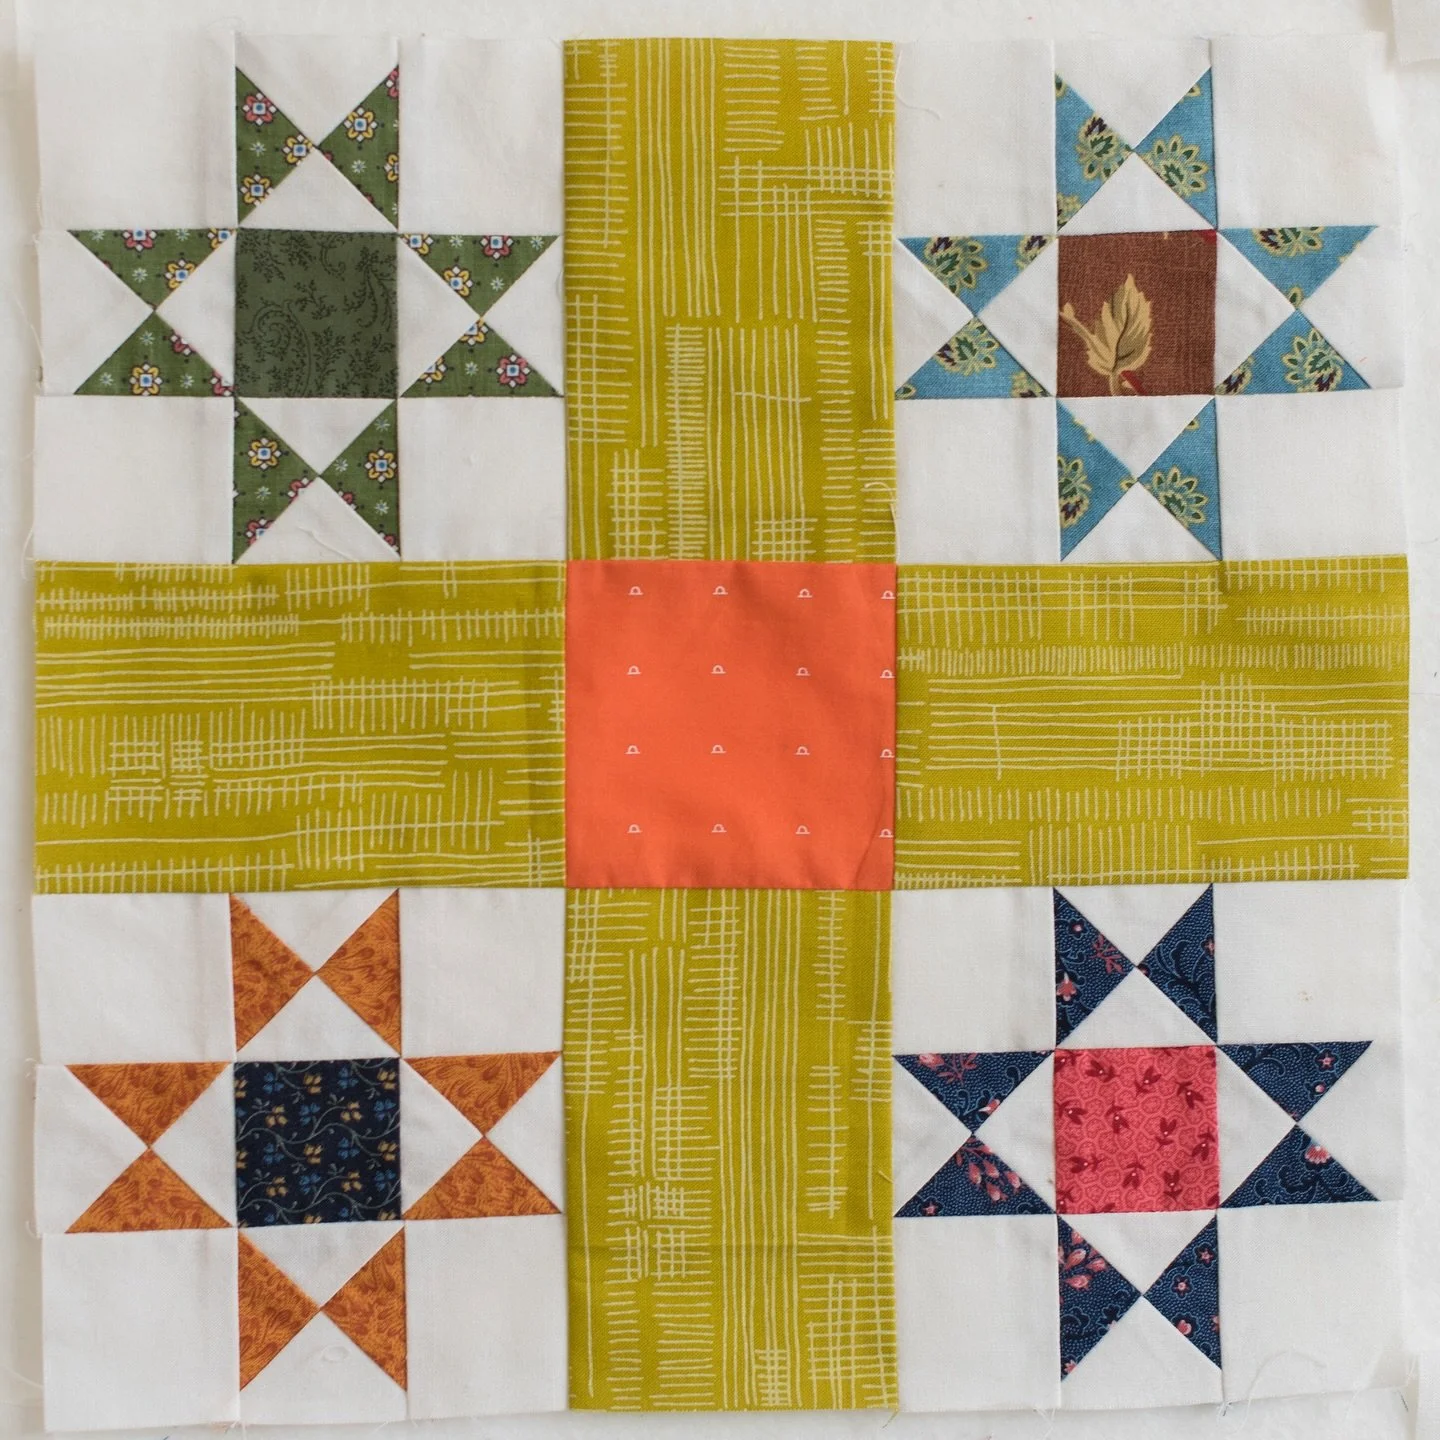
 I've also been building bigger blocks from the wee stars. These are six inch nine patches.
 It has been a productive couple of weeks here on the farm!
Point Me - King Size
I am working on a king sized commission quilt. I admit I'm proud of myself for getting it pin basted last night. I've never made a quilt this large before but I'm loving the challenge. D was home and helped me move the couch out of the living room and get all of the layers spread and even. It's going to be 108 inches wide by 101 inches long. I'm making it a bit larger to allow for shrinkage in quilting and washing.
 There is a lot of negative space to fill with quilting and that is a bit intimidating. I'll quilt it with groups of wavy "straight" line quilting. I want the wavy lines to be close enough to interact with each other but I think quilting the whole quilt that close could be a bit overbearing visually. I discussed quilting options with Gwen Marston last week and she suggested doing the quilting in groups with a space between them. I thought that was a great idea.This afternoon I marked some straight lines to help me maintain some order while quilting. I mentioned to D that a chalk line like those used in house construction might be helpful but that I didn't want to risk the chalk not washing out. He went to the basement and came up with this nifty laser level tool. I think I may be adopting it to live in my sewing room.
 Isn't this the greatest tool EVER??? The boys came in with a friend this afternoon and I heard the comment "woah, EXTREME quilting!" I love when quilting impresses the boys!
 I was wondering how to make sure I trim the quilt straight and square given that there are no blocks or borders to measure from. Problem solved!! I love that.
Something New
I may have started another quilt last night. I sort of fell in love with the hourglass block last week. Gwen had a number of medallion quilts that featured the hourglass. Last night, on a whim, I went through the scrap bin and cut squares that will eventually be made into hourglass blocks. I'll use the same shortcut method that I used to make the hourglass portions of the stars in the quilt I made at retreat. The method I used is similar to this. (I cut and sew without drawing the line.) The good news is that I can now close the lid on the basket of scraps!
Rossie Made Me Do It
I've really been busy sewing since school started. It's a great feeling to be able to sit and get things done! Here's another finished quilt top to show for my hard work! This quilt, Rossie Made Me Do It, was made using my swiss chard blogger bundle for Pink Castle Fabrics. I got a half yard bundle and used two thirds of it. The pattern is Honey from Elizabeth Hartman's Modern Patchwork

I think this quilt would also look great as a real scrap quilt. It would be a bit more tedious to make, though. For this quilt, you sew the white to other fabrics together in strips and then cut them into triangles. For a scrappy quilt you would have cut the triangles and then sew them individually to the white "grout" strips.

I started this quilt while at a retreat with the Ann Arbor Modern Quilt Guild in August. I brought the bundle to work on but didn't have a plan yet. Rossie suggested that I make the quilt on the cover of Elizabeth's book. I think it was a good suggestion. Thanks Rossie.
Now, back to sewing. Today I'm putting together a king size Point Me commission quilt using Denyse Scmidt's pattern. I'm on a roll!
My unquilted tops pile is really growing though. I feel a big quilting session in the near future.
Medallion!
Last week I attended Gwen Marston's 2012 quilt retreat. The theme this year was medallion quilts. I love the look of medallion quilts but I was a bit intimidated by making my own. It is not a style that I'm very comfortable working in.I was floored by the number of medallion quilts that Gwen had to show in her presentation, given that the quilts in her book, Liberated Medallion Quilts
 When packing, I went through my pile of unfinished projects looking for something that I could use for the center of the quilt. I found several applique pieces that I had done about 10-15 years ago. Not knowing really what I was going to do or what might inspire me when I saw Gwen's presentation, I chose three applique pieces and fabrics to go with each of them.In the end, this purple batik block was the one I worked with while at the retreat. The center applique design was from Elly Sienkiewicz's Baltimore Beauties and Beyond: Studies in Classic Album Quilt Applique, Vol. 1.
 I started with the applique and thinking that sawteeth look good on pretty much anything, I added those first. Then I made the star blocks. The size of the finished star blocks dictated the size of the greenish border that came between the sawteeth and the stars. A narrow purple border with green corner stones came next.
 At this stage, I decided to set it on point - which doubled the area of the quilt. I added strips of half square triangles and then let the large scale of the the fabric do the work in the rest of the corner. The last round in the medallion is border of the same purple fabric used earlier. I love the way it made the little green corner squares appear to float.
 I am thrilled with the results of the medallion building workshop. Maybe some day I'll make medallion quilts from those other long forgotten applique pieces. I am inspired to try different techniques and border styles. As always after retreat, my head is spinning with ideas.It was lovely to spend a few days relaxing and sewing at the retreat.
 White Birch Lodge, Elk Rapids, MI.
Washi Dress
 I love the dress version of the Washi pattern. Anna Maria Horner's new Field Study fabric was a perfect choice. School started Tuesday and I've been working like crazy in the sewing room trying to get caught up and organized.I did a bit of cleaning and discovered some fabric bleed on a few of the tiny stars I've been working on. Yikes! I spray tested a bunch of fabrics and threw out the ones that bled. Now, I'll be spray testing all of the finished stars before putting them into a quilt. These blockes were sprayed with water and pressed. The blue one on the left had fabric bleed before even being sprayed. I'm glad I discovered this before piecing the whole quilt. The good news is that my cutting table is now actually clean enough to use! For months I've been using a smaller cutting mat on my sewing table.
 I have a few other quilts that I'm working on that I hope to share with you soon. I seem to have been on a quilt starting kick lately... I'll be working on some quilt finishes as fall progresses.
End of Summer Sewing
I told you before that I was thrilled to be making clothes for me that actually fit. Well, it's true. I'm really on a roll with the Washi pattern. This one is made from Tula Pink's Birds and the Bees fabric. Yeah, I know, it's August, I live in Michigan, and these are sleeveless tops. I'm thinking about that too. That's why when I took miss P shopping for school supplies today, I picked up a couple of cardigans in coordinating colors.
 I've started a dress version of the pattern in Anna Maria Horner's Field Study. That turquoise sweater will look great with the dress too!
 In the evenings this summer I've been relaxing with handsewing and scraps. As soon as I cut out the Tula Pink top I used some of the scraps in the hexy project. I love that with scrap projects, anything goes. How about a little 1994 meets 2012?
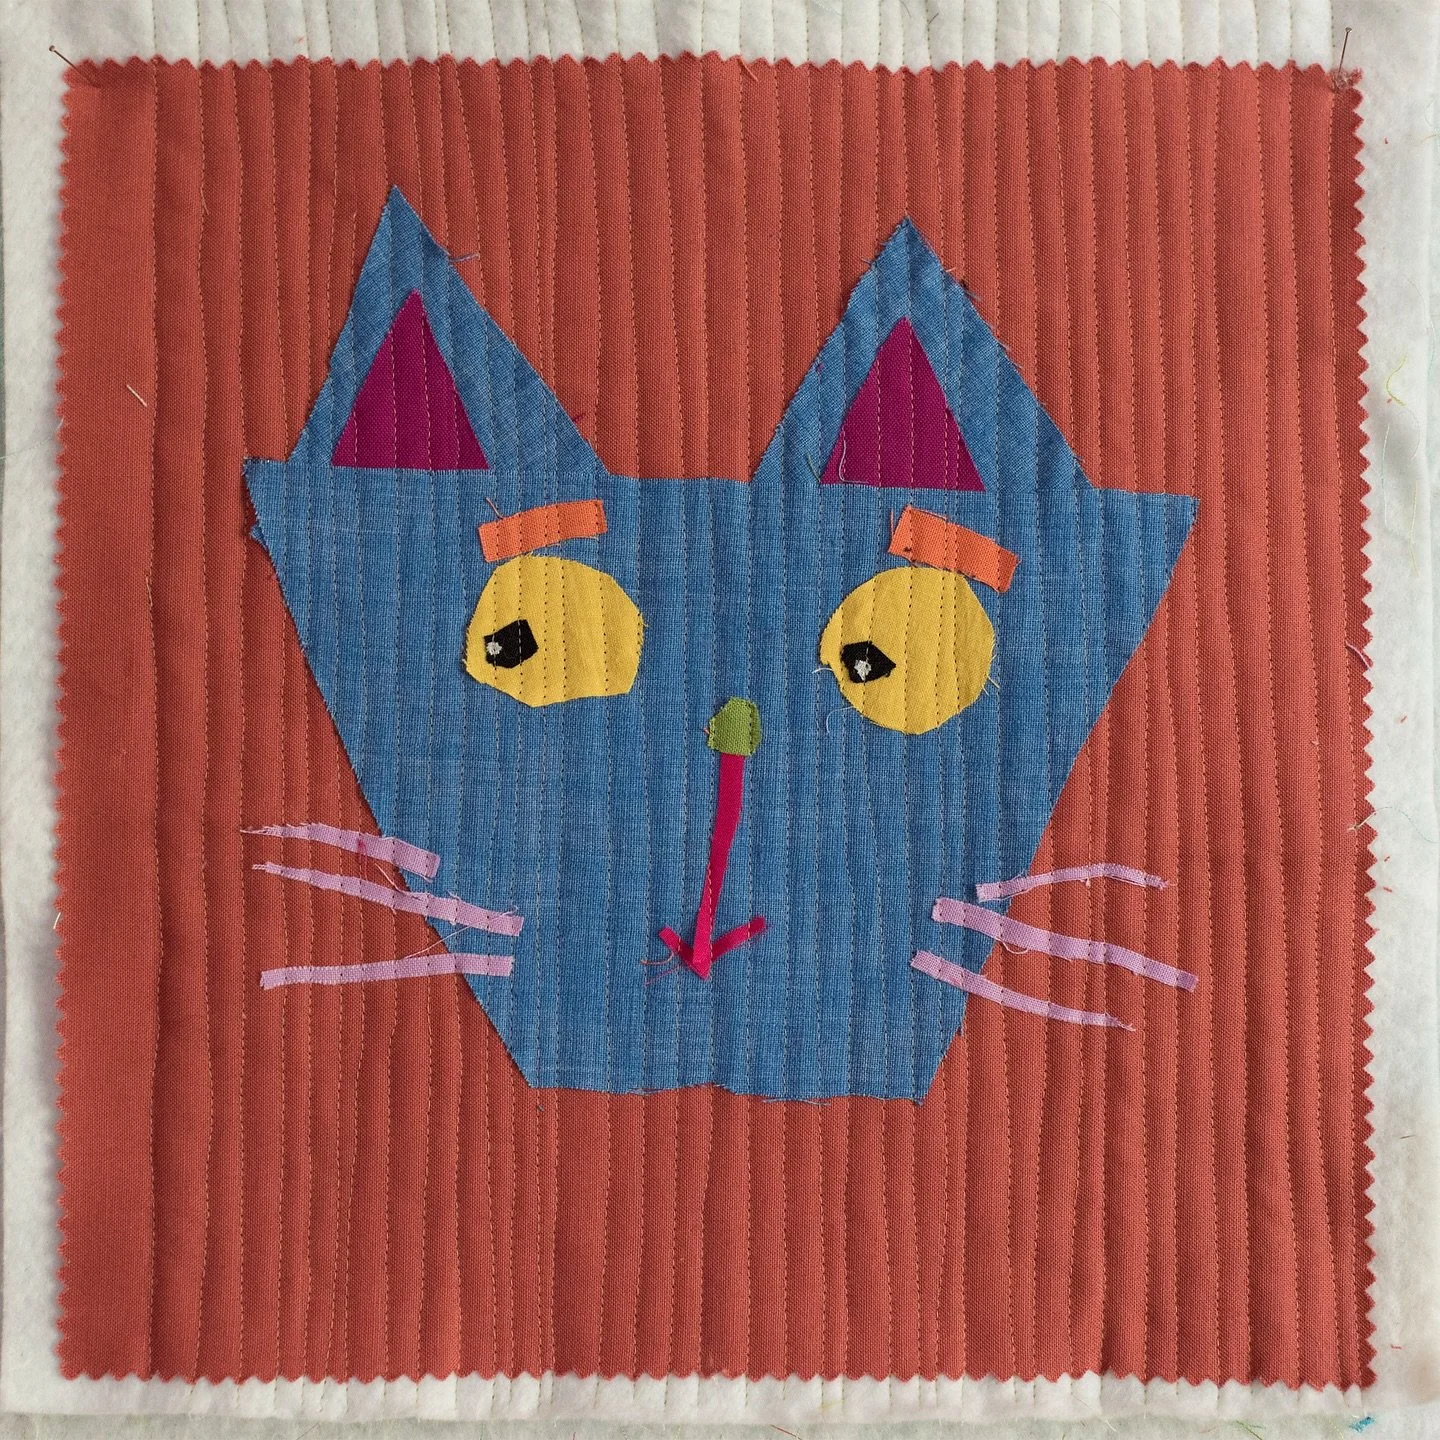
 That cat print is left over from a star quilt of cat print fabrics that I made for M when he was quite small.I'd love to hear what projects YOU are working on.
Washi Tunic
Last week I took a fitting class with Rae and Karen where I learned some basic tips for bodice fitting. Most importantly for me was how to move the dart. After adjusting the Washi Dress pattern we made a "test" top. Here's mine. I used some fabric that I had in my stash and I'm pretty happy with how it turned out. After making adjustments to the pattern, the top/dress goes together pretty quickly.I also like the shirring in the back - no zipper!
 I'm going to make a few more adjustments to the pattern and make another.