Needle and Thread

Pinwheels and Strings

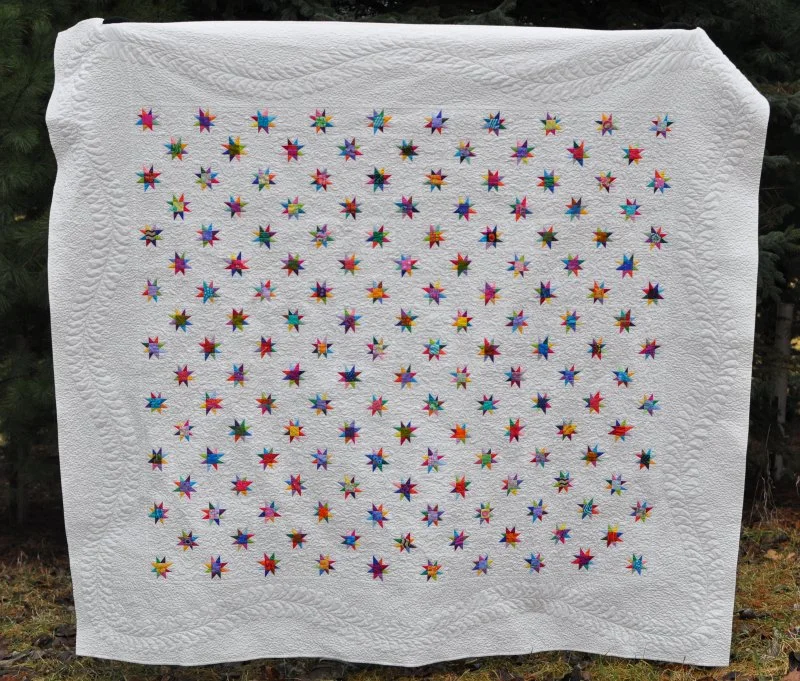
Last night I finished hand stitching the binding on this Pinwheels and Strings quilt.

This scraptastic quilt is heavily quilted and finished with a half inch binding.

I have started putting more quilting on quilts that will be used and washed. My early quilts didn't have nearly as much quilting on them and I have found that with wear and washing some of the quilting threads have broken. More quilting means that there is less stress on any single quilting thread.

Also, I like the half inch binding better for wear too. After quilting I trim the batting and backing to 1/4 inch bigger than the top. That way I can avoid clipping any of the quilting threads and they will not be able to slip out from under the binding seam.  Straight quilting lines will have an extra quarter inch of stitching to help keep it from pulling out.

The finished quilt measures 83.5 x 60 inches.

I think I can still pull a few more scraptacular quilts from the scrap bin!

String PInwheel Top

Yesterday, miss P was home with a fever. She worked on making some Valentines while I pieced this string pinwheel top together.

I'm pretty happy with it so far. I think I'll use a multi color thread for the quilting over the strings and maybe a blue for the pinwheels - or maybe the pinwheels will be left unquilted. I haven't decided yet.

I need to order more batting so I have some time to think about it.

String Quilt Update

I've been working on the string quilt! It turns out I couldn't read my own handwriting and I needed 140 six inch blocks instead of 130. I whipped out 10 more of those yesterday and went on to phase two - sewing triangles to one corner of each block. Phase three - making four patch pinwheels from the six inch blocks. Here's a big 12 inch block comprised of four of the smaller ones.

I think I'm really going to like this one when it's finished.

Crushed

Here they are. All 130 string pieced blocks needed for a twin size quilt. I am smitten with this block on top. That row of tiny scraps gets me . I don't remember who gave me that skeleton fabric scrap but that is the last bit of that fabric that I have.

Really, it slays me. I know that if I had started with yardage of that fabric I wouldn't feel the same way. It was precious and I had to include it in this quilt.

Are you like that? Do some fabrics make you emotional?  Is it just me? I got a little teary feeling this morning cutting a center for a tiny star out of the very last scrap of fabric left from a dress I made myself in 1975. Sigh.Look, they are crushed under their own weight.

This little stack is making me very happy. I think I'll just keep it and pet it for awhile before moving to the next step.

edited to add: My method for making string pieced quilts is shown in detail in chapter one of my book, Every Last Piece. There are directions for several string quilts as well as photos and ideas for more string quilts included. You can purchase an autographed copy of the Every Last Piece from me here.

Stringing Along

I've really been using up the scraps this week. I'm making six inch (finished) string blocks. I need to make 130 blocks for the twin size quilt I have planned.  I'm using quite a mix of fabrics. Leftovers from a skirt for P, a sunhat I made for D when he was little, scraps from kid pajamas, scraps from other people, new scraps - do you see some Jeniffer Paganelli in there? A couple of the blocks even have scraps from a dress I made for myself when I was in middle school. Pretty much anything goes. I am not using the very pale or mostly white fabrics so there's not too much value contrast. These are just like the string blocks I made for this quilt and this quilt. I plan to do something different with these though.  I'll be sure to show you when I get to that step.

four six inch string blocks:

Here's my method for making these blocks.

Because I want there to be a visual direction to the blocks I use strings, or long skinny scraps. I often have strips of quilt backs after trimming, extra strips or parts of strips from cutting quilt pieces and they work great for these blocks. I am making these blocks 6 inches because that is the size of my ruler.  I work with the ruler right next to me.

First I cut a bunch of strips to length.

Fatter scraps are cut to narrower strip widths.

Short pieces are sewn together to make strips that are long enough for the block. I usually work with scissors for a more "organic" look to the piecing but I sometimes trim one edge of these pieced strips with the rotary cutter to make it easier to sew them to the block in progress.

I sew these strips together to make a chunk of fabric that is large enough for a block. As I sew each strip on I lay it where I want the seam to be on the block below. I often place it a little askew to get wedge shaped strings. I sew along the straight edge of the new strip and then trim the extra fabric away. Sometimes the bit that is cut away is wide enough to sew to another block.

It is best to press before adding each new strip. I work in big batches of sewing and then pressing.

Here and here are a couple of other quilts that use a similar string piecing technique.'Tis the season to bust those scraps! String piecing is quick and easy. You should give it a try!

Crazy Love Quilt

I finished the binding on this Crazy Love quilt this morning. I am pleased with how it turned out. I used a blue Carolina Chambray from Robert Kaufman for the triangles and binding. I like that the zig zag of the blue makes diagonal channels of color.

I chose to do minimal quilting on this to echo the diagonal lines of the blue. I quilted in the ditch on all of the seam lines and then one walking foot width to either side of the blue triangles as seen here.

You can see a corner of the  pink tone on tone fabric Jennifer sent for the backing in the picture below. P was hoping there would be some extra of that fabric!

The binding on the quilt is 1/2 inch wide.It measures 64 x 79 inches.

Fabrics are from the Crazy Love line coming out this spring from Jennifer Paganelli.

I started my next scraptacular quilt today. It already has some Crazy Love scraps sewn in. It will be one of those quilts that includes all kinds of fabrics. After a couple of quilt finishes I found that my scrap bin is over flowing again and the tiny stars are just not putting any dent at all in that huge pile of fabric.  I have started a scrap intensive quilt. I'll share more later, after I have a few photos.

Productive Weekend

I went on a little sewing retreat with the Ann Arbor Modern Quilt Guild this weekend. I had a lot of fun and was very productive.

I made 50 tiny stars,

and finished the Crazy Love top for Jennifer Paganelli.

Thank you, Rossie, for suggesting the diagonal bands of color. The color bands help calm the chaos that was happening with all of these lively prints together.P is back at school today so I want to keep the productivity going. I'm off to the cutting table! 

Twinkling Stars

I finished the binding on this quilt a few days ago. I was waiting for a good weather day for photos but it has been dreary and rainy everyday. I am tired of waiting and want to share this before the year is over. It is my last "finish" of 2011".

I started this quilt in September 2010.

As I said before while making it, I am thrilled with this quilt.

The finished quilt is 67 by 73 inches.

Here's a peek at the back and my photo helper.

I think it has found a new home. Or maybe it'll be a bed topper. Or maybe I'll just carry it from room to room with me!

You can see the rest of my 2011 finished projects here.

Hope you have a great New Year's Eve. We are having game night with some friends.

The Feathered Vine

I don't know why I waited so long to quilt the border of this quilt.

It really wasn't hard. I got out Gwen's Quilting with Style book and refreshed my memory on the process. I first marked the vines and then the individual feathers. I use a silver colored pencil (berol verithin). The markings wear off as I work on the quilt and what ever is left will wash out.

When doing the actual quilting I started with the vine. I sewed the center vine line all the way around the quilt. Then I quilted one side of the feathers all the way around and next moved to the other side. I really tried to be relaxed and not in a hurry while quilting the feathers. I think that made all the difference. I was slow and careful and even managed to get some of the restitched areas (where you have to sew back over the original stitching to make the pattern continuous) stitched in the same holes as the original stitching. I'll have to remember this in the future. "It's not a race." "Take your time."

I wanted the feathers to stand out a bit so I put in some background stippling around the feathered vine.

I'm pretty pleased with it so far. I just need to bind, wash, and put it on the couch!

Hopefully we'll have a bright day for me to take finished pictures! It has been dreary and raining this week so my photos are not the best.

Star Crossed

As I have been making more tiny two inch star blocks I've been thinking about my "Twinkling Stars" quilt that I started LAST September.

The stars in that quilt are three inch liberated stars.Last February I quilted the main section of the quilt leaving a wide nine inch border unquilted. At the time I thought it needed a big feathered vine in it and was intimidated by the idea.

I have gotten the quilt out many times and thought about what I could quilt in there. I tried plain cross hatching, and seriously considered a closely stitched bishop's fan.

Still, I think it needs a big feathered vine.

I've told myself that this needs to be the next quilt I finish. You heard me so now the pressure is on. I need to mark it and get to quilting. Really, what have I been waiting for?

When I finish I can snuggle up under THIS!

Here's hoping I can get it done. 

Brenda's Stars - tutorial

I finished and washed my latest quilt, Brenda's Stars.

It is heavily quilted in the linen look background and the star centers. The sashing and star points are not quilted.

Here's the full view.

50 by 62 inches. It shrank a bit in the quilting and washing.

The fabrics are from Pink Castle Fabrics. It was fun to browse through Brenda's great selection and put these fabrics together.

Here are some basic directions for the quilt as I made it.

Cut from the fabrics:
large floral         - 20  6 1/8 inch squares
fat quarter spots - 50   5 1/4 inch squares for star points and 30   1 1/2 inch squares for cornerstones
quilter's linen      - 80  4 1/2 inch squares and 20  5 1/4 inch squares

Cut all of the 5 1/4 inch squares on the diagonals as shown to make quarter square triangles.

Lay out the blocks as shown.

You will be piecing the block into diagonal chunks. Sew the first groups together as shown. Be careful not to stretch the pieces as you sew and press.

Continue sewing the pieces together into sections as shown.

Sew the last two seams to make the block.

Measure the size of your completed block (mine measured 12 1/2 inches). Cut 49 1 1/2 inch wide rectangles the length of your completed block (12 1/2 inches).

Lay the quilt out the way you want it to be sewn together.

Sew the top together, sandwich with the batting, and quilt as desired.

Tealorange

I had more fun mail this week! In addition to a box from Godiva Chocolates on my porch I got a package from Sarah containing these blocks

.Aren't they great?

I am eager to get working on these orange and teal stars. I am still awaiting a few more blocks but I hear they are in the mail! Wooo Hoo.

We have pies in the oven and a turkey in the fridge. Have a great day tomorrow.

Mustard Melody

Here's the finished quilt Mustard Melody.

It is made with a fat quarter bundle of Jennifer Paganelli's Poodle line and 2.5 yards of a Robert Kaufman Carolina Chambray in a mustard color. I don't know what the actual color name is.

It has been quilted, bound, and washed. I used a half inch binding for a little bigger than usual frame around the design.

Here's the full view.

The block, birds in the air, finishes at 10.5 inches.The large piece in the block is cut 7.5 inches square. The half square triangles are 4 and 3/8 inch squares cut on the diagonal.

There are 48 blocks in the quilt. I mostly used the largest prints for the big squares but added in a few of the smaller prints to make all 48 blocks.

The quilt shrank up a little with quilting and washing and now measures 59 by 77 inches.